Accounts and access
How a person gets an account, signs in, and ends up inside the right organization with the right role.
Your account is global. Your access is not. Each organization you belong to gives you one role, and everything you see is scoped to the organization named in the header. Switching organizations changes what you can open and what you can change.
This area also covers the profile page, personal access tokens for scripts, and the way a session stays alive while you work. Each sign-in is a session of its own, so being signed in on a laptop and a phone at the same time is normal.
Who uses this
Admin
Can everything a member can, plus invite people, choose their role, revoke a pending invitation, change a member's role, remove a member, and delete the organization
Cannot remove or demote the last admin, or see anyone else's personal access tokens
Member
Can sign in, verify and reset a password, read the members list, create personal access tokens, accept or decline invitations sent to their address, create a new organization, switch organizations, and leave one
Cannot invite anyone, or see who has been invited
Approver
Can exactly what a member can
Cannot anything extra here. The role is not even offered when inviting somebody or changing a role
Auditor
Can sign in, read the members list, read their own token list, leave an organization, accept an invitation and create an organization of their own
Cannot create or revoke a token, invite anyone, or change anything inside the organization
Outside party: someone you invite
Can open the invitation link without an account, read the organization name and the role, and create an account from it
Cannot see anything else until they verify their email and sign in
The screens
Sign in
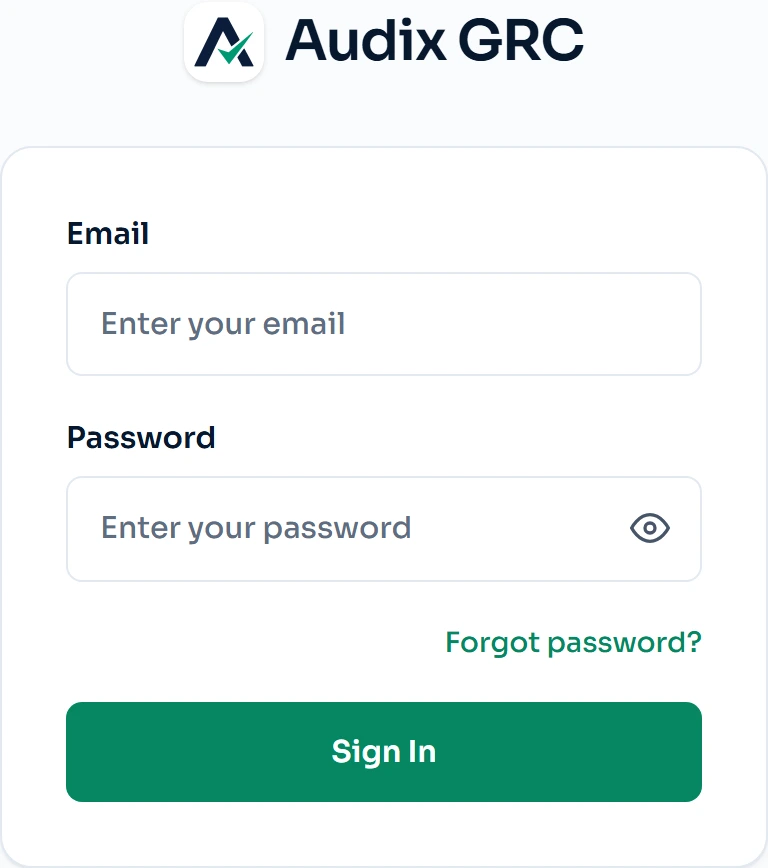
- Sign in with your work address. One account carries across every organization you belong to, so this address is who you are rather than where you work.
- Forgot password. Sends a code to that address and lets you set a new password yourself, without an administrator.
What the sign-in decides
Email, Password, a show and hide toggle, Forgot password? and Sign In. There is no sign-up link, because sign-up is invite only.
Create your account
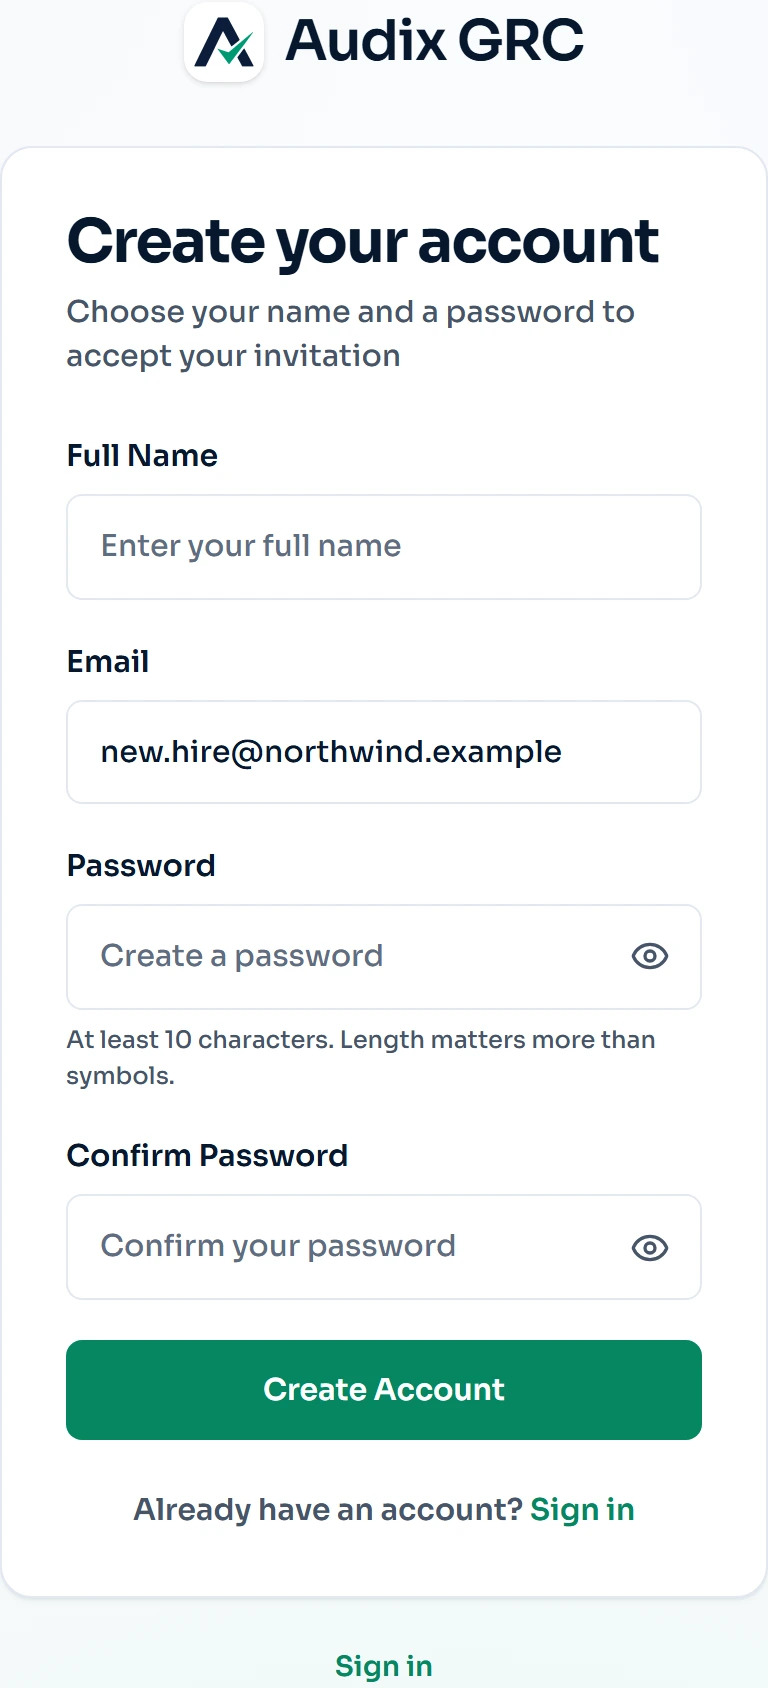
- The invited address, locked. The invitation was issued to this address and is checked against it, so the account cannot be created for anyone else.
- One password rule: length. Ten characters and no symbol requirements, stated here because it is exactly what the server enforces.
How an account comes into being
Full Name, Email locked to the invited address, Password, Confirm Password and Create Account.
Verify Your Email
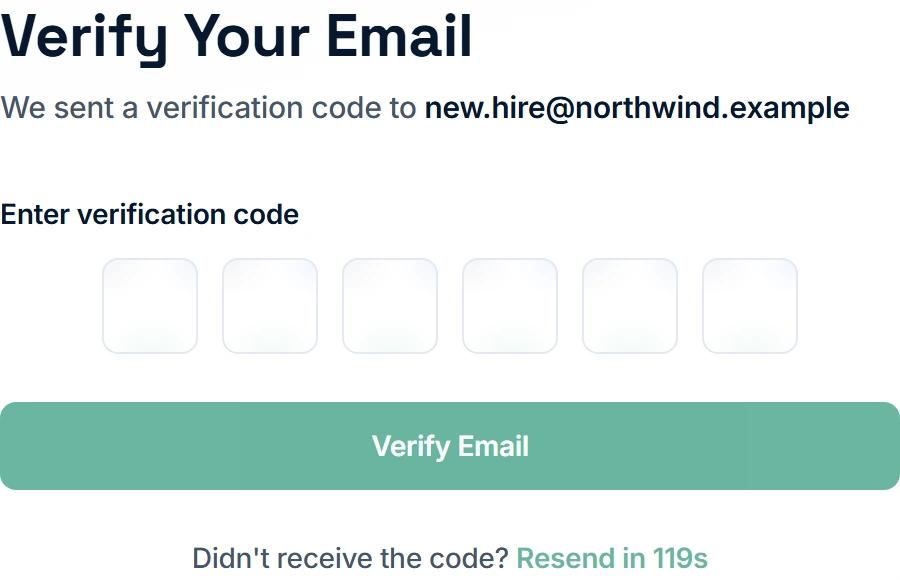
- Six digits from the mailbox. Typing the code proves you can read mail at that address, which is what joins the account to the organization that invited it.
- Resend, once the wait is over. The countdown matches the server's own gap between codes, so the button is never offered while a press would be refused.
Six one-digit boxes, Verify Email, and Resend code behind a 60 second countdown.
Forgot Password
Email and Send Reset Code.
Reset Your Password
Reset code, New Password, Confirm Password and Reset Password.
Change your password
Current password, New password, Confirm new password and Save new password. The forced version is headed Choose your own password and cannot be skipped.
Invitation
You're invited! with the organization, role, invited address and expiry, and one action that depends on whether you have an account and who you are signed in as.
No workspace
Either Create your organization or You've been invited, in place of the whole app.
Create an organization
Organization name and Create organization, reached from the workspace menu in the header.
My Profile
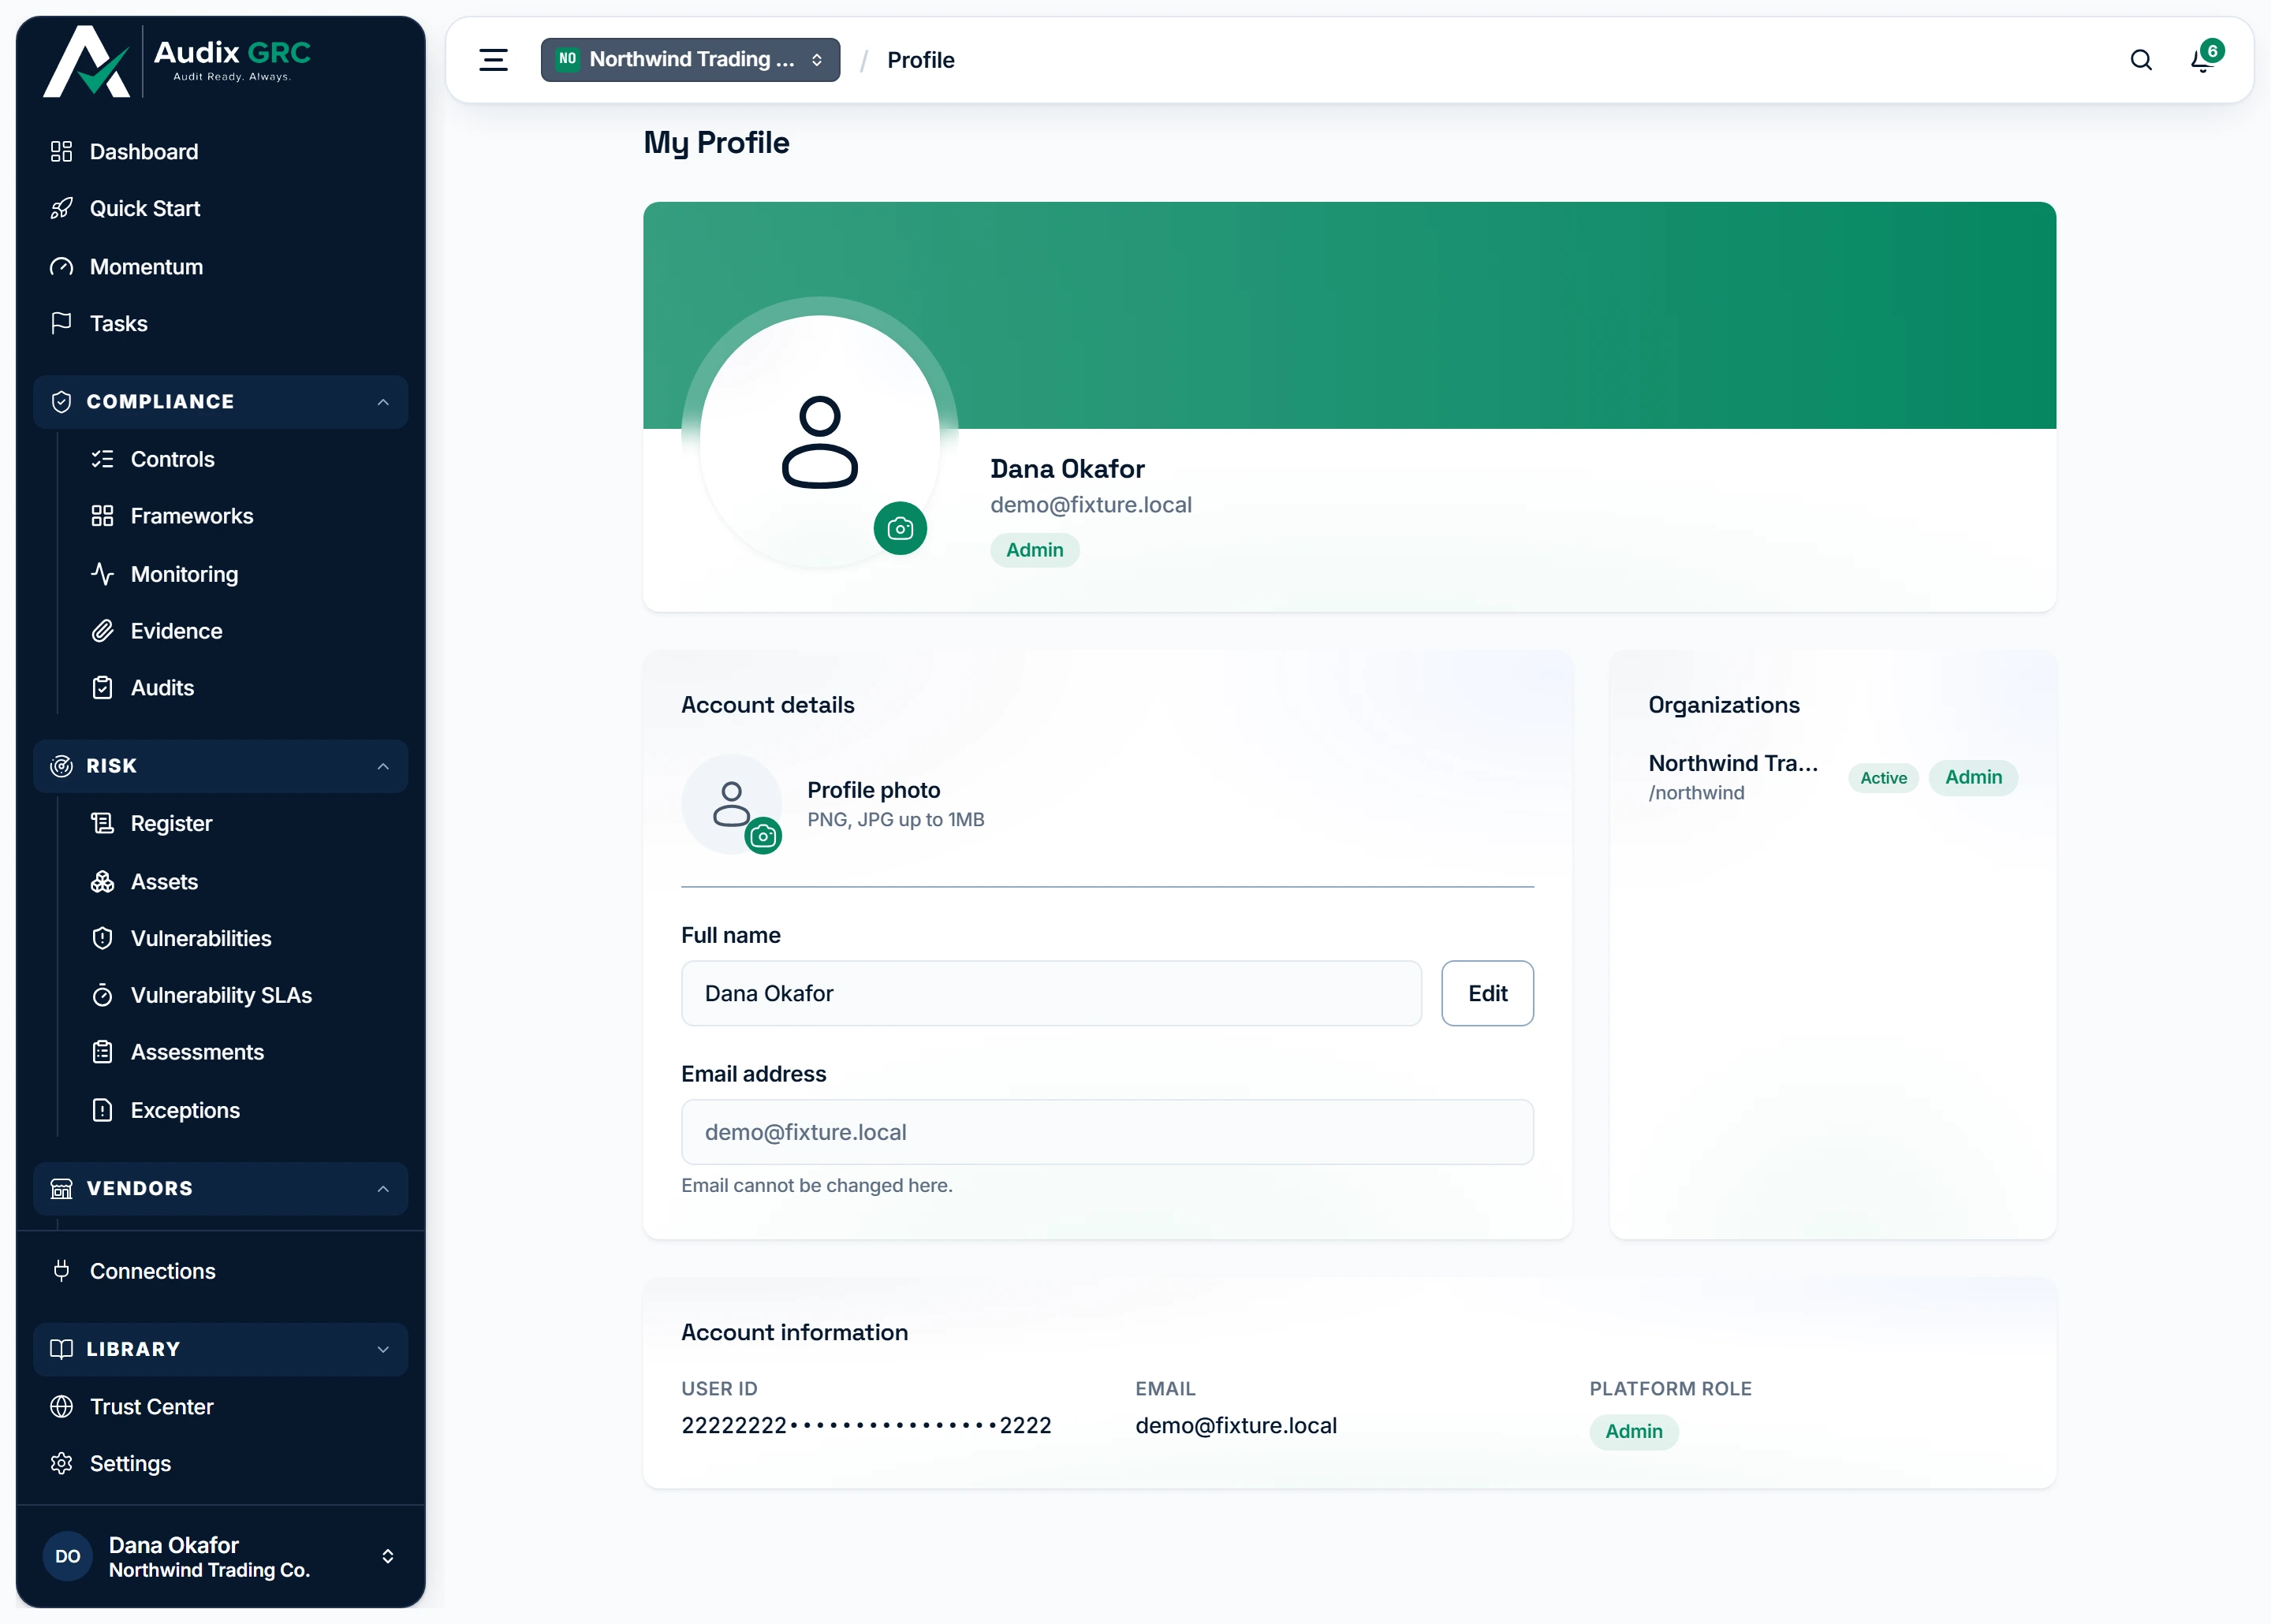
- What you can change about yourself. Your name and photo follow you into every organization; the email address is fixed here, because it is what the account is identified by.
- Where your access comes from. One account can belong to several organizations, and the badge beside each one is the role you hold in that organization only.
Your name, email and role, Account details, the Organizations you belong to, and Account information.
Settings, Members
A User, Role, Status table with Leave on your own row. Admins also get the invite form, a role dropdown on each row, a remove icon and Pending invitations.
Settings, API Keys
Token name, Expires in, Create token, and your existing tokens with an Active, Expired or Revoked pill.
Settings, Organization details
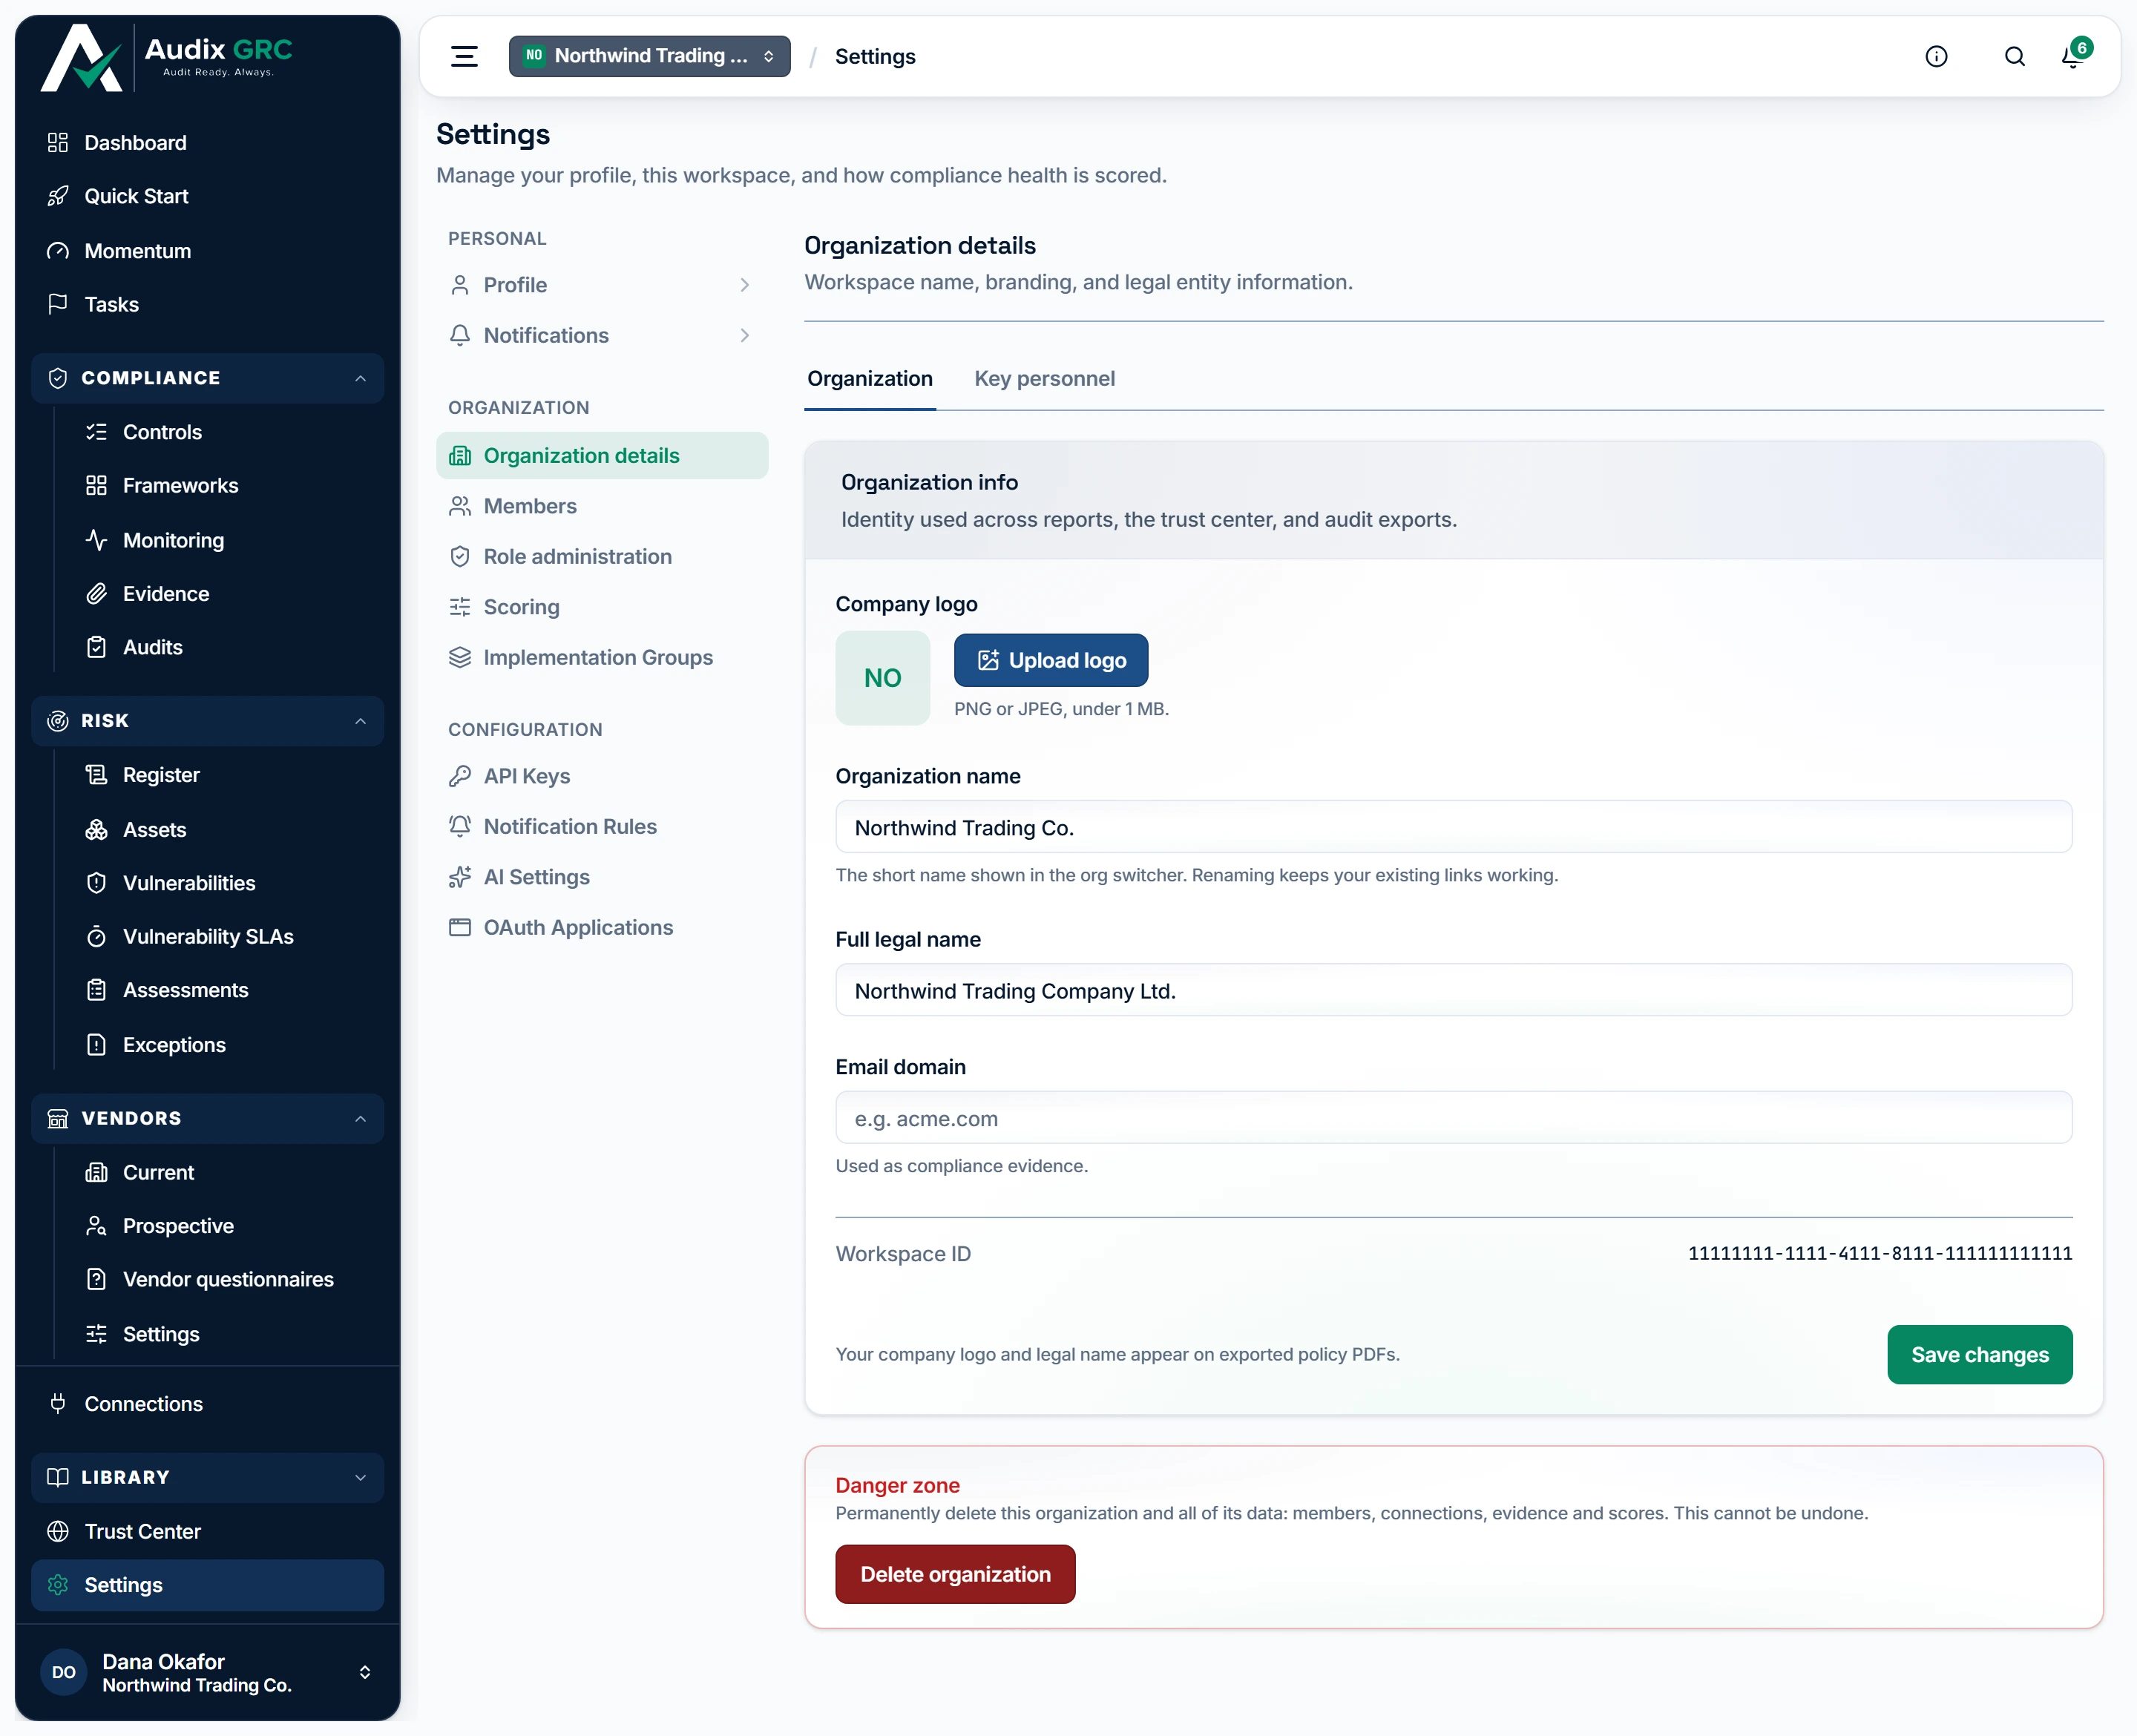
- Members. Who is in this organization: an admin invites people from here, sets the role each one gets, and takes them out again.
- API Keys. Personal access tokens that call the API as you, in this organization, with the role you hold at the time.
The organization name and branding, and Delete organization.
What you can do
Create your account from an invitationLive
An invitation link is the only way to make an account yourself. The link carries the organization, the role and the address the invitation was sent to.
As a member
- Open the link in the invitation email. The card shows the organization, the role, the address it was sent to and when it expires.
- Click Accept & Create Account. The sign-up form opens with your email filled in and locked.
- Enter Full Name, Password and Confirm Password, then click Create Account.
- You see "Registration successful! Please verify your email." and land on the verification screen.
Rules that apply
- Your password must be 10 to 128 characters. The hint under the field says six characters, which is wrong. A shorter password passes the form and is refused by the server.
- Full name must be 2 to 150 characters.
- If the address already has an account you get "Email is already registered". Sign in instead, and accept from the banner.
- An invitation that has been used, revoked or has expired is refused with "This invitation has expired or has already been used. Ask an administrator to send a new one."
- Opening the sign-up page without an invitation link fails when you submit, with no explanation. Always start from the email.
Verify your email with a codeLive
Proves the mailbox before the account can sign in, and joins you to the organization that invited you.
As a member
- Open the email "Verify your email - Audix GRC". It carries a six digit code that lasts 10 minutes.
- Type the six digits into the boxes. Verify Email turns on at six digits.
- You see "Email verified successfully!" and land on the sign-in form. Sign in with the password you set at sign-up.
- A wrong code gives "Invalid email or OTP". An old one gives "OTP has expired. Please request a new one". Click Resend code and try again.
Rules that apply
- Verifying does not sign you in. You enter your password once more.
- Resend code waits 60 seconds on screen, and the server refuses a second code within two minutes of the last one.
- Verifying accepts the invitation you registered from, and only that one. Any other invitation to your address stays pending and appears as a banner after you sign in.
- An address that is already verified gets "Email is already verified".
- Opening the screen without an address shows Missing Email. Go back to the email or the sign-in form.
Reset a forgotten passwordLive
Set a new password using a code sent to the address on the account.
As a member
- Click Forgot password? on the sign-in screen, type your email, click Send Reset Code.
- The reset screen opens whether or not that address has an account. The product never says which.
- Open "Password Reset OTP - Audix GRC". The six digit code lasts 10 minutes.
- Type the code, a New Password of at least 10 characters, and Confirm Password. Click Reset Password.
- You see "Password reset successful!" and go to the sign-in form.
Rules that apply
- A reset also marks your address verified, so an account that never finished verification is not stuck at "Please verify your email first".
- A reset ends every session of your account on every device, the same as changing your password does. You sign in again with the new one.
- Resend code waits 60 seconds on screen and two minutes on the server.
- A wrong code gives "Invalid email or OTP". An old one gives "OTP has expired. Please request a new one".
Stay signed in, and sign outLive
Keep a tab working without typing your password again, and end the session when you are done.
As a member
- Nothing to do while you are working. The tab checks the session every four minutes, and whenever you come back to it, and renews it shortly before it runs out.
- Return to a tab you left for a while and you see "Restoring your session" for a moment, then the page you were on.
- To sign out, open the account menu in the sidebar and click Log out.
- Signing out ends that device only. Anywhere else you are signed in stays signed in.
Rules that apply
- A session lasts three hours from the moment you signed in, working or not. Inside that window the tab renews it for you without asking for your password. At three hours you sign in again.
- Signing out asks the platform to end that session before the browser's cookies are cleared, so what the browser held cannot be used again. Your other devices are untouched.
- A background tab renews nothing. It catches up when you come back to it.
- If the platform cannot be reached, you are not signed out. The tab retries.
- Each device keeps its own session, so several tabs renewing at the same moment no longer sign you out.
- Changing your password, resetting it, or having it reset for you ends every session on every device.
Join or create your first organizationLive
A signed-in person who belongs to no organization has to join one or start one before the product does anything.
As a member
- Sign in with no organization and one card replaces the whole app.
- With an invitation waiting, you see You've been invited. Click Accept Invitation to join and load into that organization.
- With no invitation, you see Create your organization. Type an Organization name and click Create organization.
- You become its first admin. Policy templates and a Trust Center page are set up for you.
- Click Refresh to check again for an invitation, or Sign out.
Rules that apply
- Anyone signed in can create an organization. There is no approval step.
- The name is 2 to 200 characters. The short web name is generated for you and never shown.
- If the platform is slow to answer, you see a reconnecting state instead of this card. Someone who already has organizations is never asked to create one.
Switch between organizationsLive
One account can belong to several organizations. This picks the one every screen is scoped to.
As a member
- Click the organization name in the header. The Workspace menu lists every organization where your membership is active, with a tick on the current one.
- Click another one. The page reloads on the dashboard for that organization.
- Click Create organisation to start a new one. You become its admin and land inside it.
Rules that apply
- Your role can differ between organizations. What you can do changes when you switch.
- A membership that has been removed or suspended is refused with "You are not an active member of that organization".
- Picking an organization grants nothing on its own. Every request is re-checked against your membership on the server.
Accept or decline an invitationLive
Join the organization that invited you, or turn it down. Either way the person who invited you is told.
As a member
- With an account already, a banner appears at the top of every page within twenty seconds: "You've been invited to join {org}".
- Click Accept Invitation to join and reload into that organization, or Decline to turn it down.
- From the link instead, open it and click Accept & Join Organization.
- Signed in as somebody else, the card says so and offers Sign out and continue, which signs you out and brings you back to the invitation.
- Not signed in, click Sign in to accept. You return to the card afterwards.
Rules that apply
- The address you are signed in as must match the address the invitation was sent to, ignoring capitals.
- Declining tells the person who invited you, in the app and by email.
- An invitation grants your first access only. Accepting one for an organization you are already an active member of does not change your role.
- An invitation that has been used, revoked or has expired makes the banner disappear without a message.
- An expired link says "This invitation has expired. Please ask your administrator to send a new one."
Change roles, remove people, and leaveLive
Keep the member list right, and take yourself out of an organization you no longer work with.
As a member
- Open Settings and click Members. The table shows User, Role and Status for everyone.
- To leave, click Leave on your own row and confirm "Leave this organization? You will lose access unless re-invited."
- You land in another organization you belong to, or on the screen that asks you to create one.
As an admin
- Open Settings and click Members.
- Pick a new role in the dropdown on any row to change it. It applies at once.
- Click the bin icon on a row to remove that person. They lose access immediately.
- Leaving works the same way it does for a member.
Rules that apply
- The last admin cannot be removed or demoted: "This is the last admin. Promote another member to admin before removing or demoting them". Promote someone first.
- Leaving deletes your membership. You need a new invitation to come back.
- An auditor can leave an organization even though they cannot change anything else in it.
- Two admins removing each other at the same time cannot leave the organization without an admin. The second one is refused.
Delete the organizationLive
Remove an organization and everything collected under it.
As a member
- Not available. Only an admin of that organization can delete it.
As an admin
- Open Settings, then Organization details.
- In the Danger zone card, click Delete organization.
- Type the organization name into Delete this organization? to confirm.
- You land in another organization you belong to, or on the screen that asks you to create one.
Rules that apply
- Deleting takes the memberships, the connections, the evidence and the scores with it.
- There is no undo and no export step. Take what you need before you confirm.
Create a token for scripts and CILive
A personal access token calls the API as you, in one organization, with the role you hold at that moment.
As a member
- Open Settings and click API Keys.
- Type a Token name, choose Expires in of 30, 60, 90, 180 days or 1 year, and click Create token.
- Copy the token straight away: "Copy your token now; it won't be shown again." Click Done.
- Send it on any API request as
Authorization: Bearer <token>. - To end a token, click the revoke icon on its row and click Confirm revoke. It stops working at once.
Rules that apply
- A token carries your live role. Lose the role or the membership and the token loses it in the same moment.
- Every token expires. One year is the longest you can pick.
- Only the first 18 characters are ever shown again. Lose the rest and you have to revoke the token and make another.
- Tokens are personal. An admin cannot see or revoke anybody else's here.
- Auditors see the list, but Create token and the revoke icon are refused with "Auditors have read-only access".
- You need to be in an organization to make a token, and an account owing a forced password change cannot use one.