Vendors
The register of every third party you rely on, and the record of what you did about each one.
A vendor row holds two things, kept deliberately apart. What the vendor says about itself: its services, its policies, who to contact. And what your organization decided about it: inherent risk, residual risk, who owns it, when it has to be looked at again.
Vendors you are still evaluating sit under Prospective. Vendors you already use sit under Current. Retired ones are archived and hidden until you ask for them. Moving a vendor from Prospective to Current is not a single click. The platform checks a list of requirements, each one built from a real field on the record, and refuses while any of them is empty.
Around the record sit the working parts of a third-party program: named security reviews with their own history, an encrypted vault for SOC 2 reports and DPAs, a sub-processor register, remediation follow-ups, and questionnaires sent to the vendor by link.
Who uses this
Admin
Can add vendors, edit both halves of the record, run and finalize security reviews, upload and delete documents, declare sub-processors, raise and close follow-ups, send questionnaires, approve and promote, and set the review cadence
Cannot rename a vendor, or delete one. Archiving is the only removal path offered
Member
Can open every vendor screen and read everything: the list, the heatmap, the record, the review history, the documents, the sub-processors, the follow-ups and the approval checklist. Can download a document
Cannot create or change anything. Most write buttons are hidden, and the ones that are not are refused by the server
Approver
Can everything a member can, plus sign off a questionnaire a vendor has submitted
Cannot anything else here. In the vendor register an approver is a reader
Auditor
Can read the same screens as a member
Cannot change anything. Every write is refused twice over, by the role check and again by the read-only rule on auditors
Outside party: the vendor's own contact
Can open a questionnaire link you send them and answer it, with no account and no sign-in
Cannot see the vendor record, your risk ratings, your documents or anything else in the platform
The screens
Current vendors
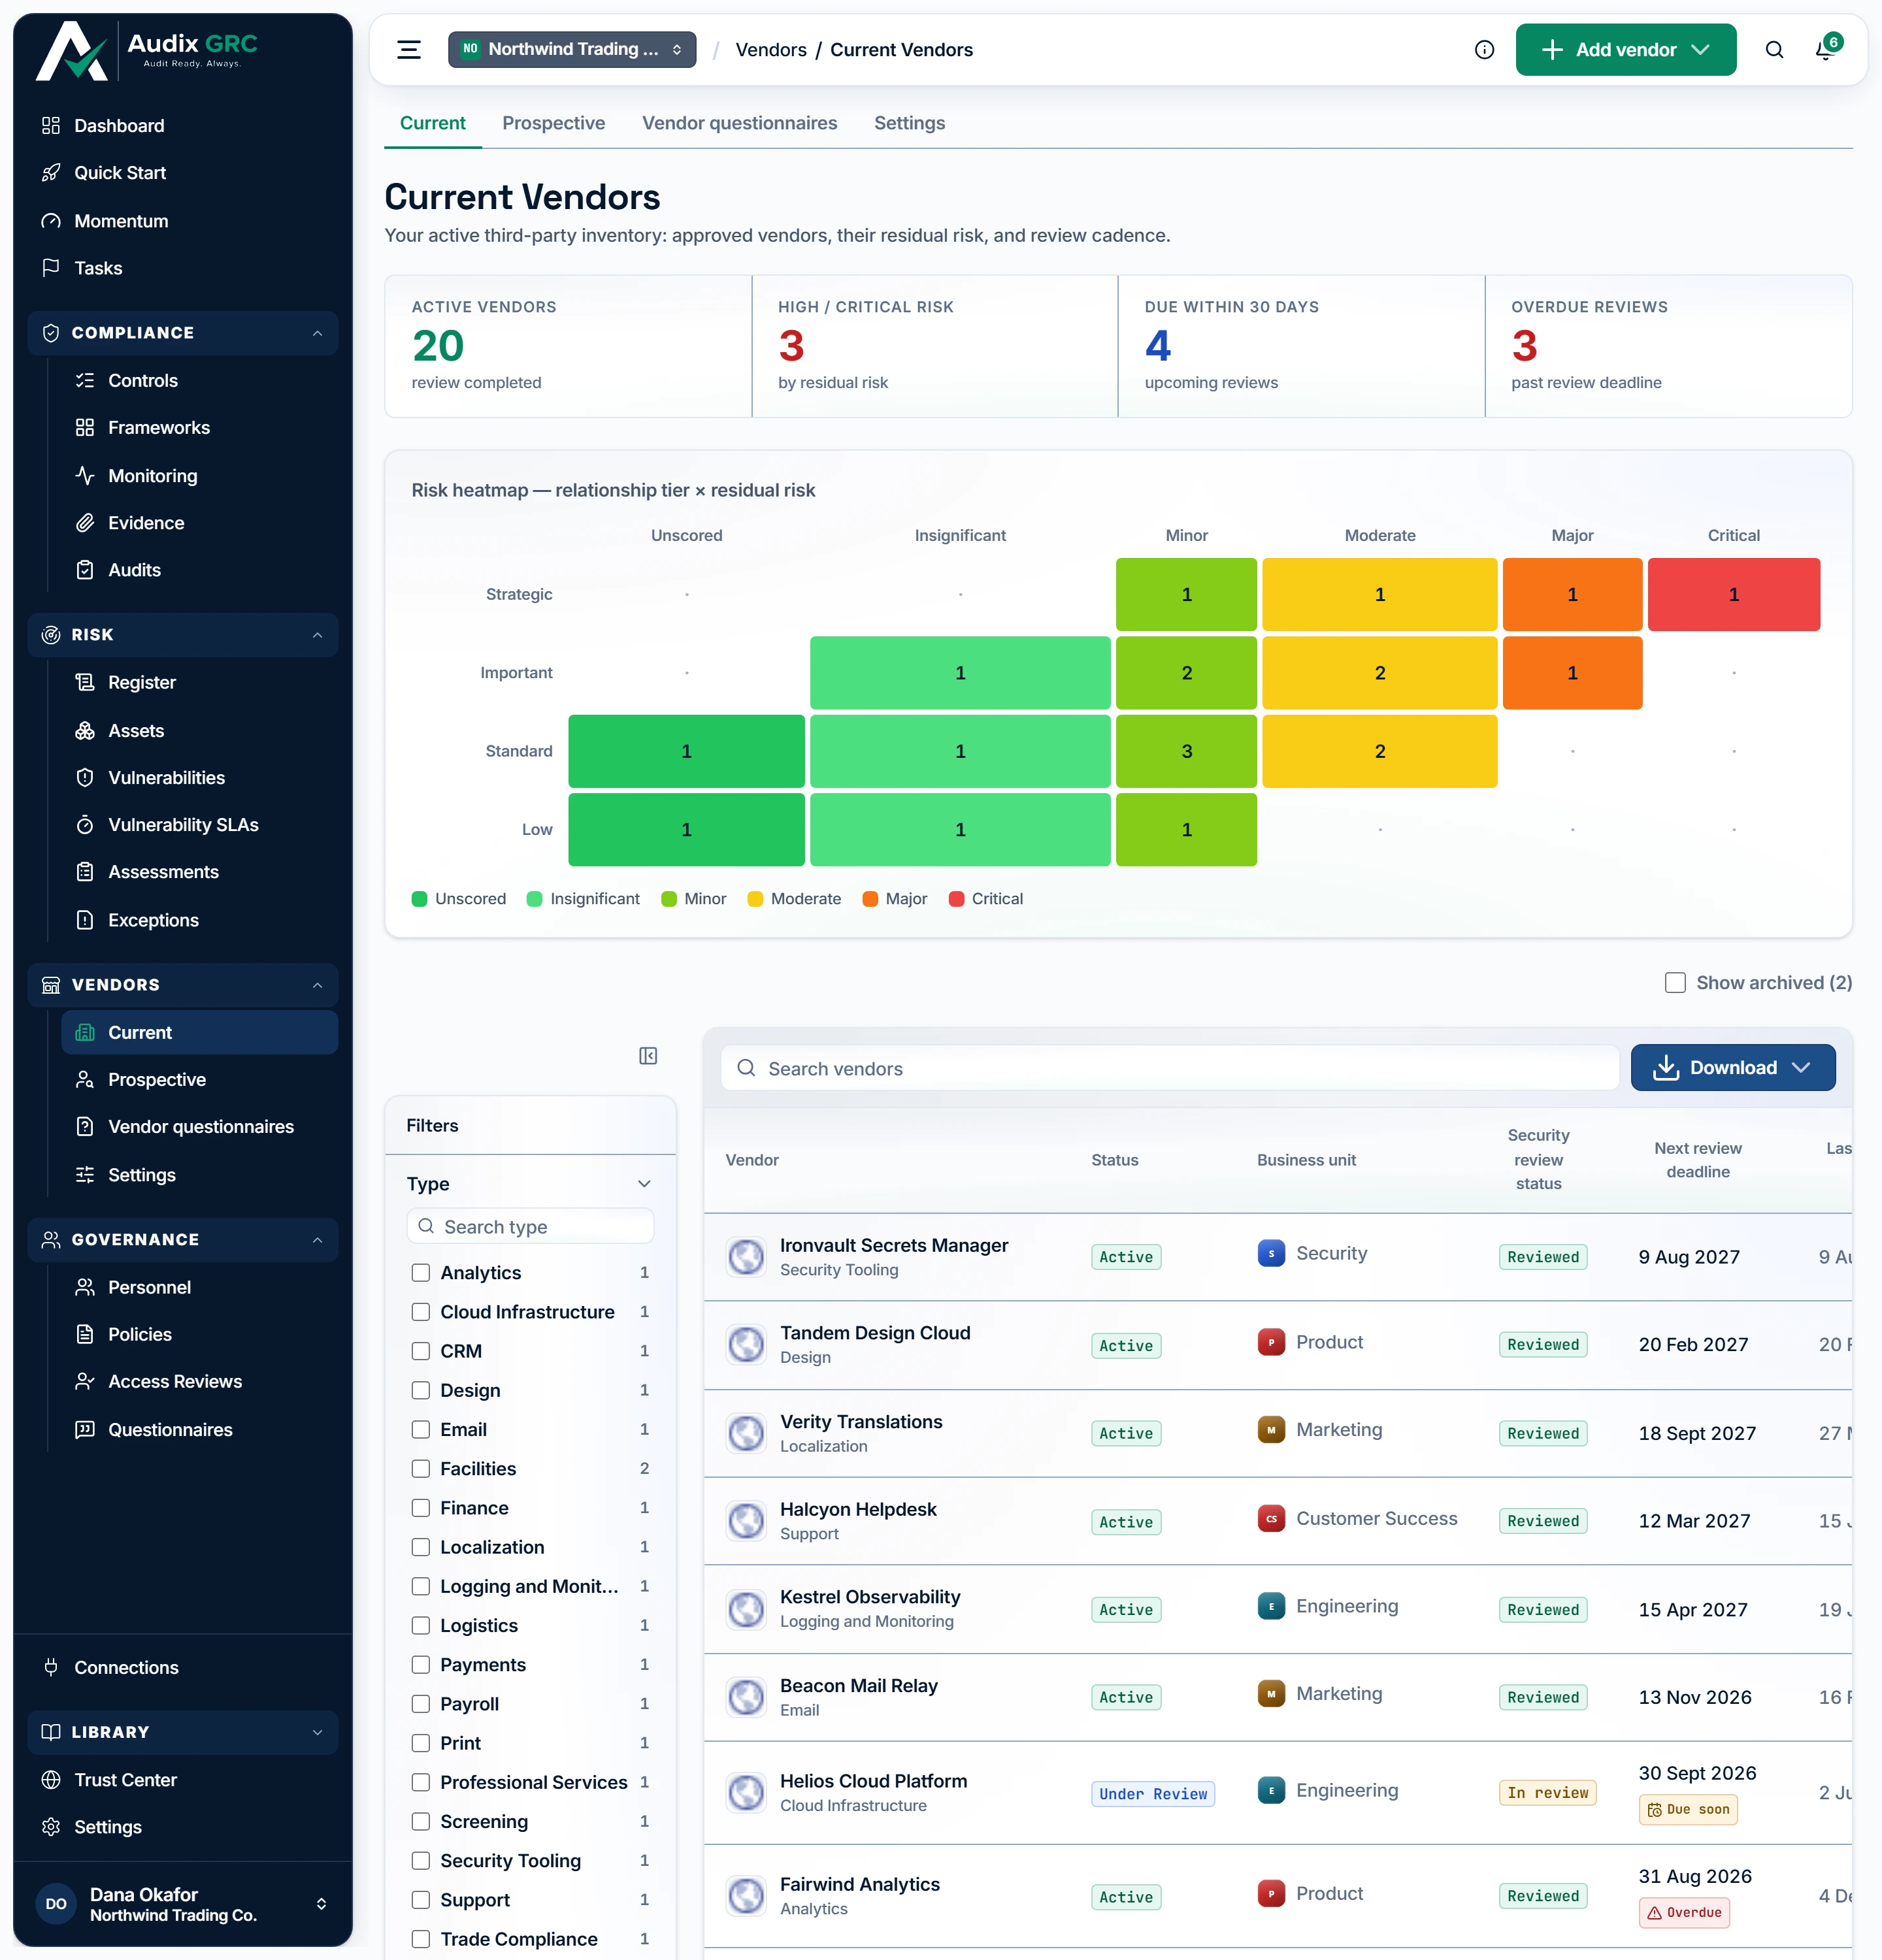
- Two ways to add a vendor. Admins get a three-step form for a single vendor, or a bulk upload that both adds and updates; everyone else has no button here at all.
- Four readings of the whole inventory. How many vendors are in use, how many score high or critical once their controls are counted, how many fall due for review within 30 days and how many are already past their deadline.
Four tiles, the risk heatmap, and the table of every vendor in use. Filter rail, search, CSV export and a Show archived toggle.
Add vendor
A three step form: Vendor details, Internal details, Finish.
Vendor record
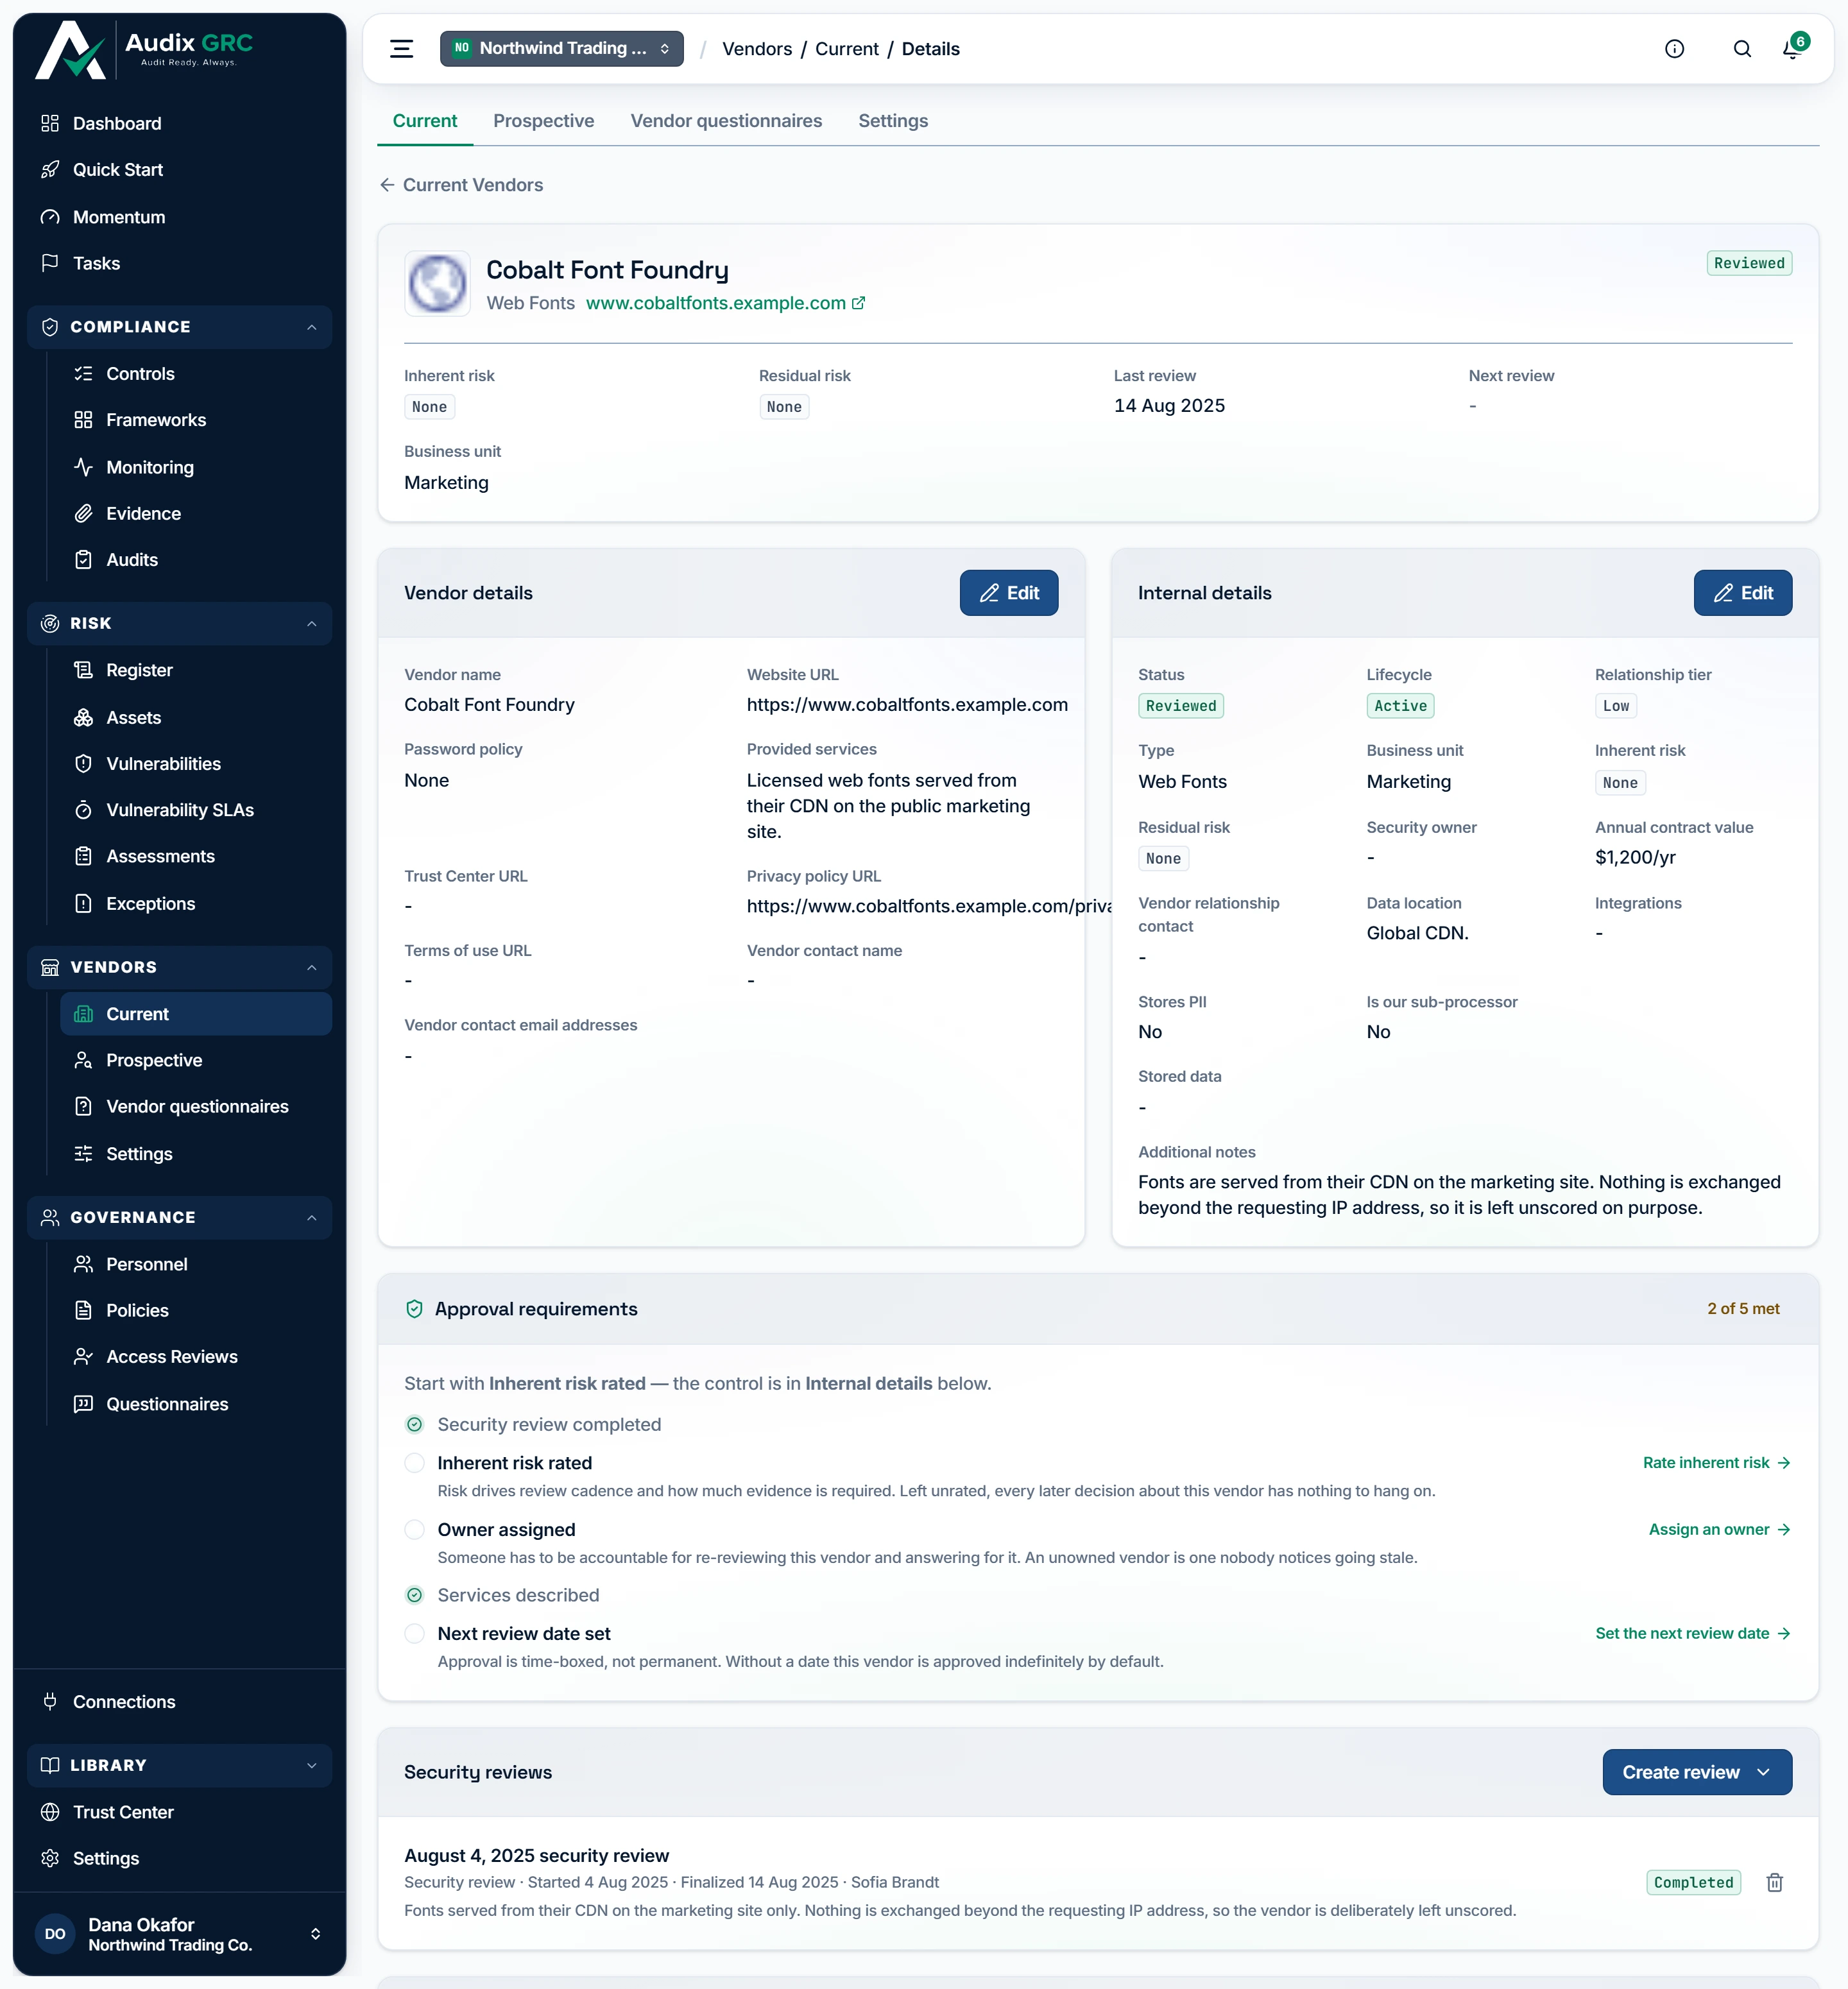
The header, Vendor details, Internal details, Approval requirements, Security reviews, Security assessments, Documents, Sub-processors and Remediation follow-ups.
Prospective vendors
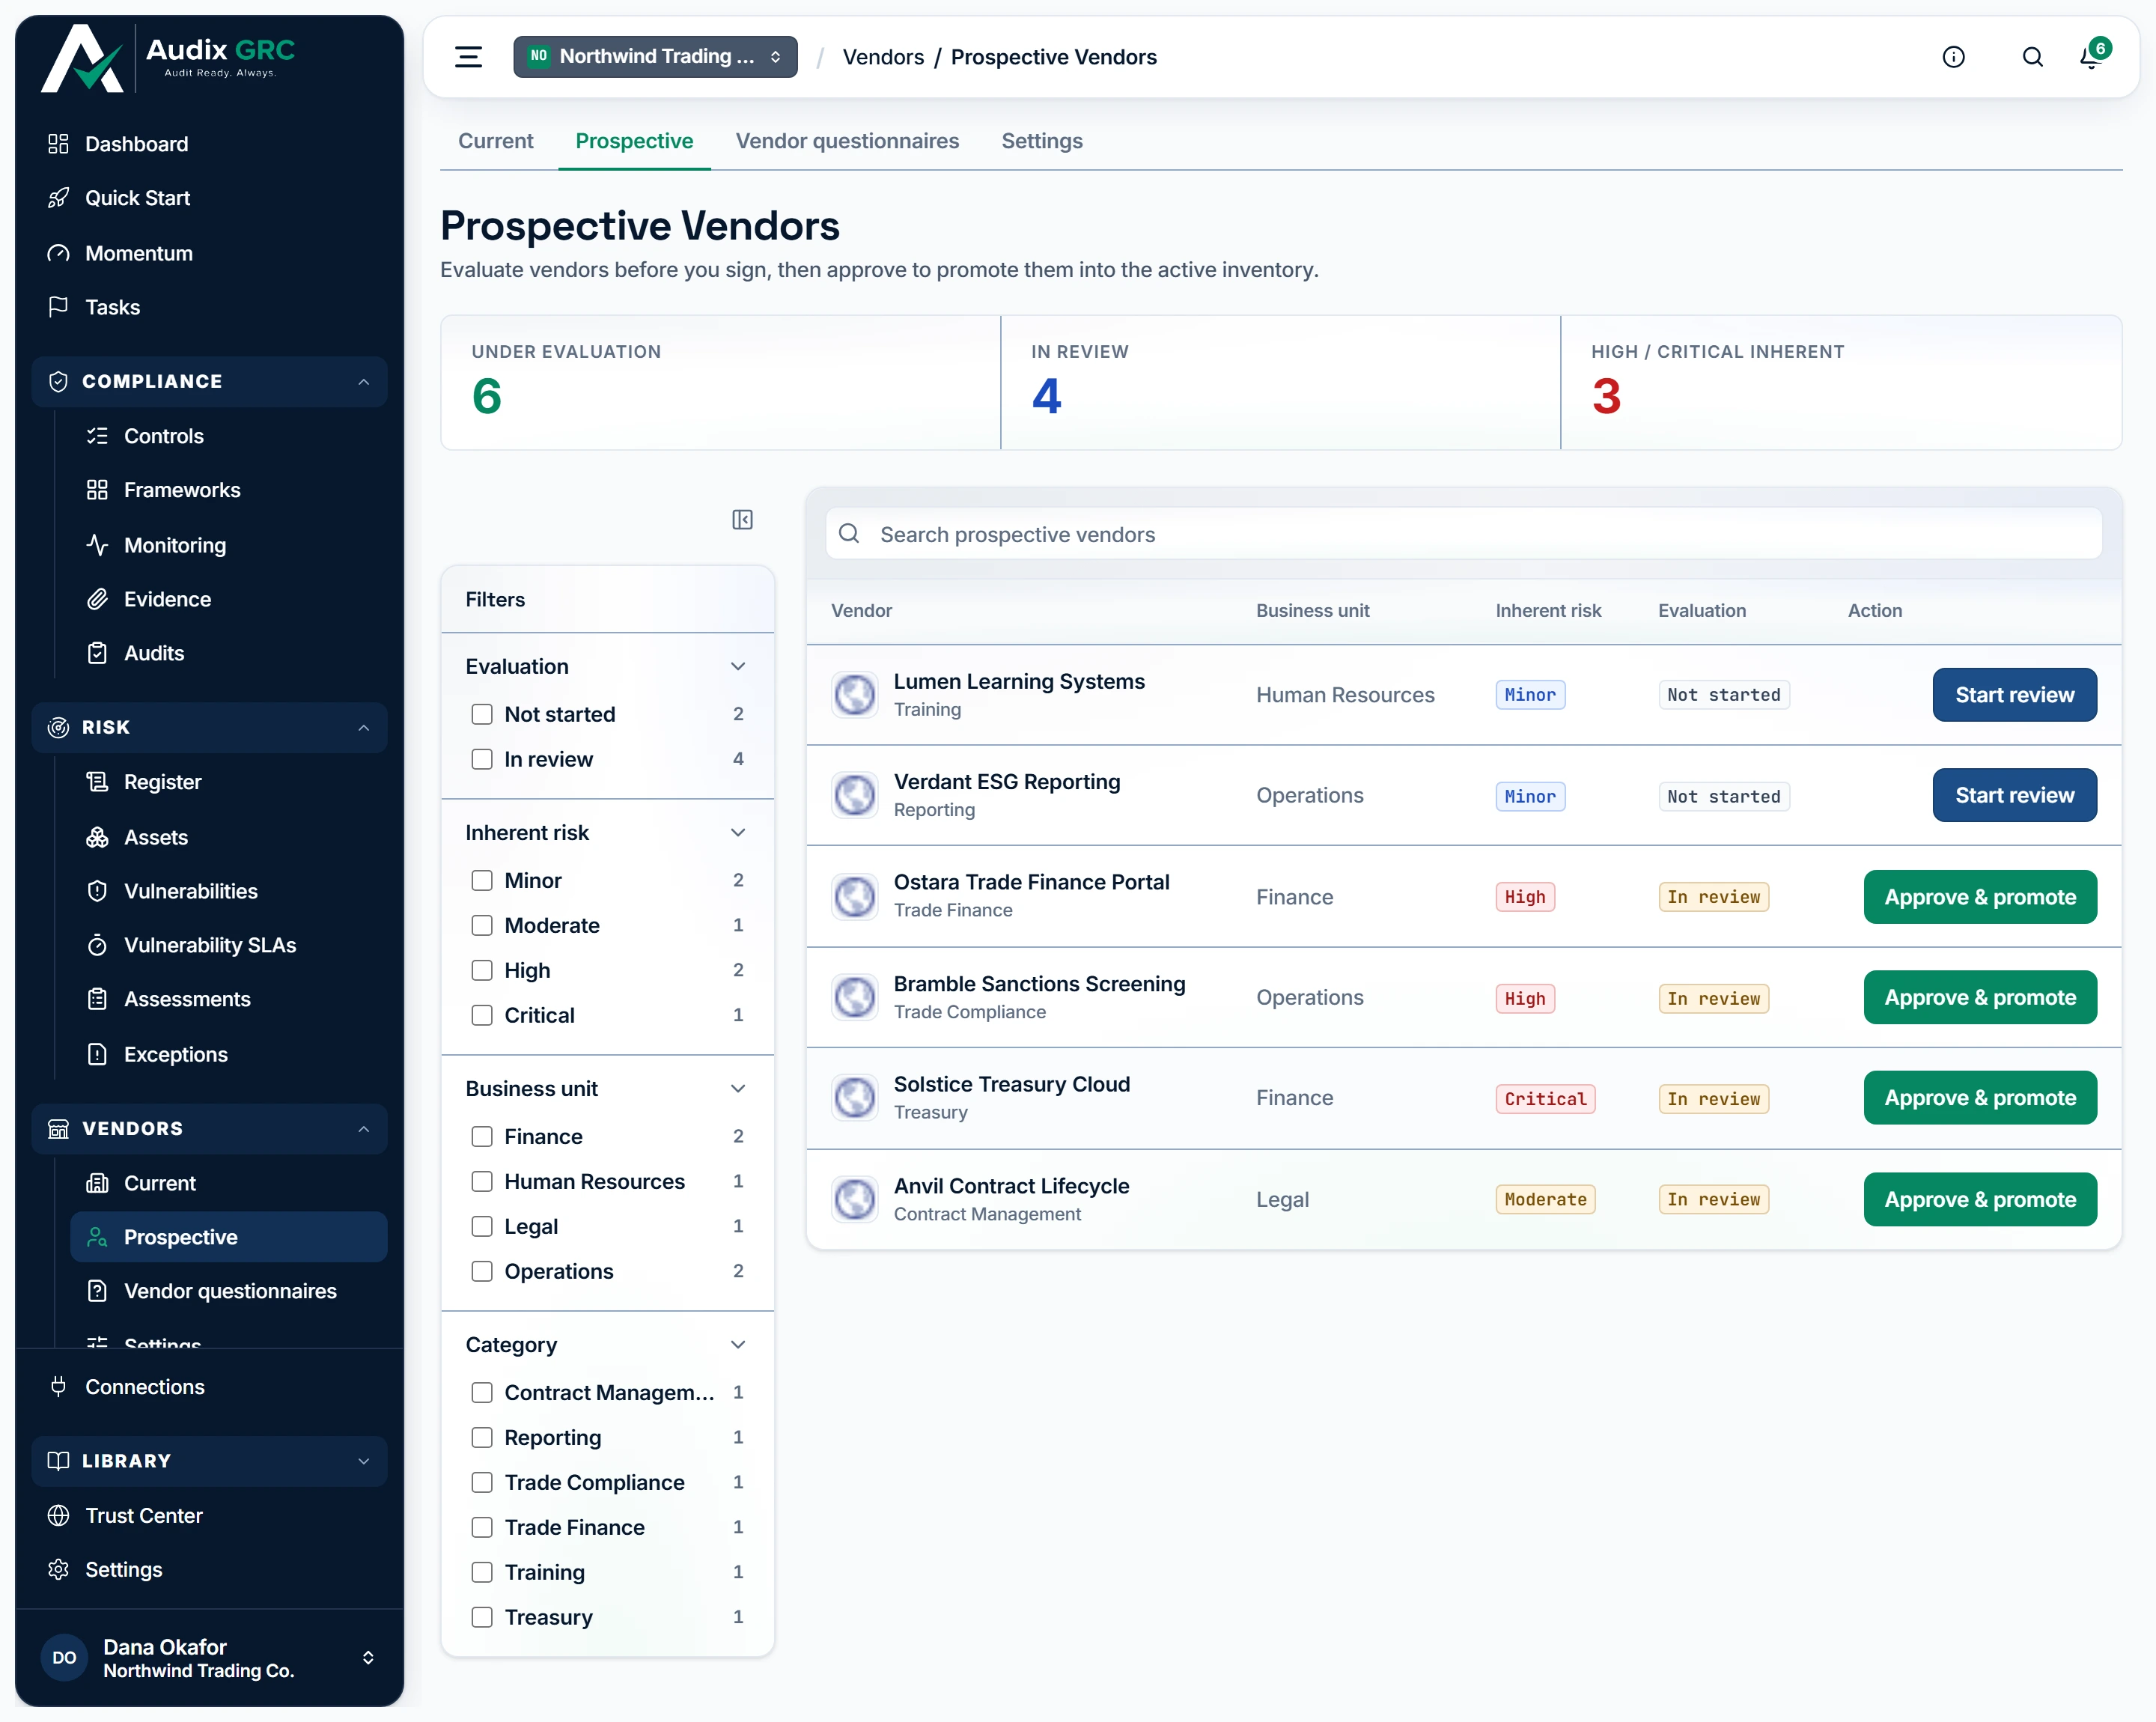
- What is still being decided. Everything under evaluation, how much of it has a review under way, and how much of it would be high or critical risk if you signed today.
- One move per row, and it changes. A vendor nobody has opened yet offers Start review; once the work is done the same column offers Approve and promote, which moves the vendor into the active inventory.
How a vendor becomes one you use
Three tiles and the table of vendors under evaluation, with Start review or Approve & promote on each row.
Vendor questionnaires
Every questionnaire you have sent and every template you have built. Covered in its own section.
Vendor settings
Where a review deadline comes from
Program configuration: review cadence per risk band, default inherent risk, and overdue flagging.
What you can do
Read the current inventoryLive
Answer "what do we use, and when was each one last looked at" without opening records one at a time.
As a member
- Open Current from the sidebar or the tab strip.
- Read the four tiles: Active vendors, High / critical risk, Due within 30 days and Overdue reviews.
- Narrow the table from the filter rail: Type, Security review status, Inherent risk, Residual risk, Next review deadline, Business unit, Security owner and Sub-processors.
- Type in Search vendors to match on name, business unit or category.
- Click a row to open the preview drawer, then Open full vendor to go to the record.
- Click Download, then Export as CSV.
- Tick Show archived to bring retired vendors into the same table.
As an admin
- Same as a member, plus Add vendor in the page header, which offers Add single vendor and Add/update in bulk.
Rules that apply
- The four tiles always describe the whole active inventory. Filtering the table or clicking the heatmap does not move them.
- The CSV export covers every loaded row, not the filtered subset you are looking at.
- Overdue reviews reads "flagging disabled" and shows 0 when your organization has turned overdue flagging off in settings.
- The Show archived tick box only appears when there are archived vendors to show.
- The filter rail is built from values actually present in your rows, so it never offers a filter that would return nothing. Risk columns sort by severity, not alphabetically.
- A vendor's logo is fetched by the platform from the website on the record, not by your browser, so no vendor domain is sent from a person's machine to a third party. A vendor with no website, or one no icon can be found for, shows a generated initials seal instead.
Spot the vendors that matter most and score worstLive
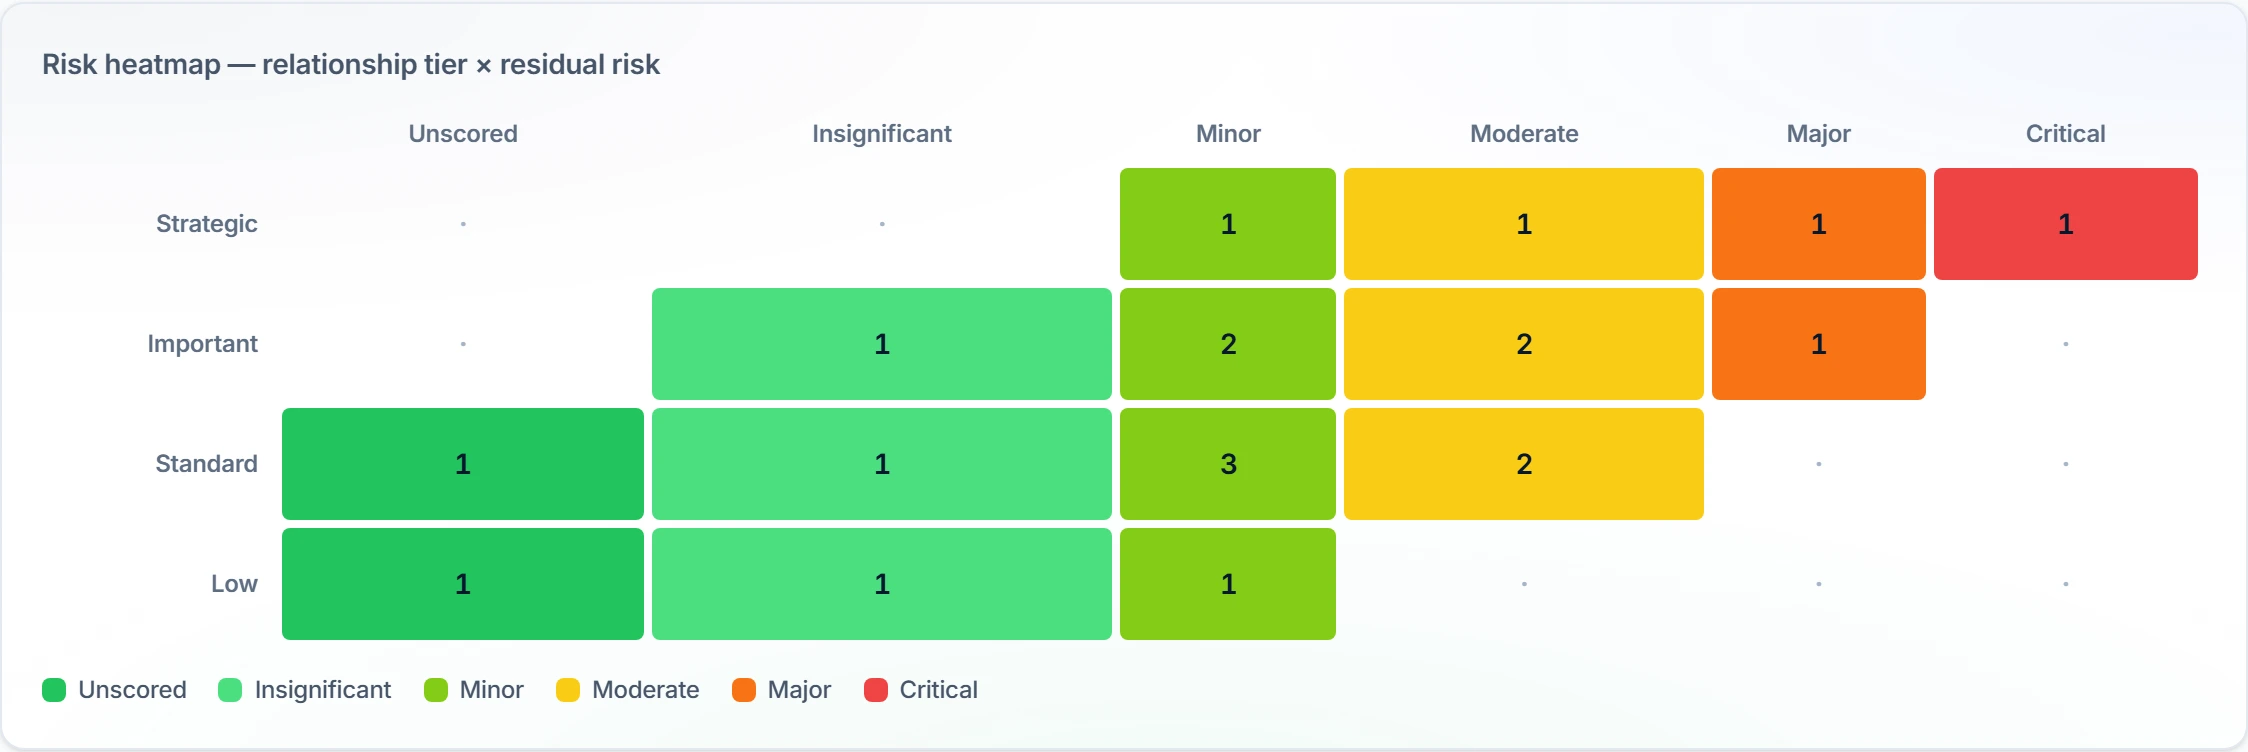
See the inventory as relationship tier against residual risk, in one grid.
As a member
- On Current, find the grid headed Risk heatmap. Rows are Strategic, Important, Standard and Low. Columns run from Unscored to Critical.
- Hover a filled cell to see up to five of the vendors in it.
- Click a cell to filter the table below to that tier and that band. A chip appears above the table.
- Click the same cell again, or remove the chip, to clear it.
Rules that apply
- The grid buckets on residual risk, never inherent risk.
- Empty cells cannot be clicked.
- The whole heatmap is hidden when you have no vendors.
Add a vendor you already useLive
Record a vendor in three steps, with the company name and website suggested as you type.
As a member
- Not available. Only an admin can create a vendor. There is no Add vendor button for you, and if you reach the form by its URL the Next on step 2 is refused.
As an admin
- On Current, click Add vendor, then Add single vendor.
- Step 1 is about the vendor. Start typing in Vendor name. After three characters the field suggests real companies with a logo, a domain and a short description. A suggestion the model is unsure of is tagged "unsure".
- Pick a suggestion to fill in the name. The website is filled in from its domain only if you have not already typed one.
- Fill in any of Website URL, Provided services, Password policy, Trust Center URL, Privacy policy URL, Terms of use URL, Vendor contact name and Vendor contact email addresses. Everything except the name is optional.
- Step 2 is about how you use the vendor: Vendor status, Type, Business unit, Residual risk, Inherent risk, Stored data, the PII and sub-processor tick boxes, Integrations, Security owner, Vendor relationship contact, Annual contract value and Additional notes.
- Click Next. This is the only write in the whole form. The vendor exists from this moment.
- Click Complete on step 3 to open the new record.
Rules that apply
- A vendor added this way always lands in Current, never in Prospective.
- Nothing is saved before step 2's Next, so abandoning the form leaves no half-made vendor behind.
- At most five vendor contact email addresses.
- The name suggestions come from a model, and the list says so and tells you to check them before saving. Nothing is filled in without you picking it, and every field stays editable.
- Integrations is fed from the real connector catalog, and Security owner from your member roster. If either fails to load the form still works, with an empty picker.
- The logo beside a suggestion is fetched the same way as the ones in the vendor list: by the platform, never by your browser. A company no icon can be found for shows the generated initials seal.
Evaluate a vendor before you use itLive
Hold vendors that are being assessed, and promote one into the active inventory once it clears every requirement.
As a member
- Open Prospective to read everything under evaluation, with tiles for Under evaluation, In review and High / critical inherent.
- Start review and Approve & promote are shown to you, but the server refuses both. Pressing one puts a role error above the table.
As an admin
- Open Prospective.
- On a vendor whose review has not begun, click Start review. Its evaluation pill moves from Not started to In review.
- When the work is done, click Approve & promote.
- If anything is outstanding, a yellow card appears saying the vendor is not ready to approve, and lists every requirement. Met ones are struck through. Unmet ones carry the reason, and a badge where the requirement only applies because of the risk band.
- Fix the outstanding fields on the vendor record, then click Approve & promote again.
- When everything is met the review status becomes complete, today's date is stamped as the last review, and the vendor moves out of this list into Current.
Rules that apply
- The check before the button is a courtesy, not the control. The server runs the same requirements again on the way through and refuses with every outstanding item named, so a stale page cannot approve an unready vendor.
- The requirements are checked against the vendor as it will be after your edits, so a last round of changes and the approval can go in one save.
- Finalizing a security review promotes a vendor out of procurement too. Those are the only two ways it happens.
- A vendor is never moved backwards on its own. Only an admin sets Lifecycle to Procurement or Archived, by hand, on the record.
Know what is missing before you approveLive
State in real fields, not tick boxes, what has to be true before a vendor is approved, and point at the control that satisfies each one.
As a member
- Open a vendor record and read the Approval requirements card. The header counts how many of the requirements are met.
- Each unmet requirement shows the reason it is unmet and a padlock reading Admin only.
- The intro line says an administrator has to complete these, and that you can see what is outstanding but not change it.
As an admin
- Read the same card. The intro names the first thing to do and which card below holds the control for it.
- Each unmet requirement carries an action link, for example Rate inherent risk, Assign an owner, Set the next review date or Send a questionnaire.
- Click one. The card that owns that field opens, scrolls into view, and the input is focused and ringed. The checklist never fills a field in for you.
- The security review link changes with the state: Start a security review when none is open, Finalize the open review when one is.
- When everything is met the card reads "Every requirement is met. This vendor can be approved."
Rules that apply
- Always required: a completed security review, an inherent risk rating, an assigned owner, a description of the provided services, and a next review date.
- If the vendor stores personal information or is your sub-processor, two more: a description of the stored data, and where that data lives.
- If inherent risk is High or Critical, one more: a submitted questionnaire on file. One nobody has reviewed yet still counts. One marked Not approved does not.
- Whitespace does not satisfy a text requirement.
- The card stays on the record after approval, so the register can still answer what the approval was based on. It re-checks itself whenever the vendor changes, with no page reload.
Keep the vendor's claims apart from your judgementLive
Two cards on the record, each with its own Edit and Save. One holds what the vendor disclosed. The other holds what you decided.
As a member
- Open a vendor record. Both cards are read-only and there is no Edit button.
- A field with nothing on file shows a dash rather than a blank space.
As an admin
- Click Edit on Vendor details to change Website URL, Password policy, Provided services, Trust Center URL, Privacy policy URL, Terms of use URL, Vendor contact name and Vendor contact email addresses. Then Save changes, or Cancel.
- Click Edit on Internal details to change Status, Lifecycle, Relationship tier, Type, Business unit, Inherent risk, Residual risk, Last review, Next review deadline, Security owner, Annual contract value, the two relationship contact fields, Data location, Integrations, Stored data, the PII and sub-processor tick boxes, and Additional notes.
- Security owner is a picker over your member roster. It also offers Invite someone new.
Rules that apply
- A vendor cannot be renamed. The name is shown but there is no input for it anywhere.
- Clearing a text field and saving clears it on the record. A field you did not touch is left alone.
- The owner has to be an active member of your organization. Anyone else is refused with "That person is not an active member of this organization".
- Set Last review and leave Next review deadline empty, and the platform works the next deadline out from your review cadence for that vendor's residual risk.
- Invite someone new sends the invitation the moment you confirm it, even if you then cancel the edit you were in the middle of.
Run and record a security reviewLive
Give a vendor a review history: named reviews, each with a kind, a reviewer, the risk band it was conducted against and a written conclusion. The vendor's review status and last review date are worked out from these rows.
As a member
- Read the Security reviews card. Each review shows its kind, start date, finalize date, reviewer, conclusion and a status pill.
- With none on file it reads "No reviews of this vendor yet." There is no Create, Finalize or delete control.
As an admin
- Click Create review and pick a kind: Security review for a full assessment, SOC report review to record findings from their SOC 2 or ISO report, or Uploaded report to file a report somebody else produced.
- The dialog pre-fills Review name with today's date. Pick a Reviewer from the roster if you want one, then click Start review.
- When the work is done, click Finalize on the open review.
- The dialog warns that this closes the review, updates the vendor's review status and last reviewed date, and cannot be undone. Add a Conclusion if you have one.
- Click Finalize. Who finalized it and when are stamped on the row.
- The bin icon deletes a review.
Rules that apply
- Only one review can be open at a time. Starting a second is refused with a message naming the open one, and the refusal only appears after you have filled in the dialog and clicked Start review.
- A finalized review cannot be edited or reopened.
- The vendor's review status is the status of the newest review by start date. It is not "complete if any review is complete", so starting a new review moves a reviewed vendor back to In review.
- The last review date is the finalize date of the newest completed review only. An open review does not restart the cadence clock.
- The risk band a review was conducted against is stamped when the review is created. Re-rating the vendor later does not rewrite what an old review says it assessed.
- Deleting the newest review rolls the vendor's summary back to whatever the one before it said.
Send the vendor a questionnaireLive
Send a security questionnaire and see what came back, without leaving the vendor record.
As a member
- Read the Security assessments card. Each row shows the questionnaire title, a status pill, how many questions are answered and a flag count.
- Once it is submitted the row also shows the scored risk band and score, and the sign-off: Approved, Conditionally approved, Not approved or Awaiting review.
- Click the title to open the full questionnaire. There is no send button for you.
As an admin
- Click Send questionnaire.
- Pick a Template, set a Title, and optionally a respondent email and a due date.
- Click Send. The panel shows the link with a Copy button, and says whether the email went out.
- If you gave an email address, the vendor gets the link. If you did not, copy the link and send it yourself.
- Use View questionnaire to open the internal view, or Send another to reset the form.
Rules that apply
- Submitting rewrites the vendor's residual risk, last review date and next review deadline from the score and your cadence. This is why a vendor's residual band can change with nobody editing the record.
- A submitted questionnaire marked Not approved does not satisfy the questionnaire requirement for a High or Critical vendor.
- If the mail server cannot be reached the panel says the email could not be sent, and gives you the link to share instead.
- With no templates built yet, the panel says to create one first and links you to Manage templates.
- A file the vendor attached can be accepted into this vendor's document vault, sealed the same way as a document you upload yourself.
Hold the vendor's assurance documentsLive
Keep the SOC 2 report, the ISO certificate, the DPA and the pen test summary in one encrypted place, with an expiry date you can chase.
As a member
- Read the Documents card. Each entry shows its title, a category pill, the file name and the size.
- A document with an expiry shows "valid until" and that date, turning red and marked expired once it has passed.
- Click Download. The file streams through the platform. Where it is actually stored is never exposed.
As an admin
- Click Upload and choose a file. The hint says PDF, Word or image, up to 10 MB, encrypted at rest.
- Set a Title if you want one. It defaults to the file name.
- Pick a Category: SOC 2, ISO 27001, DPA, Pen test or Other.
- Set Valid until if the document expires.
- Click Upload document.
- The bin icon removes a document and deletes the stored file with it.
Rules that apply
- 10 MB is a hard cap, checked in the browser and again on the server.
- PDF, Word, Excel, PowerPoint, plain text and PNG, JPEG, GIF or WebP images are accepted. Anything else is refused with "Unsupported document type. Upload a PDF, Word document, or image."
- Files are encrypted before they are stored and are tied to your organization.
- A document with a Valid until date becomes a reminder in the deadline digest, titled with the vendor and the document name. Archived vendors are skipped.
Record who the vendor relies onLive
Write down the fourth parties behind your vendor, so the data supply chain is recorded rather than assumed.
As a member
- Read the Sub-processors card. Each entry shows the name, its purpose and its location, with an external link when a URL was given.
- With none declared it reads "No sub-processors declared."
As an admin
- Click Add.
- Fill in Name and Purpose. Both are required.
- Add a Location and a URL if you have them.
- Click Add sub-processor.
- The bin icon removes an entry.
Rules that apply
- Only http and https addresses become clickable links. Anything else is shown as plain text.
- An entry cannot be edited once added. Delete it and add it again.
- This register feeds the Sub-processors filter on the Current list.
Chase what a vendor has to fixLive
Track the specific things an assessment turned up, through to resolution.
As a member
- Read the Remediation follow-ups card. Its heading counts the open ones.
- Each item shows its title, description, a severity pill, a due date and a status pill.
- A due date that has passed turns red and is marked overdue. There are no controls for you.
As an admin
- Click Add.
- Type what needs remediating, pick a severity from low, medium, high or critical, and set a due date if there is one.
- Click Add follow-up.
- Change an item's status from the dropdown on its row: Open, In progress or Resolved.
- The bin icon deletes an item.
Rules that apply
- Open items sort above in progress, which sort above resolved.
- Marking an item Resolved stamps the date. Moving it back out clears that date again.
- Only the status can be changed after an item is created. To fix a title, severity or due date, delete it and add it again.
- Follow-ups feed the deadline reminders alongside audit follow-ups.
Set how often vendors are reviewedPartial
Say how many days may pass between reviews for each risk band, and whether vendors past their deadline are flagged.
As a member
- The form opens and looks editable, but Save settings is refused with a role error. Only an admin can save it.
As an admin
- Open Settings in the Vendors tab strip.
- Under Review cadence, set the number of days for Critical, High, Moderate, Minor and None. Anything from 0 to 3650 is accepted.
- Tick or clear Flag vendors past their review deadline.
- Click Save settings. A green "Saved." appears.
Rules that apply
- Until you save this form the built-in cadence applies: 90 days for critical, 180 for high, 365 for moderate and minor, and none for unscored.
- A band set to 0 means no scheduled review. The next deadline is left empty rather than invented.
- The cadence is applied at two moments: when a questionnaire is submitted, and when an admin saves a last review date without a next review deadline.
- The form is labelled per inherent-risk tier, but the platform picks the band using the vendor's residual risk.
- Default inherent risk is saved and read back, but it is applied nowhere. A new vendor starts unscored whatever you set here.