Risk
Write down what could go wrong, what you own, what is broken on it, and what you have decided not to fix yet.
Four registers sit side by side under Risk. The risk register holds named risks scored on likelihood times impact, each with an owner and a treatment decision. The asset inventory holds the systems and data stores those risks point at, typed in by hand or discovered from your connected accounts. The vulnerability register holds scanner findings and CVEs against those assets, each with a remediation deadline. The exception register holds dated waivers: a recorded decision that one control will not be met.
Everyone in your organisation can read all of it. Writing is admin work, with one carve-out: any member can raise an exception request, and an admin decides it.
Nothing here is public. There is no vendor link, no email and no outside party anywhere in this area.
Who uses this
Admin
Can create and edit risks, assets and vulnerabilities, run the treatment workflow, link controls and threats, sync assets from connections, set the remediation SLA, and approve, reject, revoke or delete exceptions
Cannot delete a risk, edit an asset or edit a vulnerability from any screen. Those exist in the API only
Member
Can read every screen here, and raise, edit and submit their own exception request
Cannot create or change a risk, an asset, a vulnerability or the SLA policy, and cannot approve any exception, including their own
Approver
Can read the same screens as a member
Cannot do anything extra. This area gives an approver no grant at all, and the New exception button is not offered to them
Auditor
Can read every register, the waiver history and who approved what
Cannot change anything. Writes are refused for auditors before the role check is even reached
The screens
Risk Register
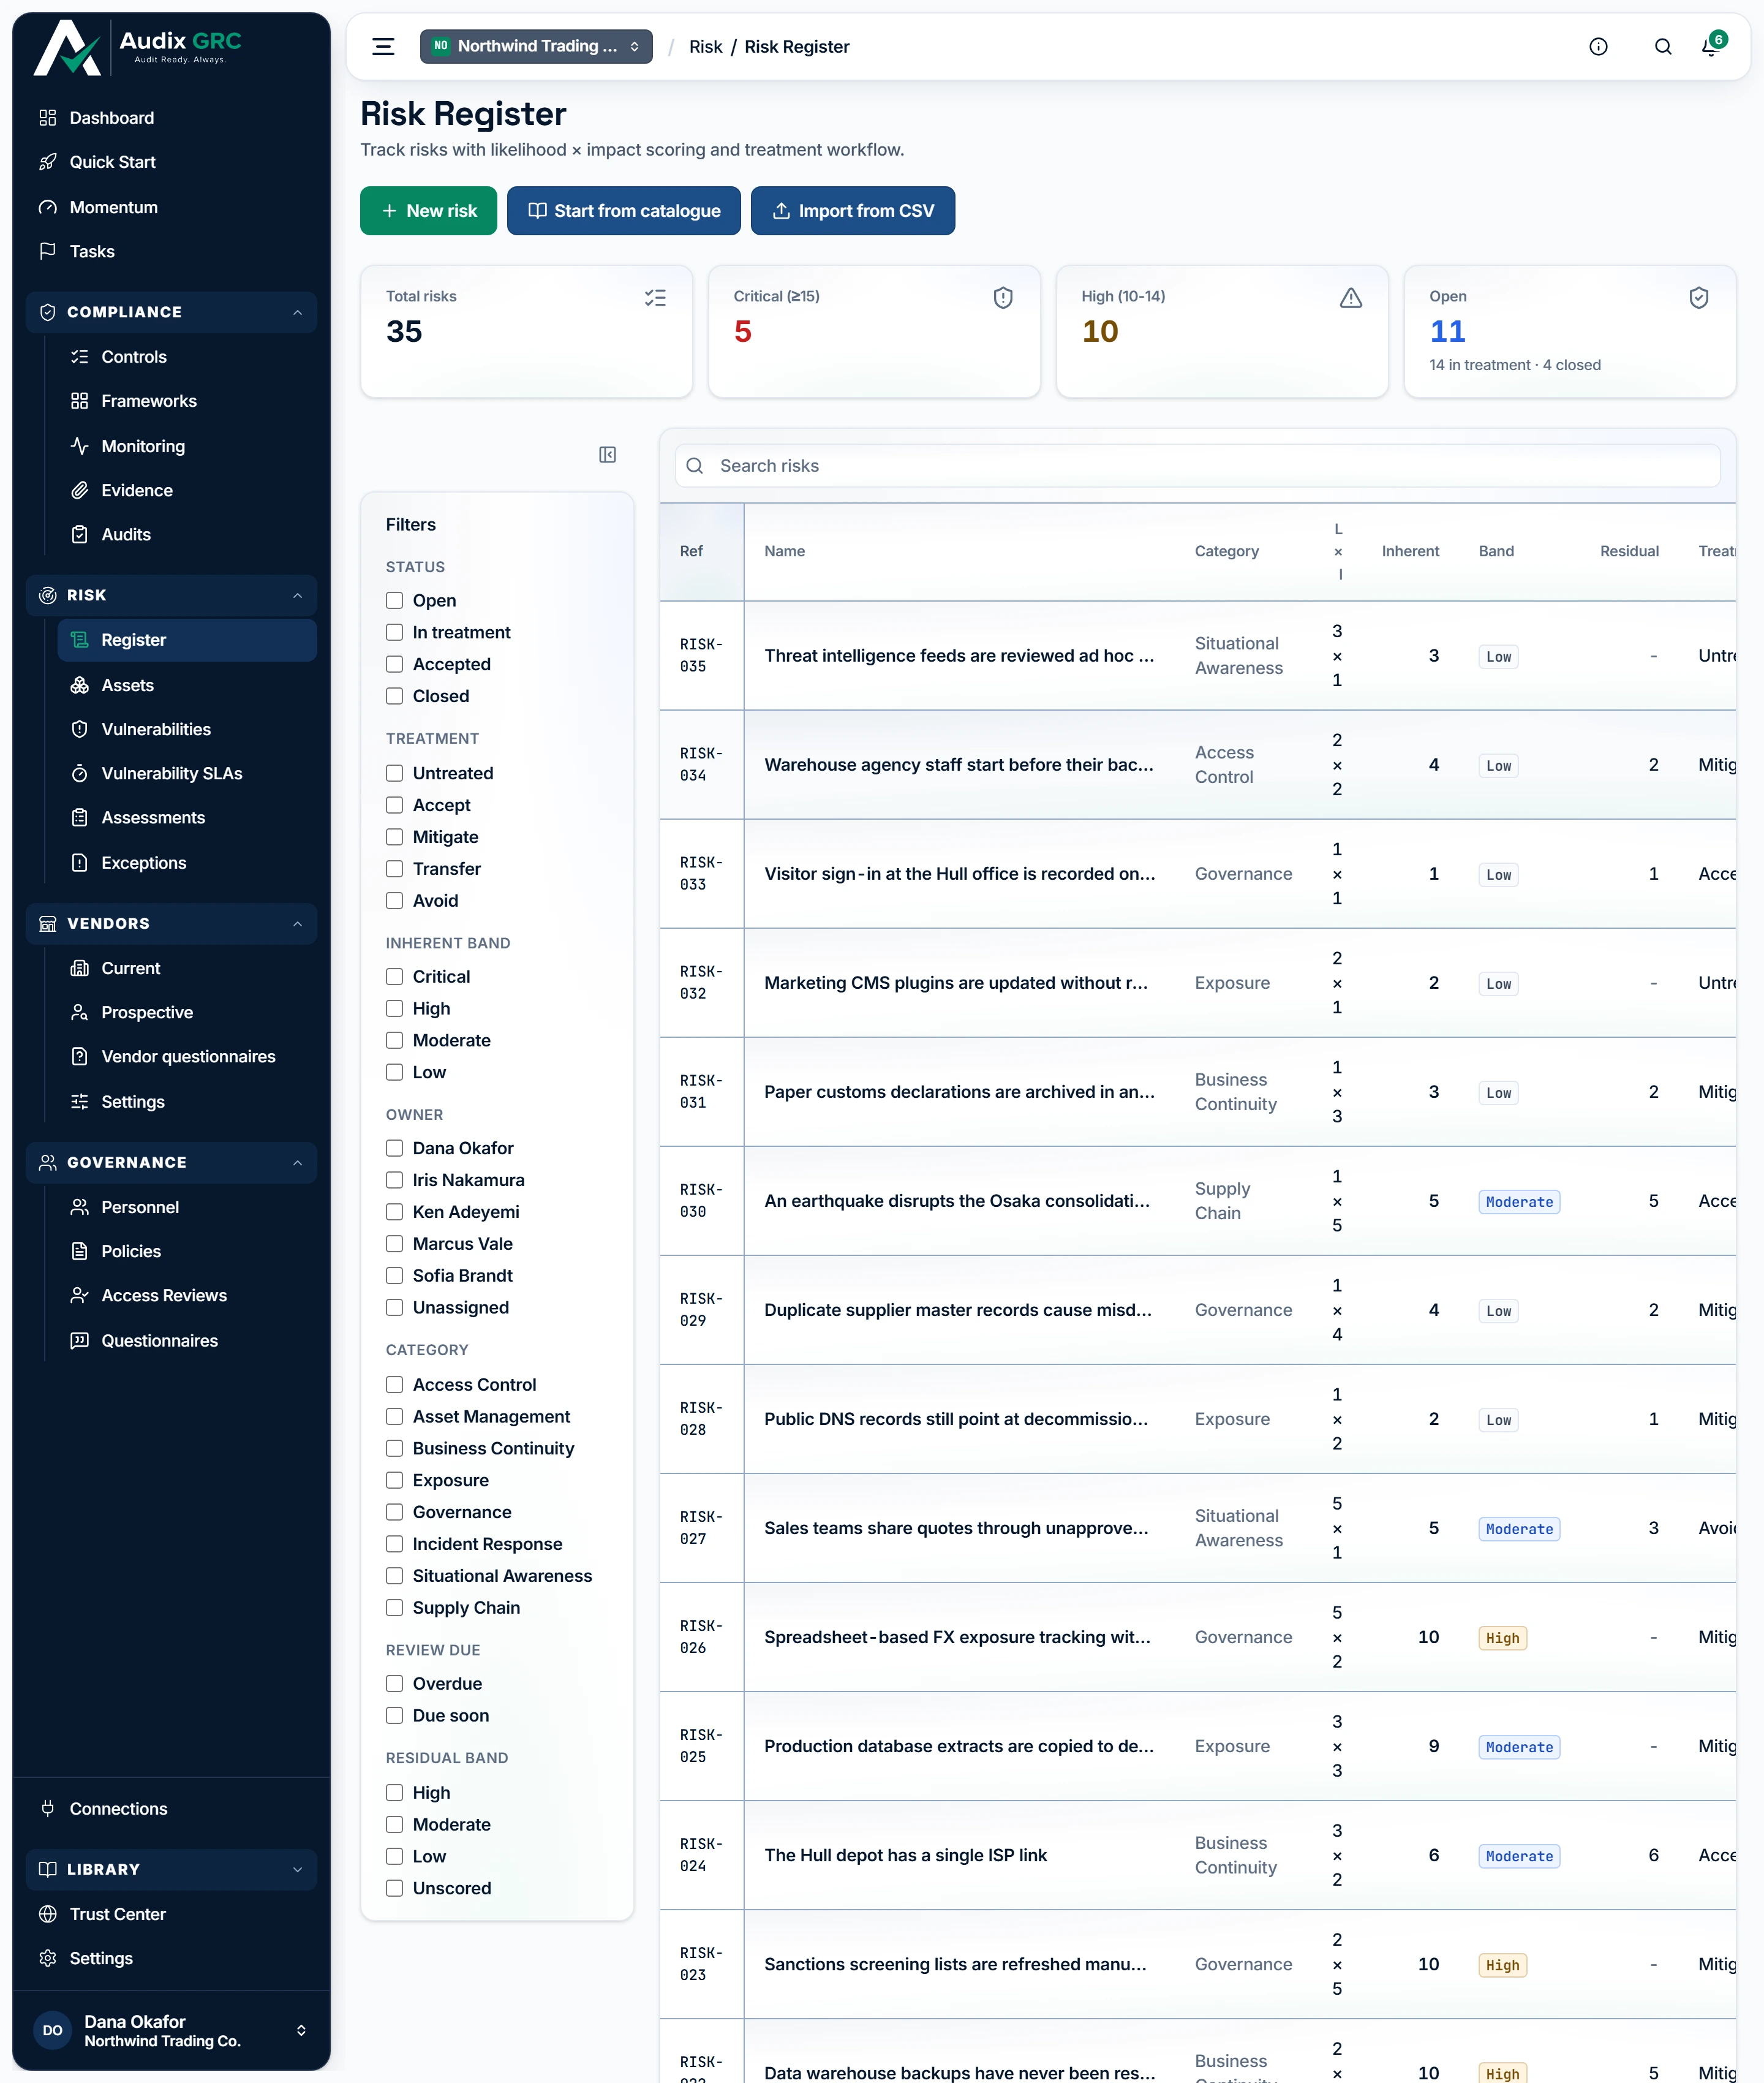
- Three ways to fill the register. Write a risk from scratch, adopt one from the catalogue Audix ships, or import the spreadsheet your organisation already keeps.
- One scored row per risk. Likelihood multiplied by impact gives the inherent score, and the score decides the band: Critical at 15 or more, High from 10 to 14, Moderate from 5 to 9, Low below that.
Tiles for Total risks, Critical (≥15), High (10-14) and Open, and a filterable table of risks. New risk shows for admins only.
Risk detail
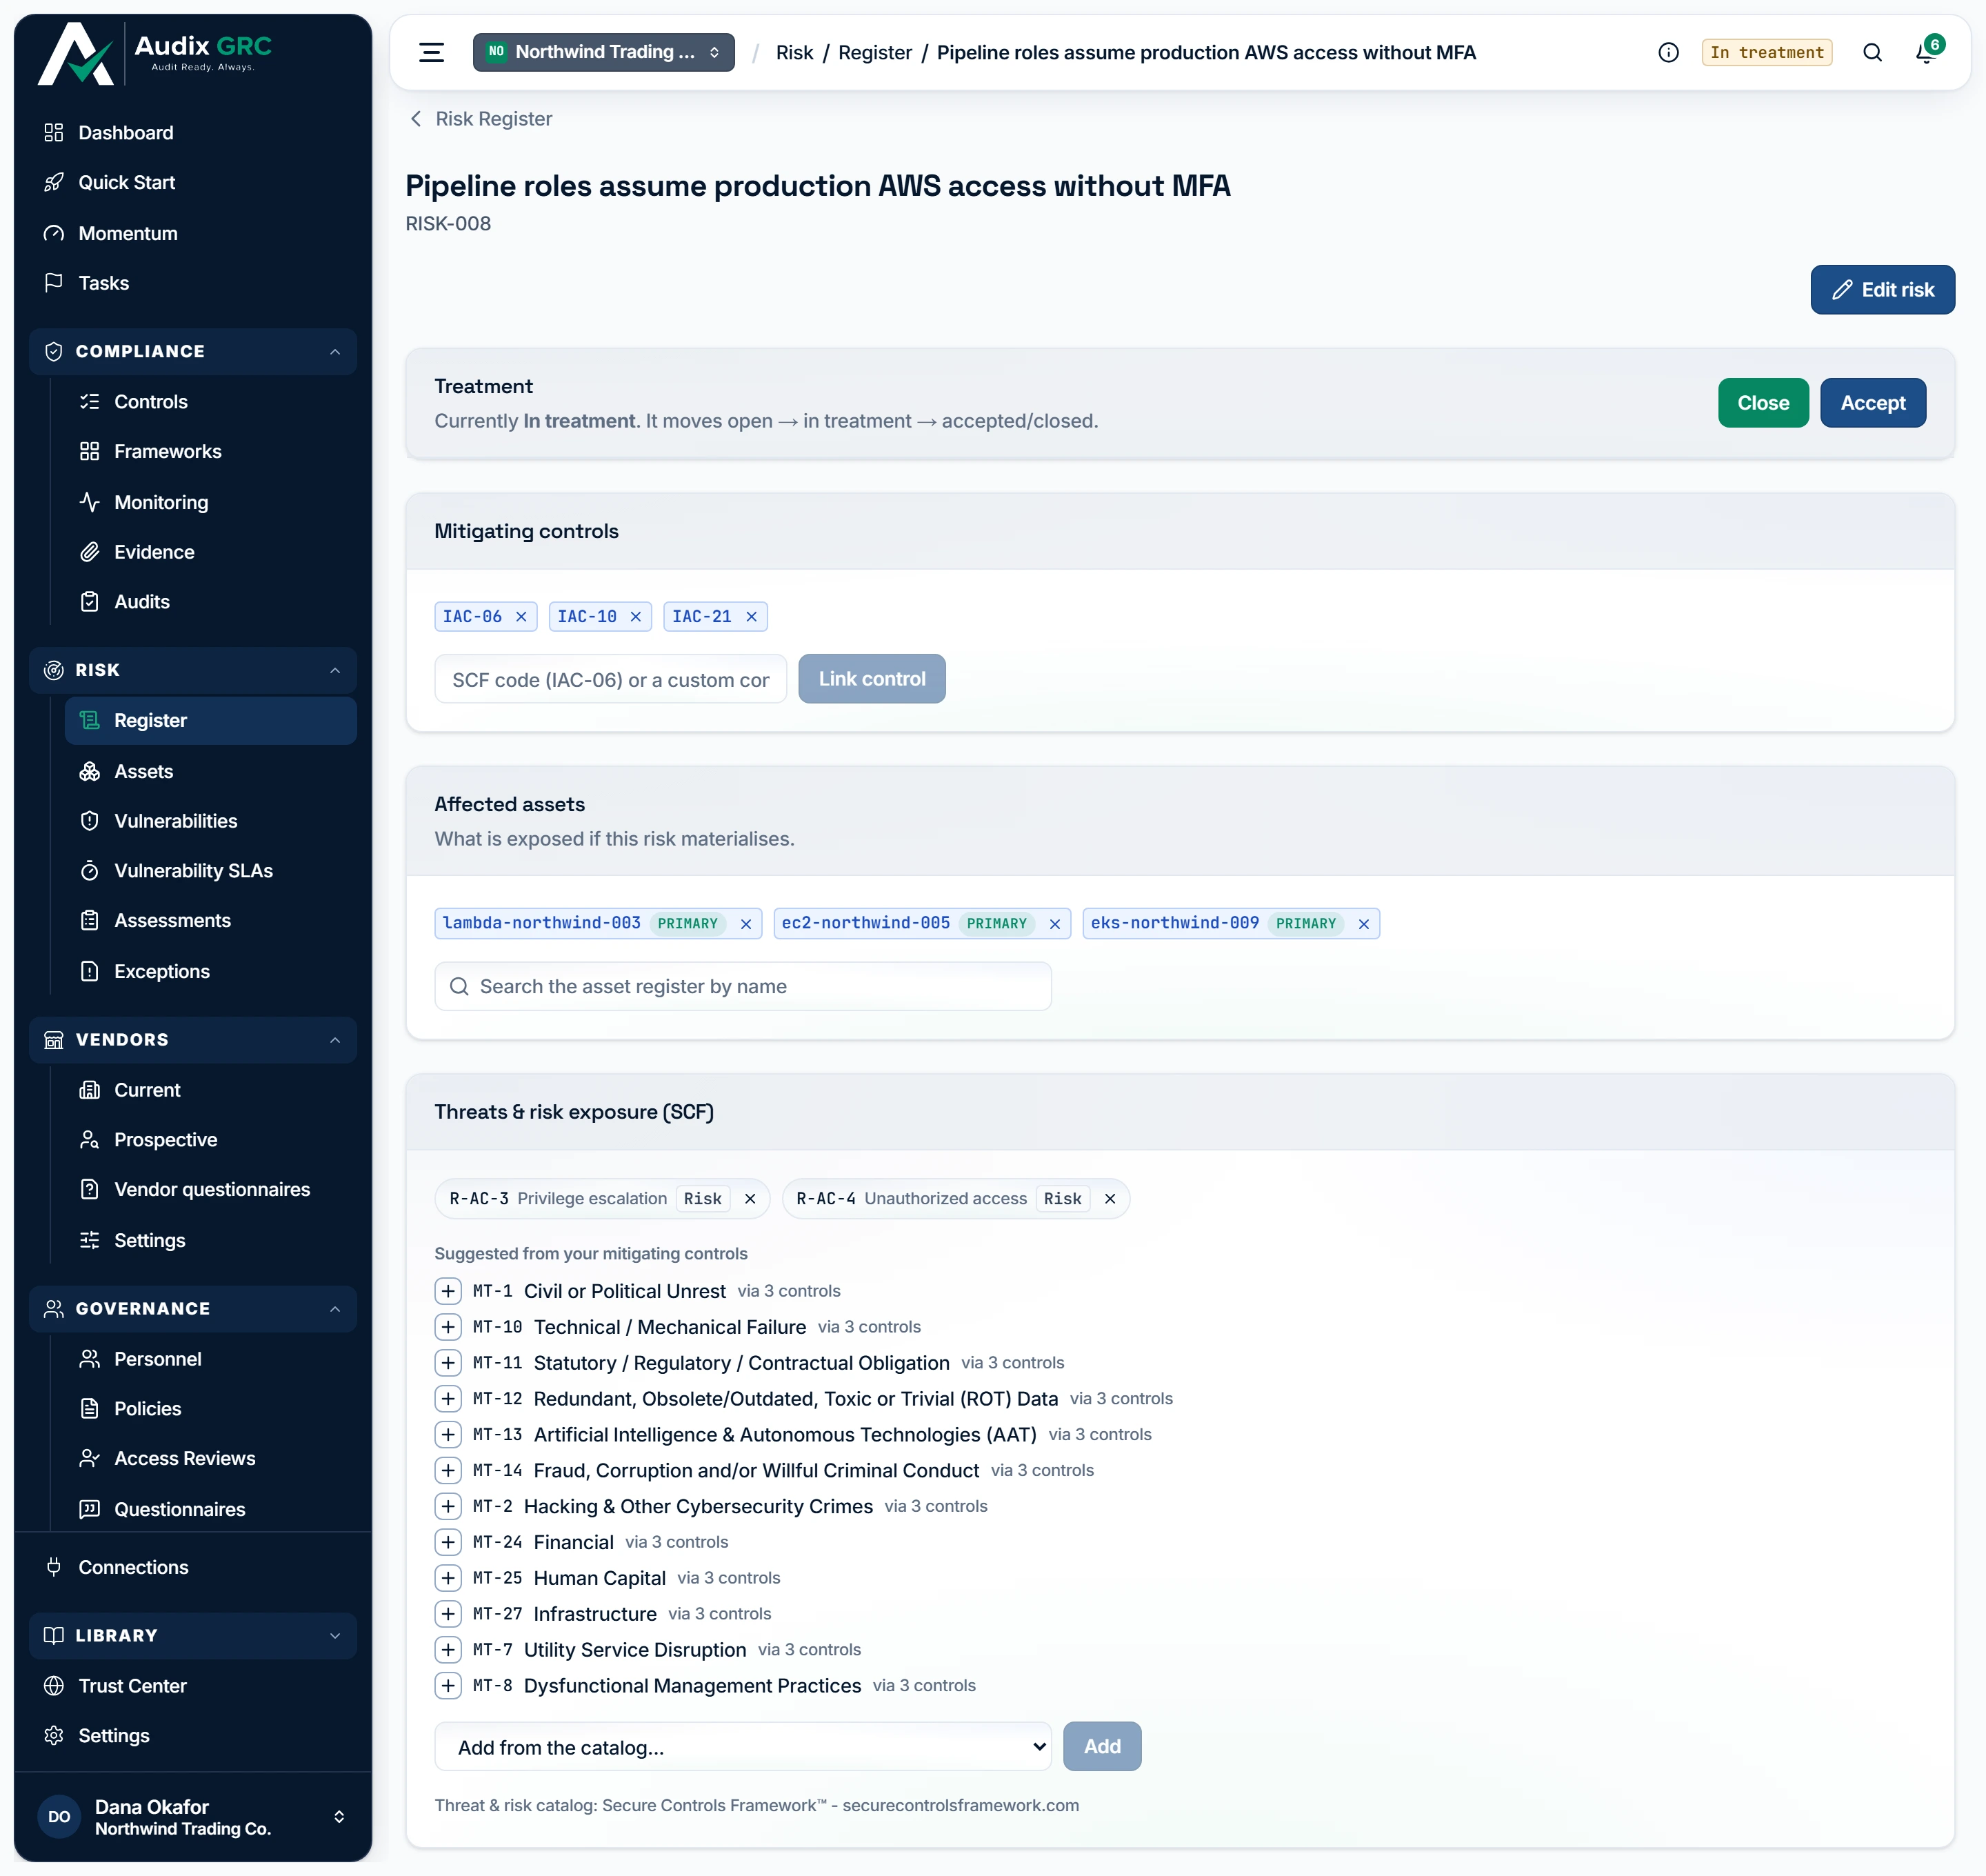
The four statuses, and the only moves between them
Status, the Treatment card, Mitigating controls, Threats & risk exposure (SCF), Inherent risk, Residual risk and the record. Buttons show for admins only.
Assets
Tiles for Total assets, Primary, Support and Discovered, and a table with the source and account each asset came from.
Vulnerabilities
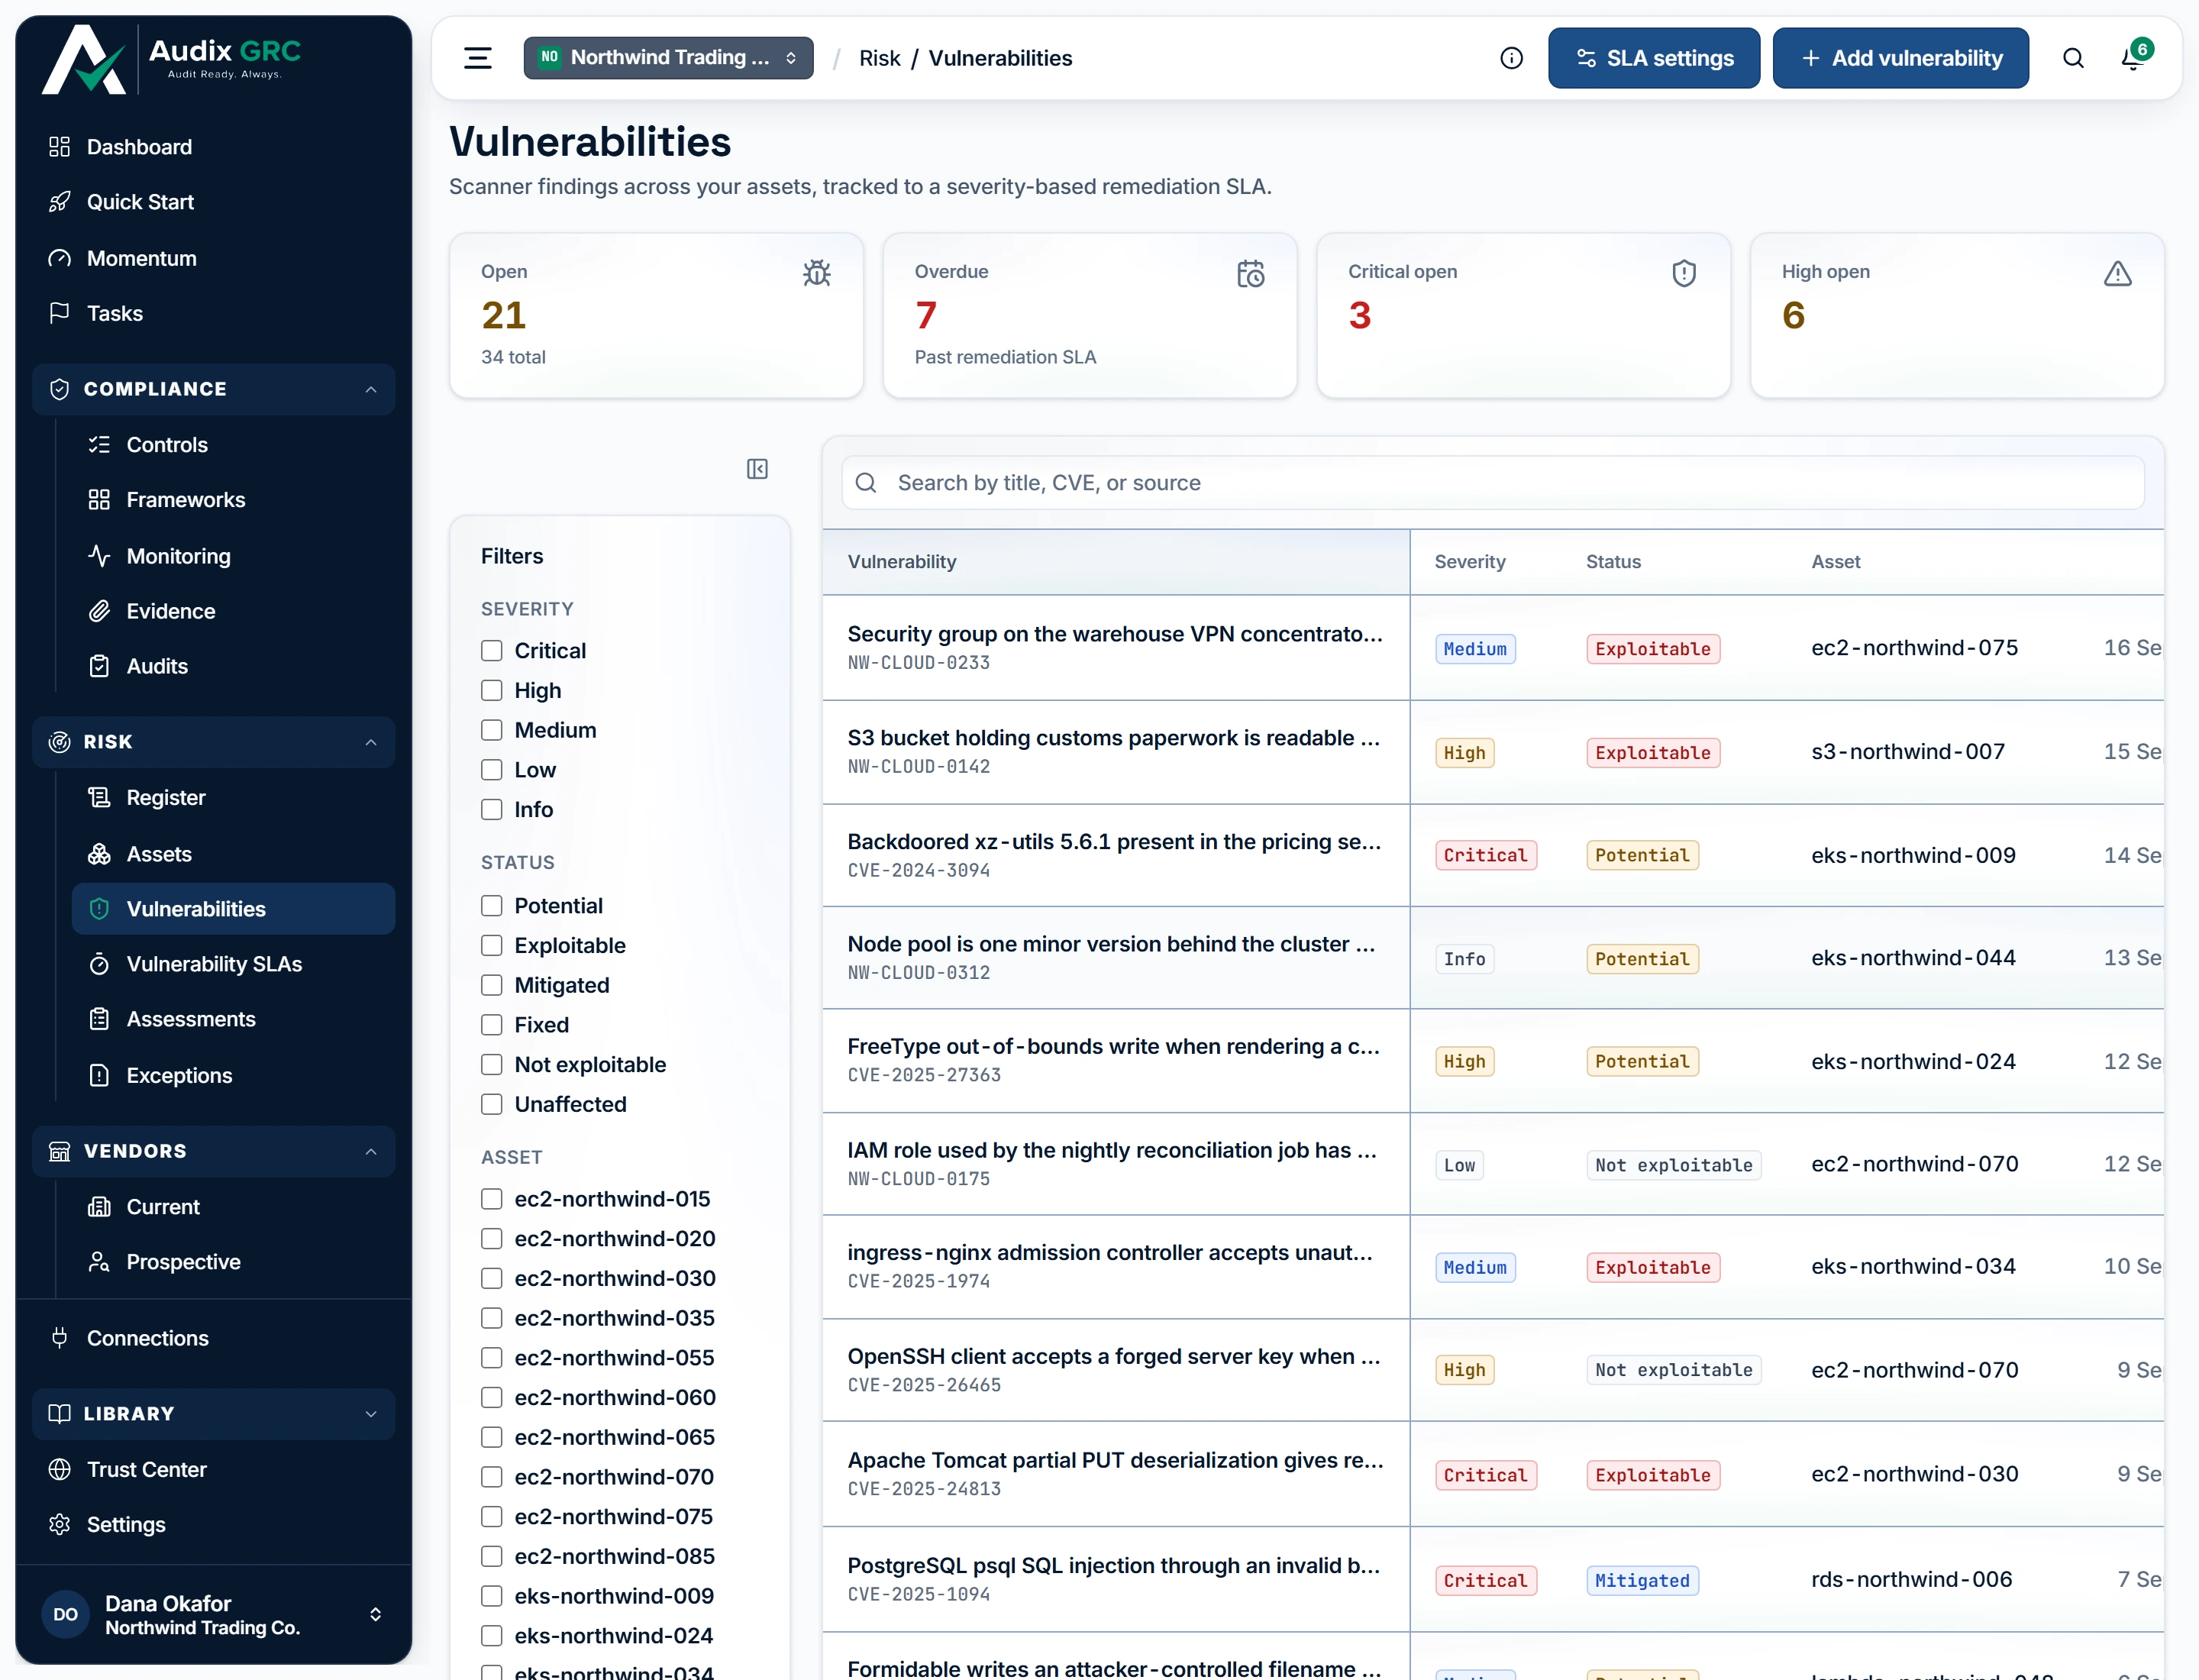
- The deadline policy behind the dates. How many days each severity band is allowed, and whether the clock starts from the detection date or the publication date.
- Open work, and how much of it is late. Only findings that are still potential or exploitable count as open, and Overdue counts the ones whose remediation deadline has already passed.
Tiles for Open, Overdue, Critical open and High open, and a table of findings with their due dates.
Vulnerability SLAs
Days allowed per severity band and which date the clock starts from.
Risk Analysis
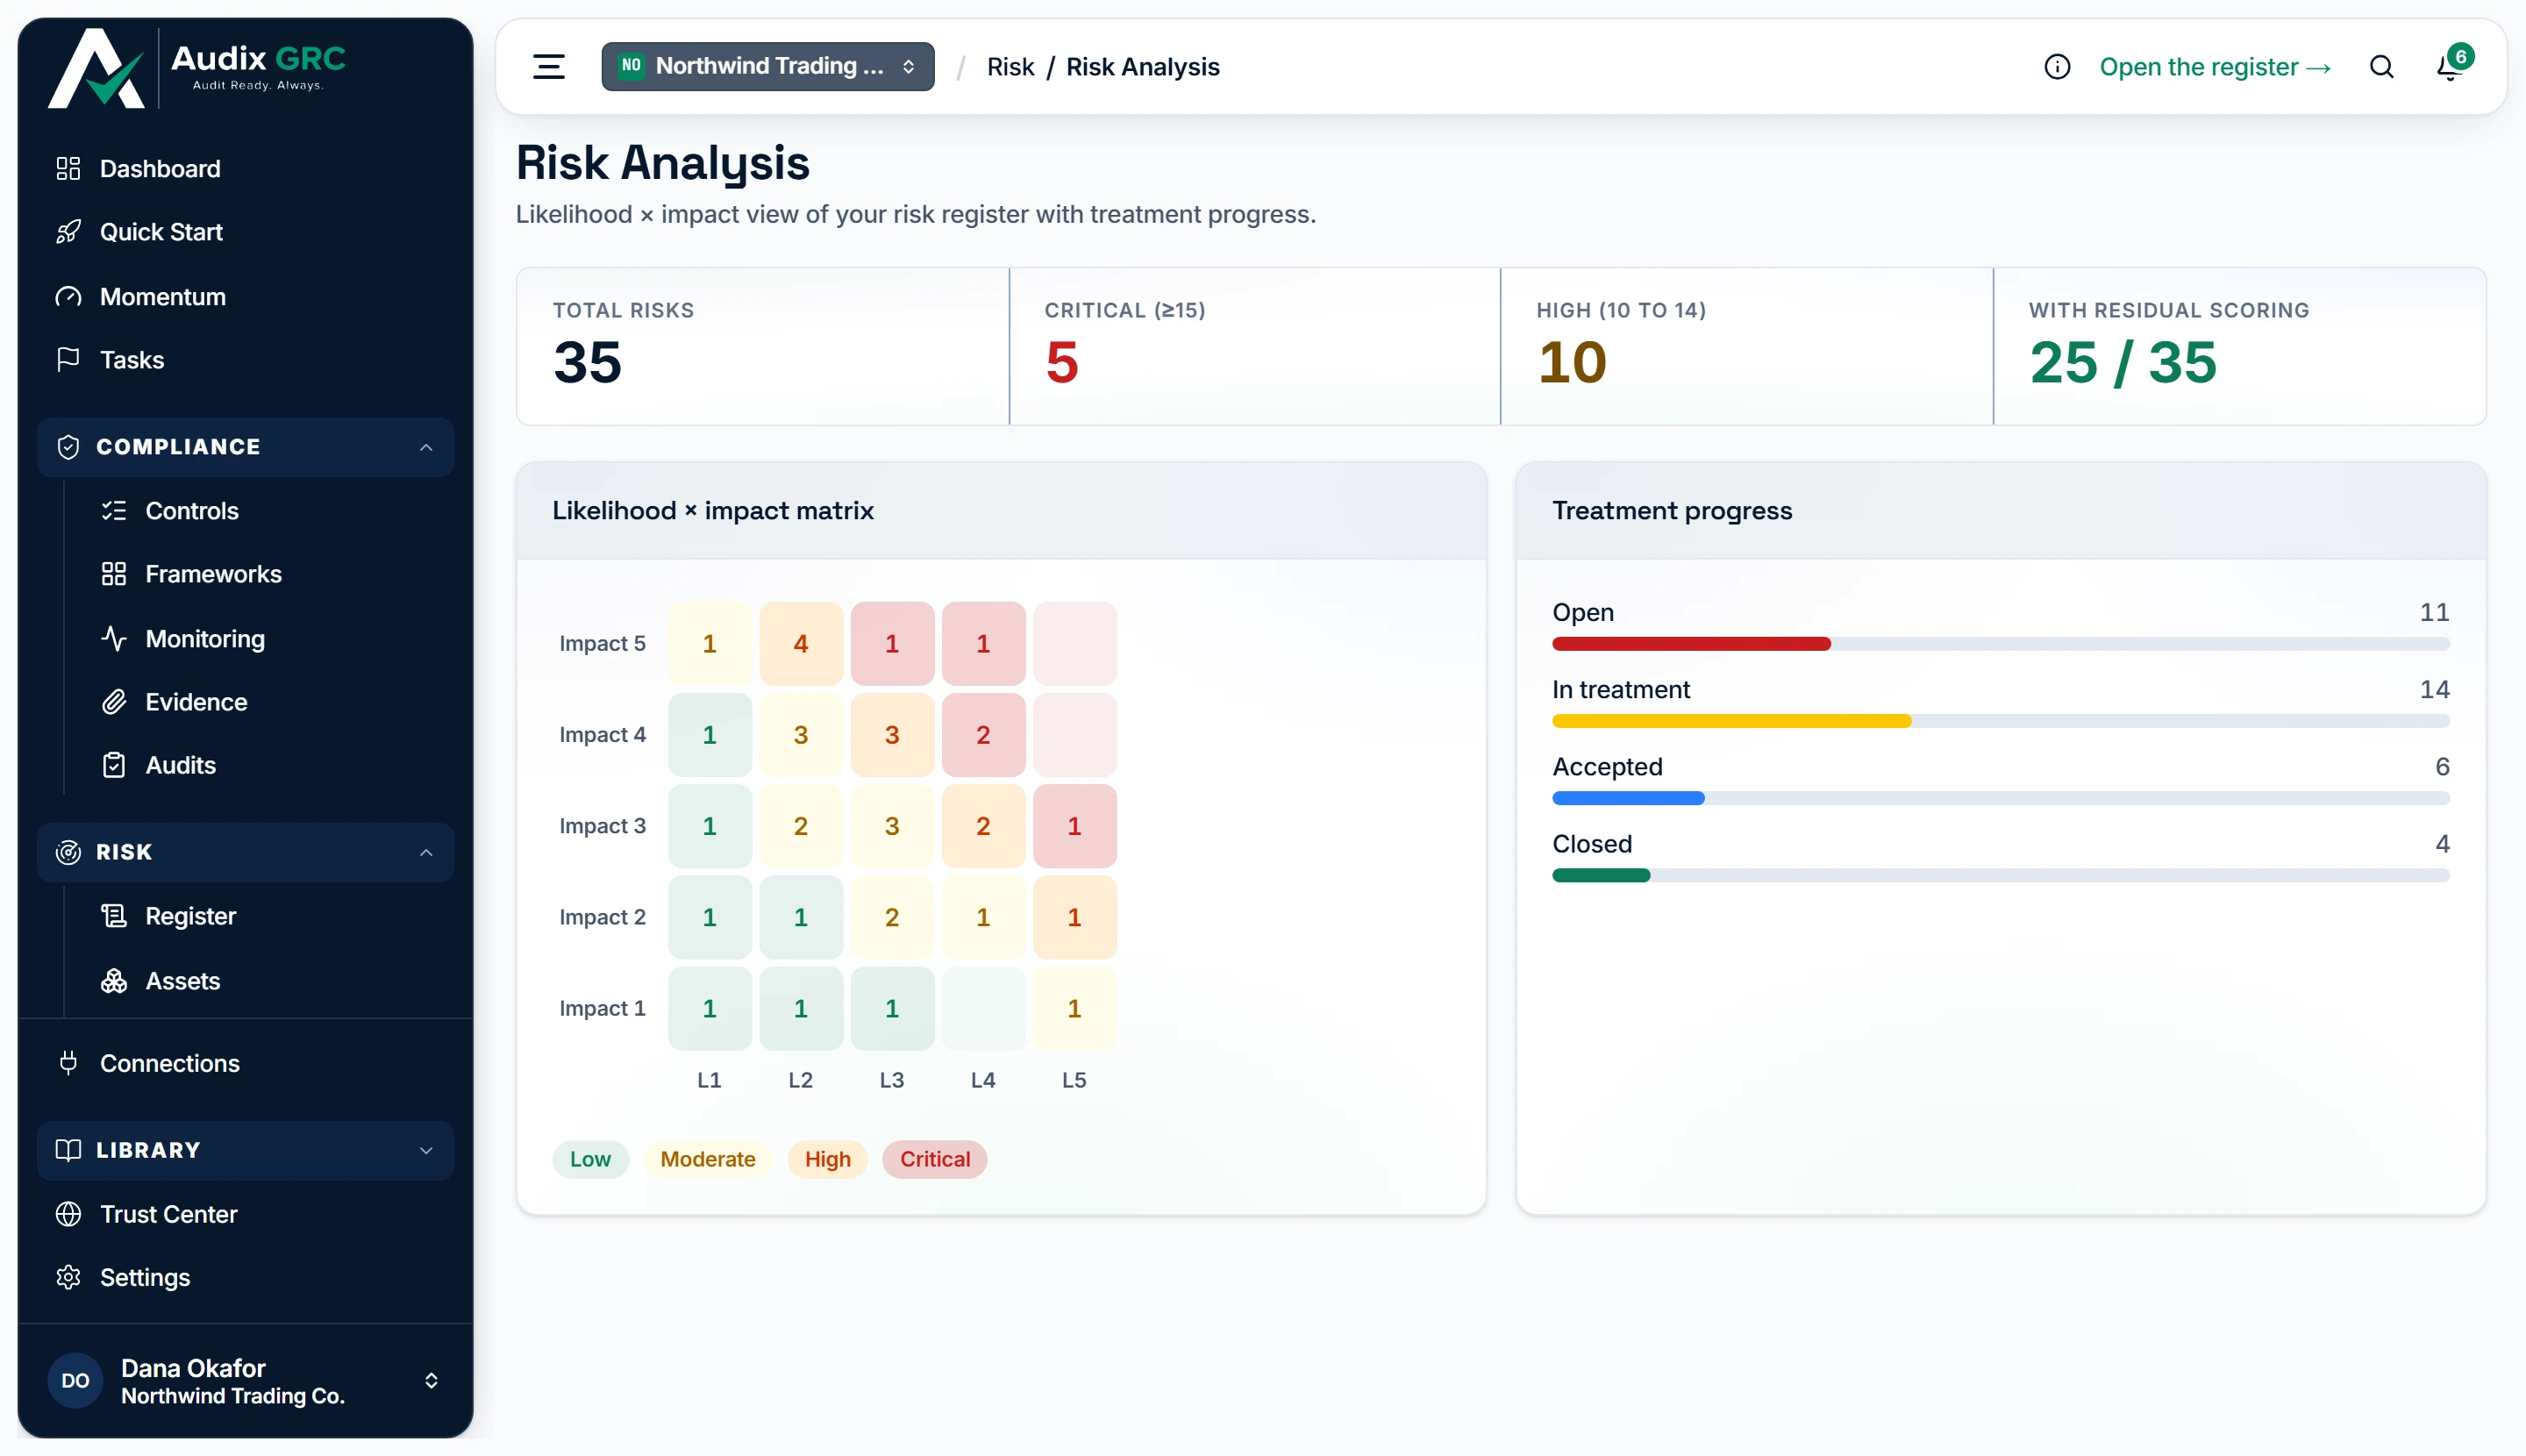
- How much of the register is scored twice. Residual scoring is optional, so this says how much of the register has been re-scored after its controls were taken into account.
- Where the register clusters. Each cell counts the risks at that likelihood and impact, so a heavy top-right corner is visible before anyone reads a single row.
- How far treatment has actually got. One bar per status, so a register full of risks nobody has started on cannot look the same as one being worked.
A five by five likelihood and impact heatmap of the register, plus a treatment progress bar.
Exceptions
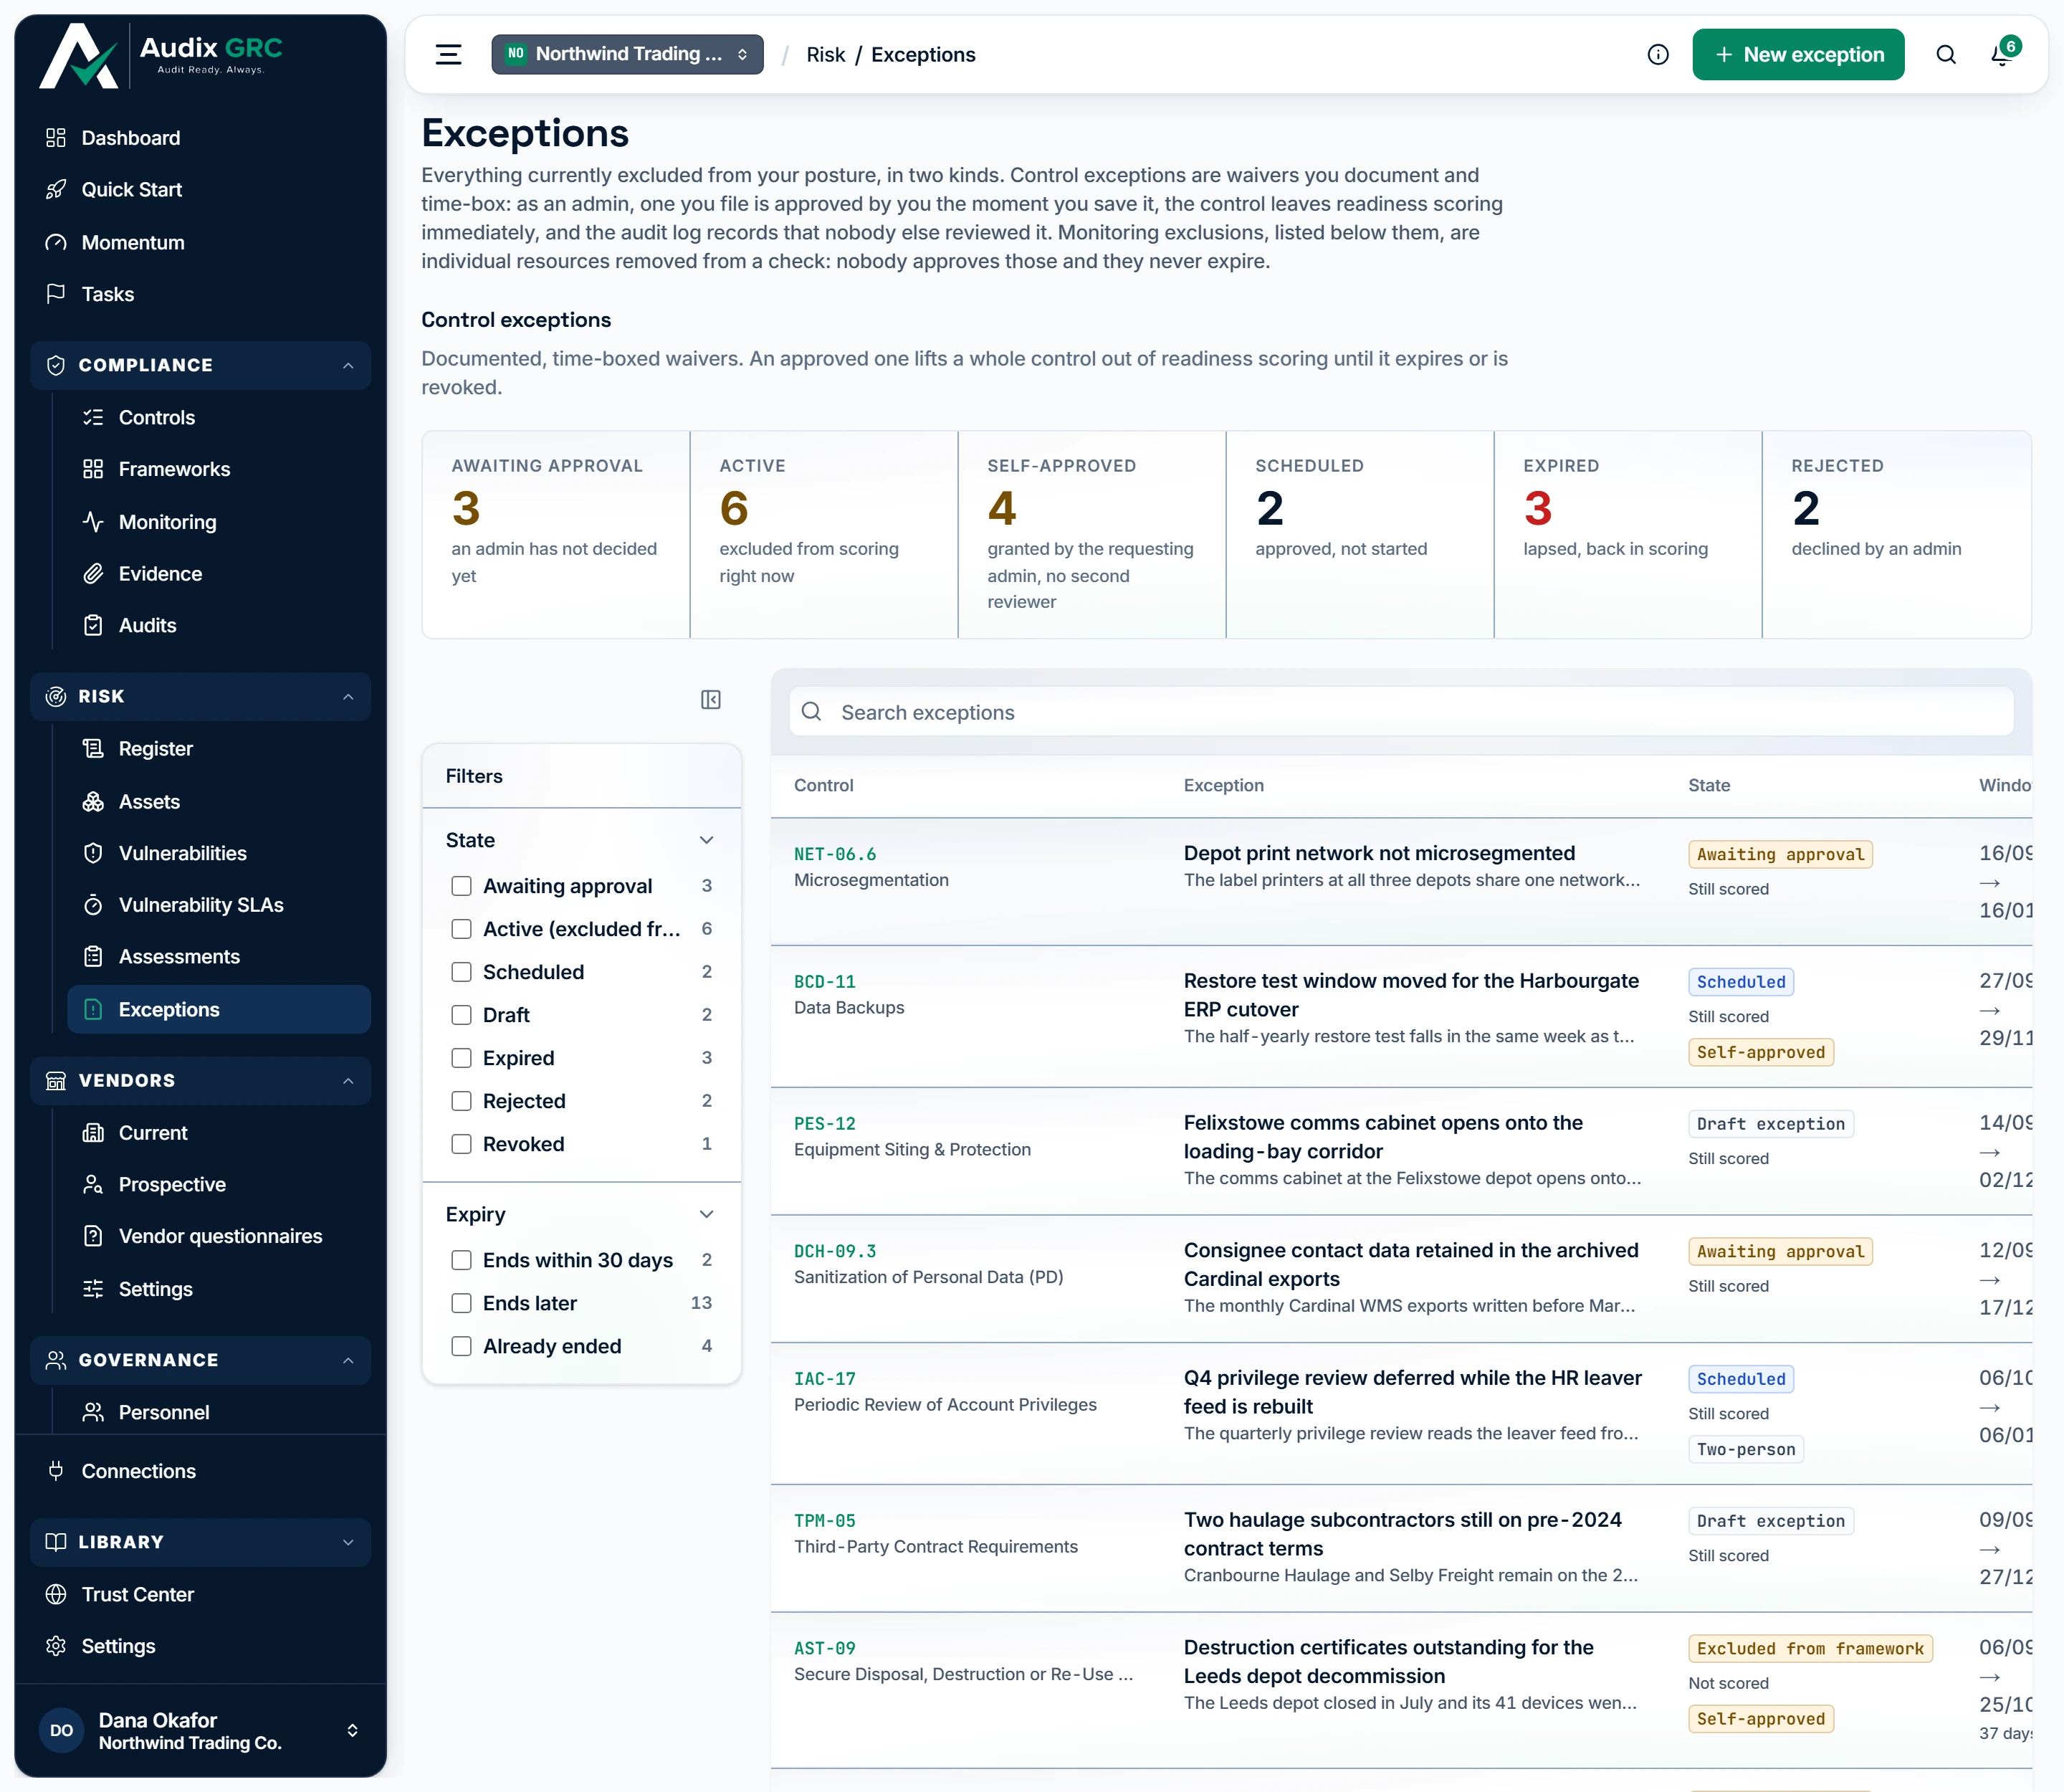
- Waivers here, exclusions below. A waiver is requested, approved by an admin and expires on a date; a monitoring exclusion, in the second table further down this page, is written by one admin, reviewed by nobody and never expires.
- Six readings of the same queue. Awaiting approval is work waiting on an admin, Active is what has left readiness scoring right now, and Self-approved counts the waivers an admin granted themselves with no second reviewer.
How a waiver reaches the readiness score
Control exceptions with their state, window and actions, and a separate read-only table of monitoring exclusions.
What you can do
Keep a register of what could go wrongLive
A numbered list of risks, each scored, owned and given a treatment decision, so you can show an auditor you know your own risks.
As a member
- Open Register under Risk. The page is titled Risk Register.
- Read the four tiles: Total risks, Critical (≥15), High (10-14) and Open.
- Filter by Status, Treatment and Inherent band. Owner, Category, Review due and Residual band appear once the register holds more than one value.
- Click a row to open the risk. Every card is visible. No buttons are offered.
As an admin
- Click New risk. Step 1, Identify, takes a Reference ID such as
RISK-001, a Category, a Name and a Description. - Click Continue. Step 2, Score, takes Likelihood and Impact, both whole numbers from 1 to 5, and optional Residual likelihood and Residual impact.
- Click Continue. Step 3, Treat, takes Treatment, Status, Owner and Next review date.
- Click Add risk. The platform multiplies likelihood by impact to get the inherent score.
- To change a risk later, open it and use the edit form. Clearing an input clears the field, and both scores are worked out again on every save.
Rules that apply
- Inherent score is likelihood times impact. The bands are fixed: Critical at 15 or more, High 10 to 14, Moderate 5 to 9, Low below 5.
- Set both residual likelihood and residual impact, or leave both blank. One on its own is refused with "Set both residual likelihood and impact, or leave both blank".
- A next review date in the past turns red and reads overdue, on the table and on the detail page.
- Reference IDs are free text up to 64 characters and are not checked. Two risks can both be
RISK-001. - The register loads the 500 newest risks and does not say so on screen.
Move a risk through treatmentLive
Walk a risk through a small enforced set of statuses so its status cannot drift out of step with its treatment strategy.
As a member
- Open a risk. The Treatment card names the current status in words. No buttons are offered.
As an admin
- Open a risk. The Treatment card reads "Currently Open. It moves open to in treatment to accepted or closed."
- Click one of the buttons offered for the current status. From Open: Start treatment or Accept. From In treatment: Close or Accept. From Accepted: Close or Reopen. From Closed: Reopen.
- The page reloads and the status pill changes.
Rules that apply
- Any move that is not on the list is refused with "Cannot {action} a risk that is '{status}'".
- Accepting a risk also sets its treatment to Accept. Starting treatment on an Untreated risk sets its treatment to Mitigate.
- Every transition is written to the audit log.
- The status counts on the register and the Treatment progress bars on Risk Analysis both come from this.
Link the controls that reduce a riskLive
Record which compliance controls mitigate a risk, so the control library and the risk register point at each other.
As a member
- Open a risk and read Mitigating controls.
- Click a chip to open that control. There is no add or remove.
As an admin
- Under Mitigating controls, type an SCF code such as
IAC-06, or one of your own custom control codes, into the box labelled "SCF code (IAC-06) or a custom control code". - Click Link control, or press Enter.
- The control appears as a chip. One of your own controls carries a Custom badge.
- Click the small x on a chip to unlink it.
Rules that apply
- A code your organisation cannot see is refused with "Unknown control '{ref}'". That includes a control belonging to another organisation.
- Linking the same control twice does nothing and reports no error.
- If the platform later retires a control from the catalogue, the link keeps showing its code and title rather than disappearing, so the risk does not read as unmitigated.
Tag a risk with SCF risks and threatsLive
Attach entries from the Secure Controls Framework risk and threat catalogue to a risk, with candidates suggested from the controls you already linked.
As a member
- Open a risk and scroll to Threats & risk exposure (SCF).
- Read the linked chips, each with a Risk or Threat pill, the suggestion list and the catalogue attribution line.
- No plus buttons and no dropdown are offered.
As an admin
- Under "Suggested from your mitigating controls", each suggestion shows its code, its name and how many of your linked controls carry it.
- Click the plus beside a suggestion to link it.
- Or pick an entry from the "Add from the catalog..." dropdown, which is grouped by SCF grouping, and click Add.
- Click the x on a chip to unlink it.
Rules that apply
- Codes are trimmed and upper-cased before lookup. An unknown one is refused with "Unknown SCF risk/threat code '{code}'. Expected e.g. MT-2, NT-4 or R-AC-1".
- Suggestions come from the control to threat crosswalk, exclude anything already linked, are ranked by how many of the risk's controls carry the code, and stop at 12.
- With no controls linked the panel reads "Link mitigating controls and suggestions appear here."
- Only the code is stored. The name is read from the current SCF release, so a new catalogue release relabels links you already made.
Read the whole register as a heatmapLive
See where your risks cluster on a likelihood by impact grid and how far treatment has got.
As a member
- Open Assessments in the sidebar. The page is titled Risk Analysis.
- Read four tiles: Total risks, Critical (≥15), High (10 to 14), and "With residual scoring" as a fraction of the total.
- Read the Likelihood × impact matrix: a five by five grid with impact down the side and likelihood across the bottom, each cell coloured by band and counting the risks that sit there.
- Read Treatment progress: one bar each for Open, In treatment, Accepted and Closed.
- Click "Open the register" to go back to the register.
Rules that apply
- This screen offers no writes to anyone, admin included.
- With no risks it shows "No risks yet" and a link back to the register.
- Everything on it is worked out from the risk rows. Nothing is stored here.
Keep an inventory of what you ownLive
The list of systems, data stores and services your risks and vulnerabilities point at.
As a member
- Open Assets under Risk. The header reads, for example, "42 assets · 30 discovered from 2 connections".
- Filter by Type and Source. Class, Resource kind, Account, Owner and Owner status appear when there is more than one value.
- Search by name, class or account.
- No buttons are offered.
As an admin
- Click Add asset.
- Fill in Name, Type (Primary or Support), Class, Resource kind, Account, Owner and Owner status.
- Set the three security objectives, confidentiality, integrity and availability, each from 0 to 4.
- Click Add asset. It is saved with a source of manual, and a sync never touches it.
Rules that apply
- Security objective values outside 0 to 4 are pulled back into range when the asset is saved.
- Once an asset is saved it cannot be edited or removed from any screen. The owner, class and ratings you set are final in the product.
- The page loads the first 100 assets. "Total assets" reports the true figure, while Primary, Support and Discovered count only the rows that loaded.
Discover assets from your connected accountsLive
Turn the resources already collected from your cloud accounts into inventory rows, without typing them in.
As a member
- Not available. Only an admin can run a sync. The Source and Account columns tell you which connection an asset came from.
As an admin
- Open Assets and click Sync from connections.
- The button reads Syncing... while it runs.
- It finishes with "Synced N of M resources." and the new rows appear with a discovered source.
Rules that apply
- A sync can be run as often as you like. Each cloud resource maps to at most one asset, so nothing is duplicated.
- An asset already in the inventory has its name and account refreshed. The owner, class and security objectives a person set are left alone.
- Assets you typed in by hand are never touched by a sync.
- Scanner findings and cloud issues are skipped, so the inventory does not fill up with one row per CVE.
- The same button also ingests vulnerability findings as its second step, but the message it prints counts assets only.
Record vulnerabilities against your assetsPartial
Track scanner findings and CVEs, each with a remediation deadline, so overdue work is visible.
As a member
- Open Vulnerabilities under Risk.
- Read the tiles: Open, Overdue ("Past remediation SLA"), Critical open and High open.
- Filter by Severity, Status, Asset and Source. An SLA filter (Overdue or Within SLA) appears when both kinds are present.
- Search by title, CVE or source.
- SLA settings opens the policy page, which you can read but not change.
As an admin
- Click Add vulnerability.
- Fill in Title, CVE / external ID, Source, Severity, Status, "Affected asset (optional)", Detected, Published, "Due (auto if blank)" and "Remediation (optional)".
- Click Add vulnerability. Leave Due blank and the platform works it out from your SLA policy.
Rules that apply
- Status is a free choice, not a sequence. Nothing stops any status following any other.
- Only Potential and Exploitable count as open, in the tiles and in the overdue count.
- A due date you type in always wins. A blank one becomes the anchor date plus the SLA days for that severity, and stays empty if that band is set to 0 days.
- On a later change, the due date is worked out again only when the severity changed and the due date is still empty.
- A finding cannot be edited, closed or deleted from any screen. One recorded as Potential stays Potential in the product.
- The page loads the first 100 findings. The row count in the header is the true total, but the four tiles count only the rows that loaded.
Set how long a fix hasLive
Decide how many days each severity band gets before a finding is flagged overdue, and which date the clock starts from.
As a member
- Open Vulnerability SLAs in the sidebar, or SLA settings from the Vulnerabilities page.
- Read the day count for each band and the anchor.
- Every field is disabled. The page ends with "Only an admin can change the vulnerability SLA settings."
As an admin
- Edit the day count beside Critical, High, Medium, Low and Info. A band set to 0 means no due date for that severity.
- Under SLA anchor, pick whether to count from the Detection date or the Published date.
- Click Save SLA settings. The page confirms "SLA settings saved."
Rules that apply
- One policy per organisation. Until you save one, the platform uses Critical 15 days, High 30, Medium 60, Low 90, Info 0, counted from the detection date.
- Day counts are held between 0 and 3650.
- Changing the policy does not move deadlines that already exist. It only fills in a due date that is still empty.
Waive a control with a dated exceptionLive
Record and date a decision that a control will not be met, so the gap is written down rather than hidden. While the waiver is in force the control stops dragging your readiness score.
As a member
- Open Exceptions under Risk and click New exception, or open a control and click Request exception.
- An amber banner tells you where you stand: "An exception takes effect only once an admin approves it. You cannot approve your own request. Until then the control keeps counting toward every framework it maps into."
- Pick a Control, write a Reason, and add "Risk accepted" and "Compensating controls" if you have them.
- Set Starts, which defaults to today, and Ends, which is required and defaults to 90 days out.
- Leave "Send for approval now" ticked and click Create exception. The request lands in the queue as Awaiting approval. Untick it and the request is saved as a draft that changes nothing.
- On a draft you own, click Send for approval to put it in front of an admin.
- While it waits, the Actions column shows why. "Needs an admin" when your organisation has one eligible approver, otherwise "You requested this".
As an admin
- The same entry points, but the banner is red: "With the box at the bottom ticked, this takes effect the moment you save. You are an admin, so you approve it yourself: nobody else reviews it."
- The checkbox reads "Approve it now and stop scoring this control". On the single-control modal the confirm button reads Exclude from framework now.
- Save with the box ticked and the waiver is approved on the spot, with you recorded as both requester and approver, a fixed note saying no second approver reviewed it, and a score recompute queued if the window is already open.
- On a draft you own whose end date is still ahead, the button turns red and reads Approve and apply now. If the end date has passed it stays Send for approval, beside "End date has passed, extend it to approve".
Rules that apply
- You can only waive a control your organisation has adopted. Anything else is refused with "Control not found or not adopted by this tenant".
- An end date is required, must be in the future, and must be after the start date. The whole window is checked again on every edit.
- You can edit only your own draft. Once it is with an admin, editing is refused: "This request is already with an admin for review and can no longer be edited. Ask them to reject it and raise a new one."
- In an organisation with one admin, a member's request is not rejected. It sits pending and the row says so: "This exception must be approved by an admin, and this workspace has only one. Ask an admin to approve it, or invite one."
- Every approved row carries a Self-approved pill in amber, or a Two-person pill in neutral, worked out from whether the approver is the requester.
- The register shows the 300 newest rows, and the Self-approved tile says when its count covers only what was loaded.
Approve, reject or revoke an exceptionLive
Decide the requests in the queue, and end a waiver early when it is no longer wanted.
As a member
- Not available. You cannot approve any request, including your own. You can watch its state change on the register.
As an admin
- Open Exceptions and find a row in Awaiting approval.
- Type a decision note if you want one, then click Approve or Reject.
- On an approved waiver, click Revoke to end it now. The control re-enters scoring immediately.
- On any row that is not approved, click Delete.
Rules that apply
- Approving a waiver whose end date has already passed is refused with "This exception has already lapsed. Extend the end date before approving".
- Rejection is final. To try again, clone the exception and raise a new one.
- An approved waiver cannot be deleted, only revoked: "Revoke an approved exception instead of deleting it".
- An approved waiver reads as Scheduled before its start date, Active inside the window and Expired after the end date. That is worked out on every read, so a lapsed waiver can never keep suppressing a control.
- Every decision that changes whether the waiver is in force queues a score recompute, and the Controls, Frameworks, Tasks and Dashboard pages are refreshed.
See which monitoring exclusions are in forceLive
Show the other thing that suppresses your posture, next to the waivers: individual resources taken out of an automated check.
As a member
- Open Exceptions and scroll to Monitoring exclusions, below the waivers.
- Read the resource, the check, the controls that check feeds, the reason, who wrote it and when.
- Search the list, or click Download CSV.
- Nothing here can be created or removed from this page. Exclusions are written in Monitoring, on a check's Exclusions tab.
Rules that apply
- A waiver above is requested, approved by an admin and expires on a date. An exclusion is written by any admin in Monitoring, is reviewed by nobody, and never expires.
- Exclusions are not counted in the waiver tiles.
- If the list cannot be read the page shows a red alert, "The exclusion list could not be read", instead of an empty table. Nothing read and nothing excluded are different claims.