People and policies
Hold the roster of who works here, the written policies you stand behind, and the periodic sign-off on who still has access.
An auditor asks three questions about people. Who works here, and is each person's laptop encrypted and their training done? What policies have you written, who approved them, and who has read them? And who still has an account in your systems, with a named human signing off on each one? This area answers all three.
The roster comes from Okta, or you type people in. Nobody's compliance verdict is guessed. It is worked out from the device and training records your connectors collected, matched to the person by email address.
Policies start from a library of 23 templates or from a file you upload, then move from draft to published with a frozen snapshot at each publish. Access reviews take a copy of every account your connectors found, and an admin certifies or revokes them one row at a time.
Who uses this
Admin
Can add and edit people, run the roster sync and the compliance recompute, match devices to people, write and publish policies, record acknowledgements on behalf of staff, and run access review campaigns
Cannot delete a person or delete a campaign. Neither has a button anywhere
Member
Can open every screen here, read every policy and its document, download the branded PDF, filter the roster and read every access review decision
Cannot change anything. Some buttons are still shown to you and the server answers with a permission error
Approver
Can everything a member can
Cannot anything extra. Policy approval is an admin action, not an approver one
Auditor
Can read the roster, every policy, the acknowledgement table, the version snapshots and every access review decision. That is the point of the role
Cannot write anything. Every change is refused at the door regardless of what the screen shows
Outside party: nobody
Can nothing. There is no vendor, no public page, no magic link and no email anywhere in this area
Cannot sign in. Staff never log in to accept a policy. An admin records the acknowledgement for them
The screens
Personnel
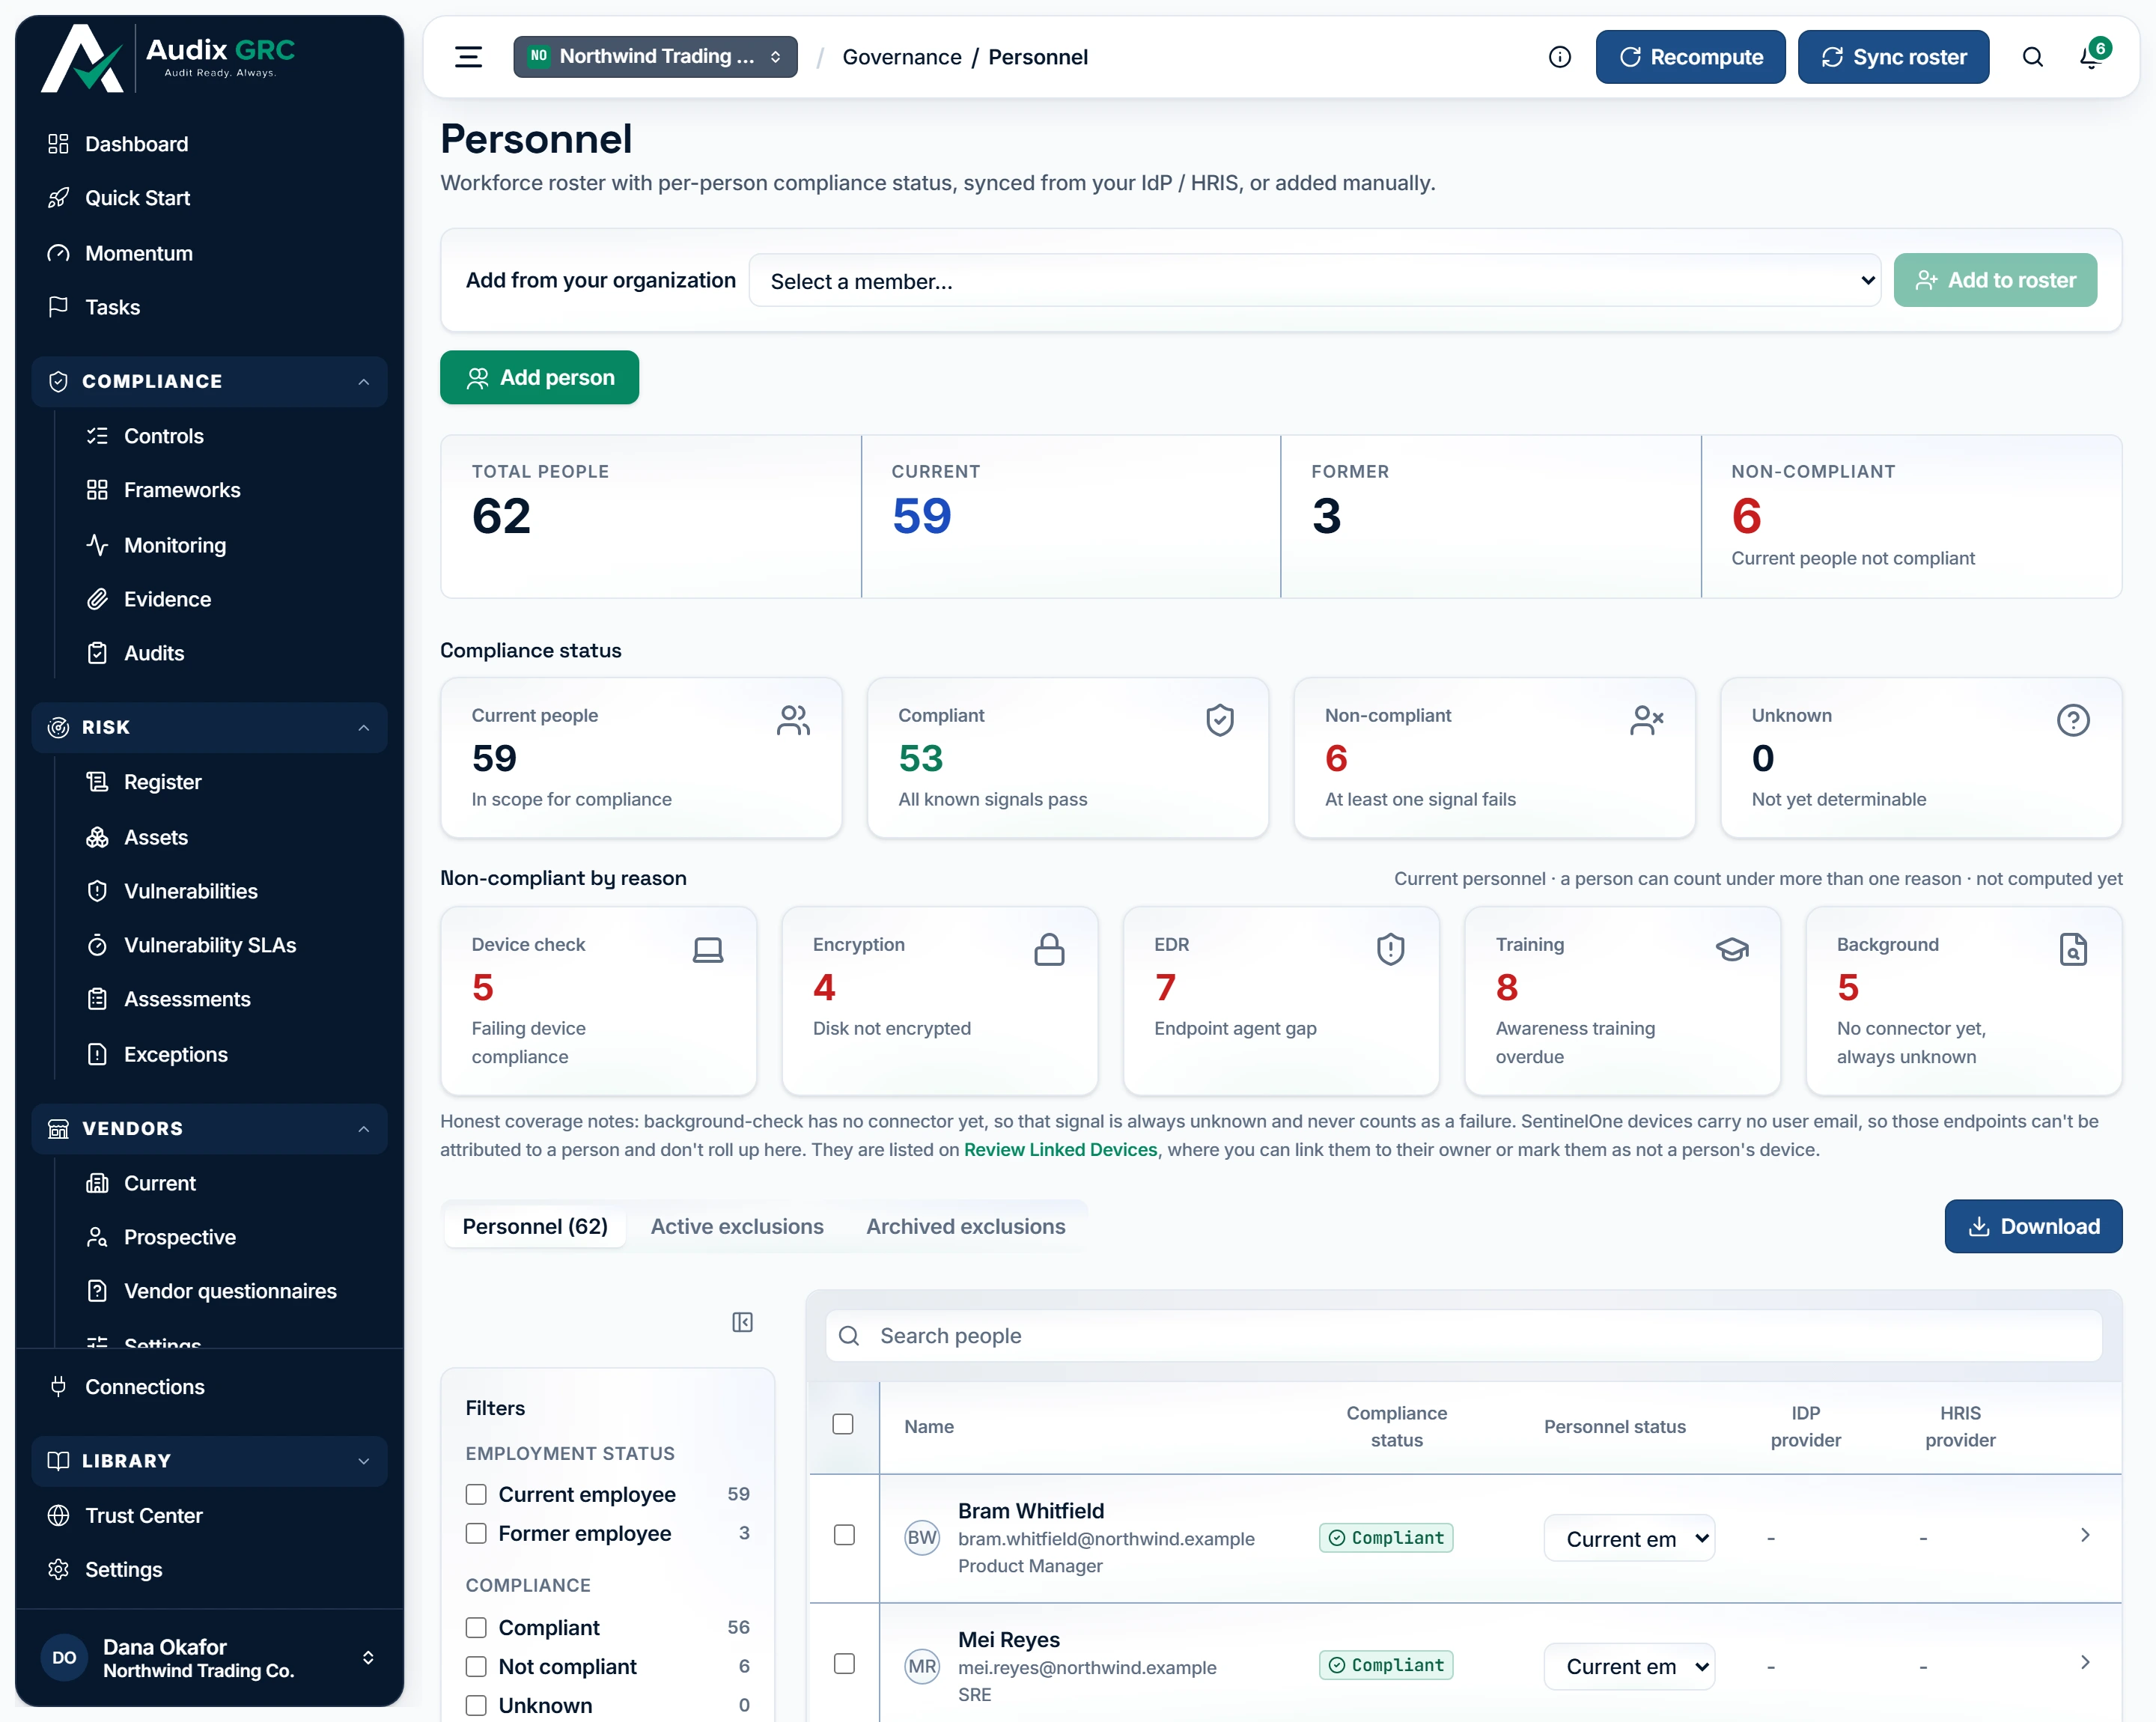
- Pull the roster from Okta. People are matched by email address and a sync never deletes anybody, so somebody dropped from Okta stays on the roster rather than vanishing from the record.
- Who is being measured. Only current people count towards compliance, so a leaver's old laptop is not treated as a live gap.
- Why anyone is failing. Each tile is one reason a person is not compliant — an unencrypted disk, a missing endpoint agent, overdue training — worked out from what your connectors collected rather than guessed.
Where a person's compliance verdict comes from
Headcount tiles, the compliance rollup, the Non-compliant by reason tiles and the filterable roster.
Person detail
Name, email, job title, employment status, compliance status, start date, IdP and HRIS provider, and a Groups card. Admins also get Edit details.
Review Linked Devices
Every collected device next to the person it belongs to, and the unmatched ones with the reason they are unmatched.
Policy Center
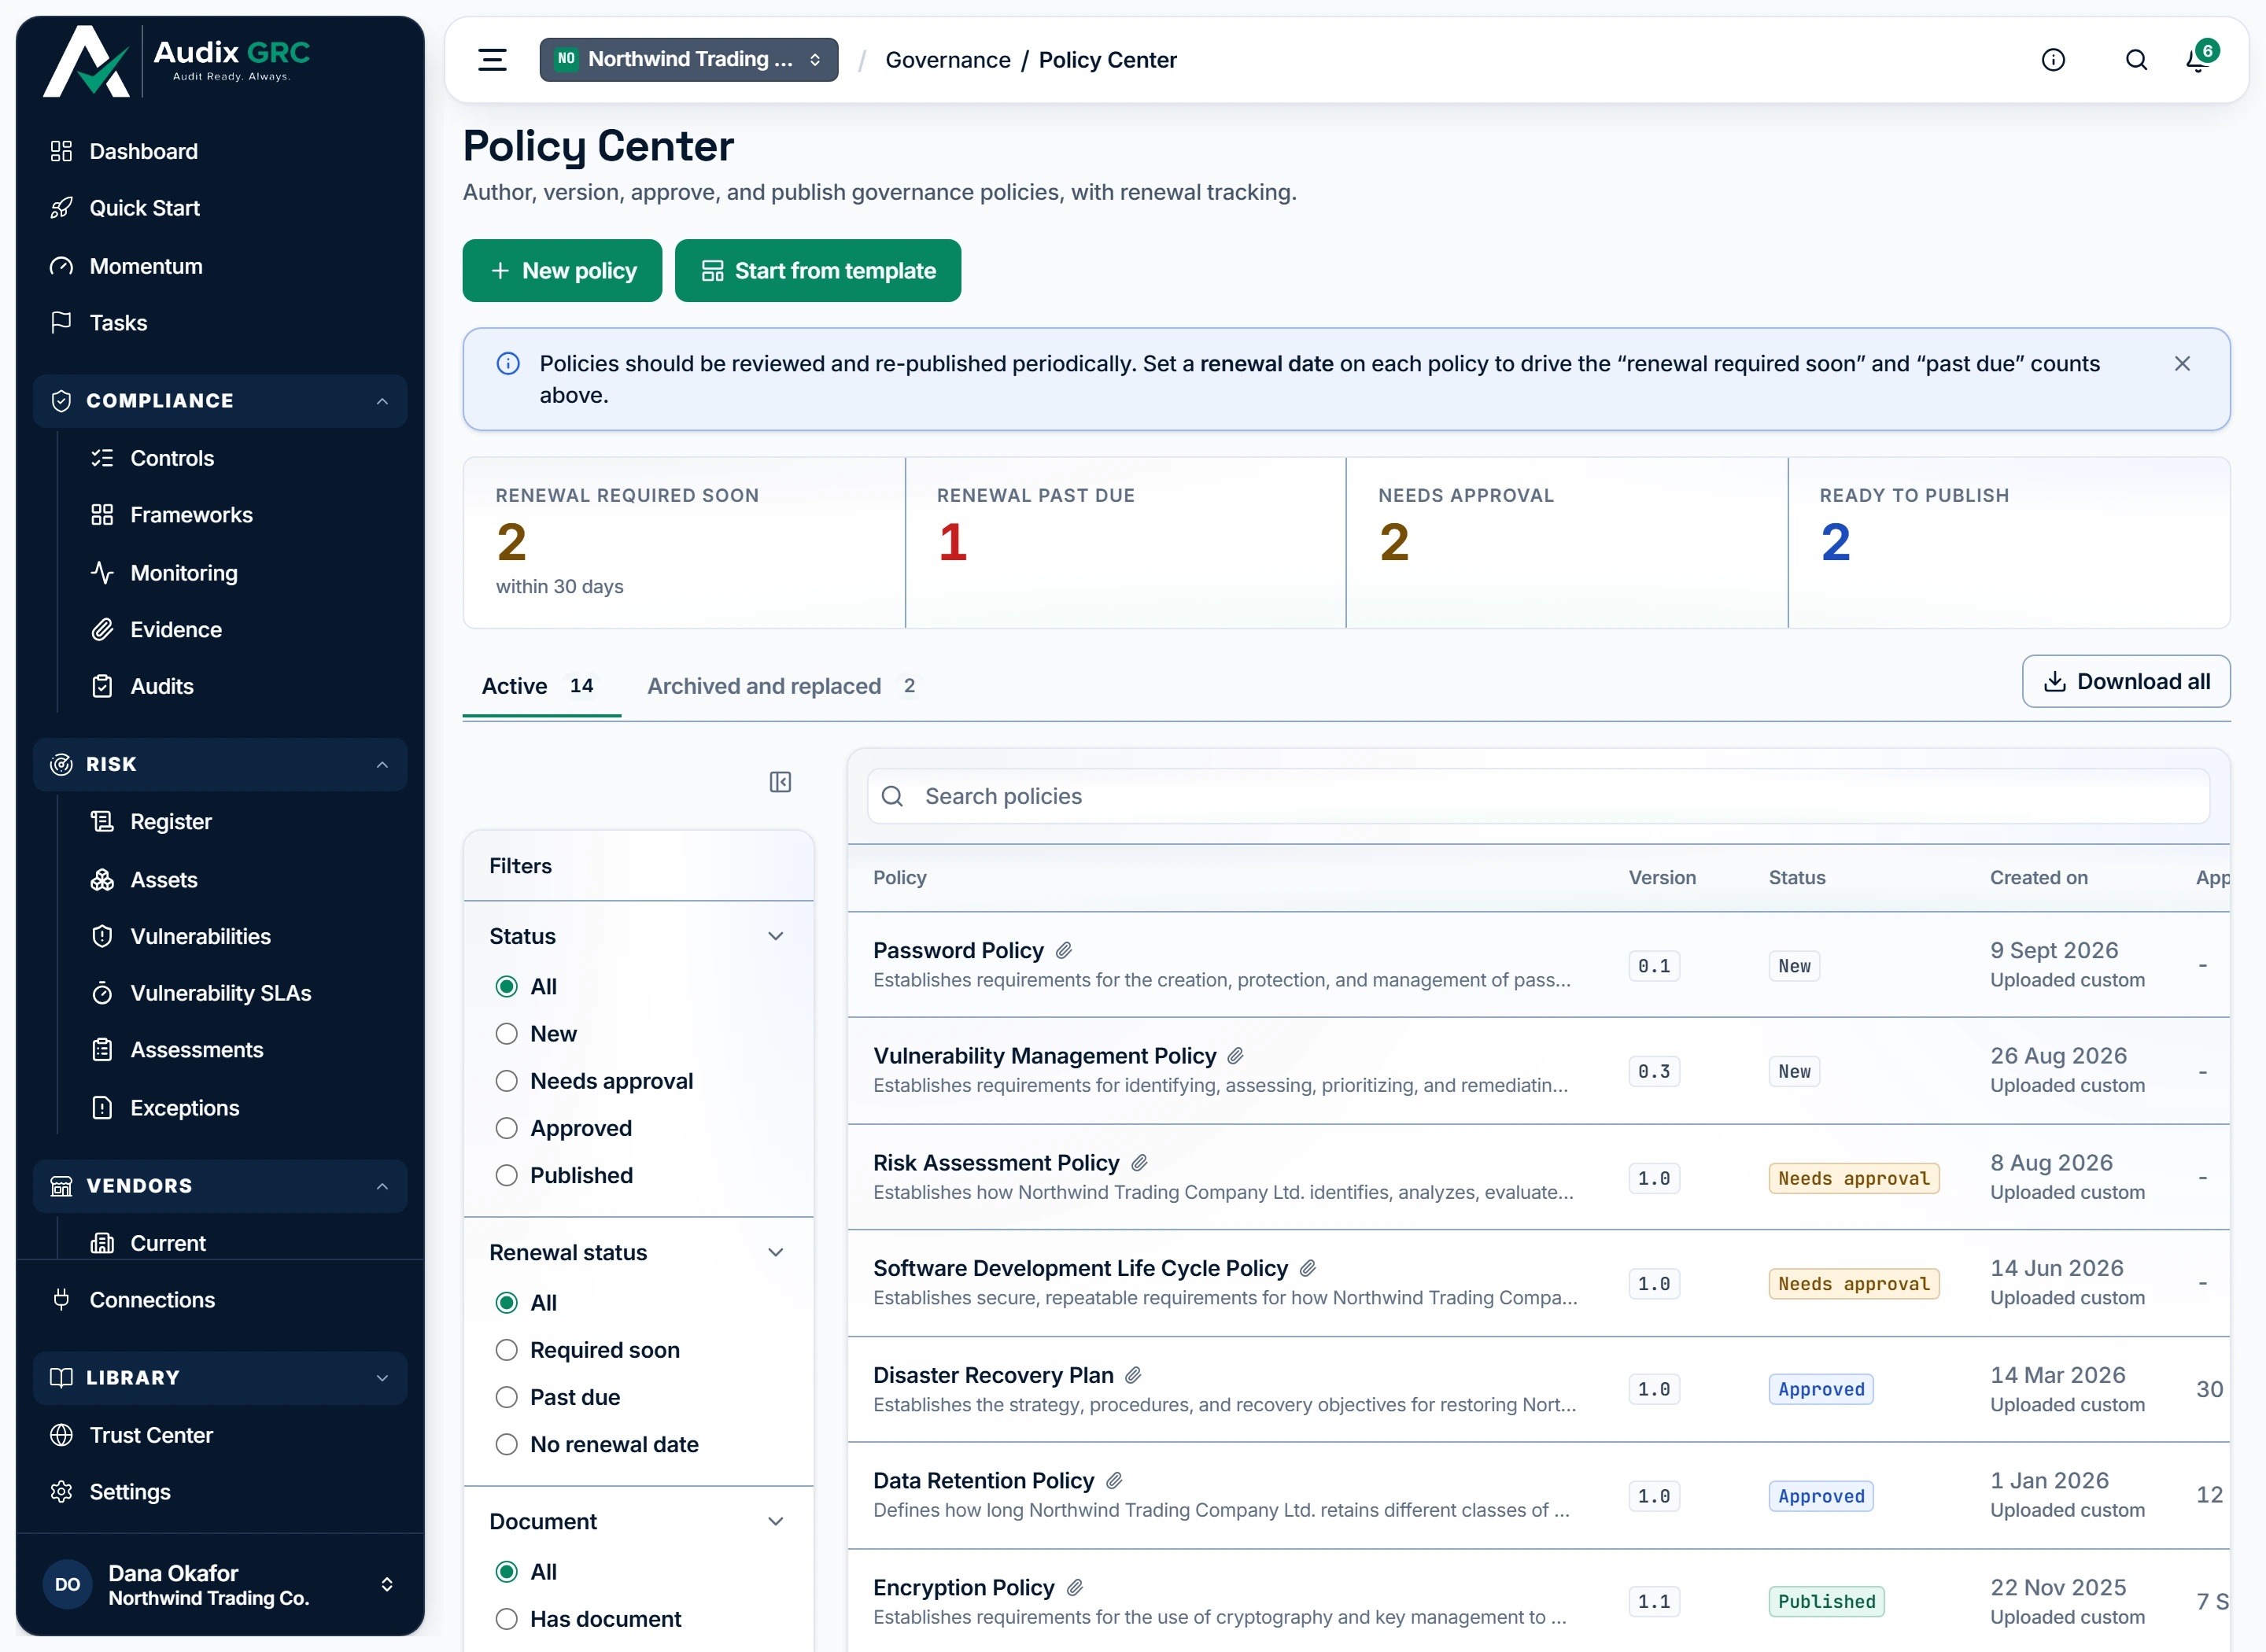
- Write one, or adopt one. Twenty-three templates ship with the product, each already mapped to the controls it satisfies, so a full policy set does not have to start from a blank page.
- What is falling behind. Policies due for renewal, overdue, waiting on approval or ready to publish, counted so a quietly expired policy surfaces before an auditor finds it.
- Live and retired, kept apart. An archived policy stays readable as the record of what was in force at the time, without counting against anything today.
What publishing a policy sets off
Renewal and lifecycle tiles, an Active tab and an Archived and replaced tab, and the filterable policy table.
Policy detail
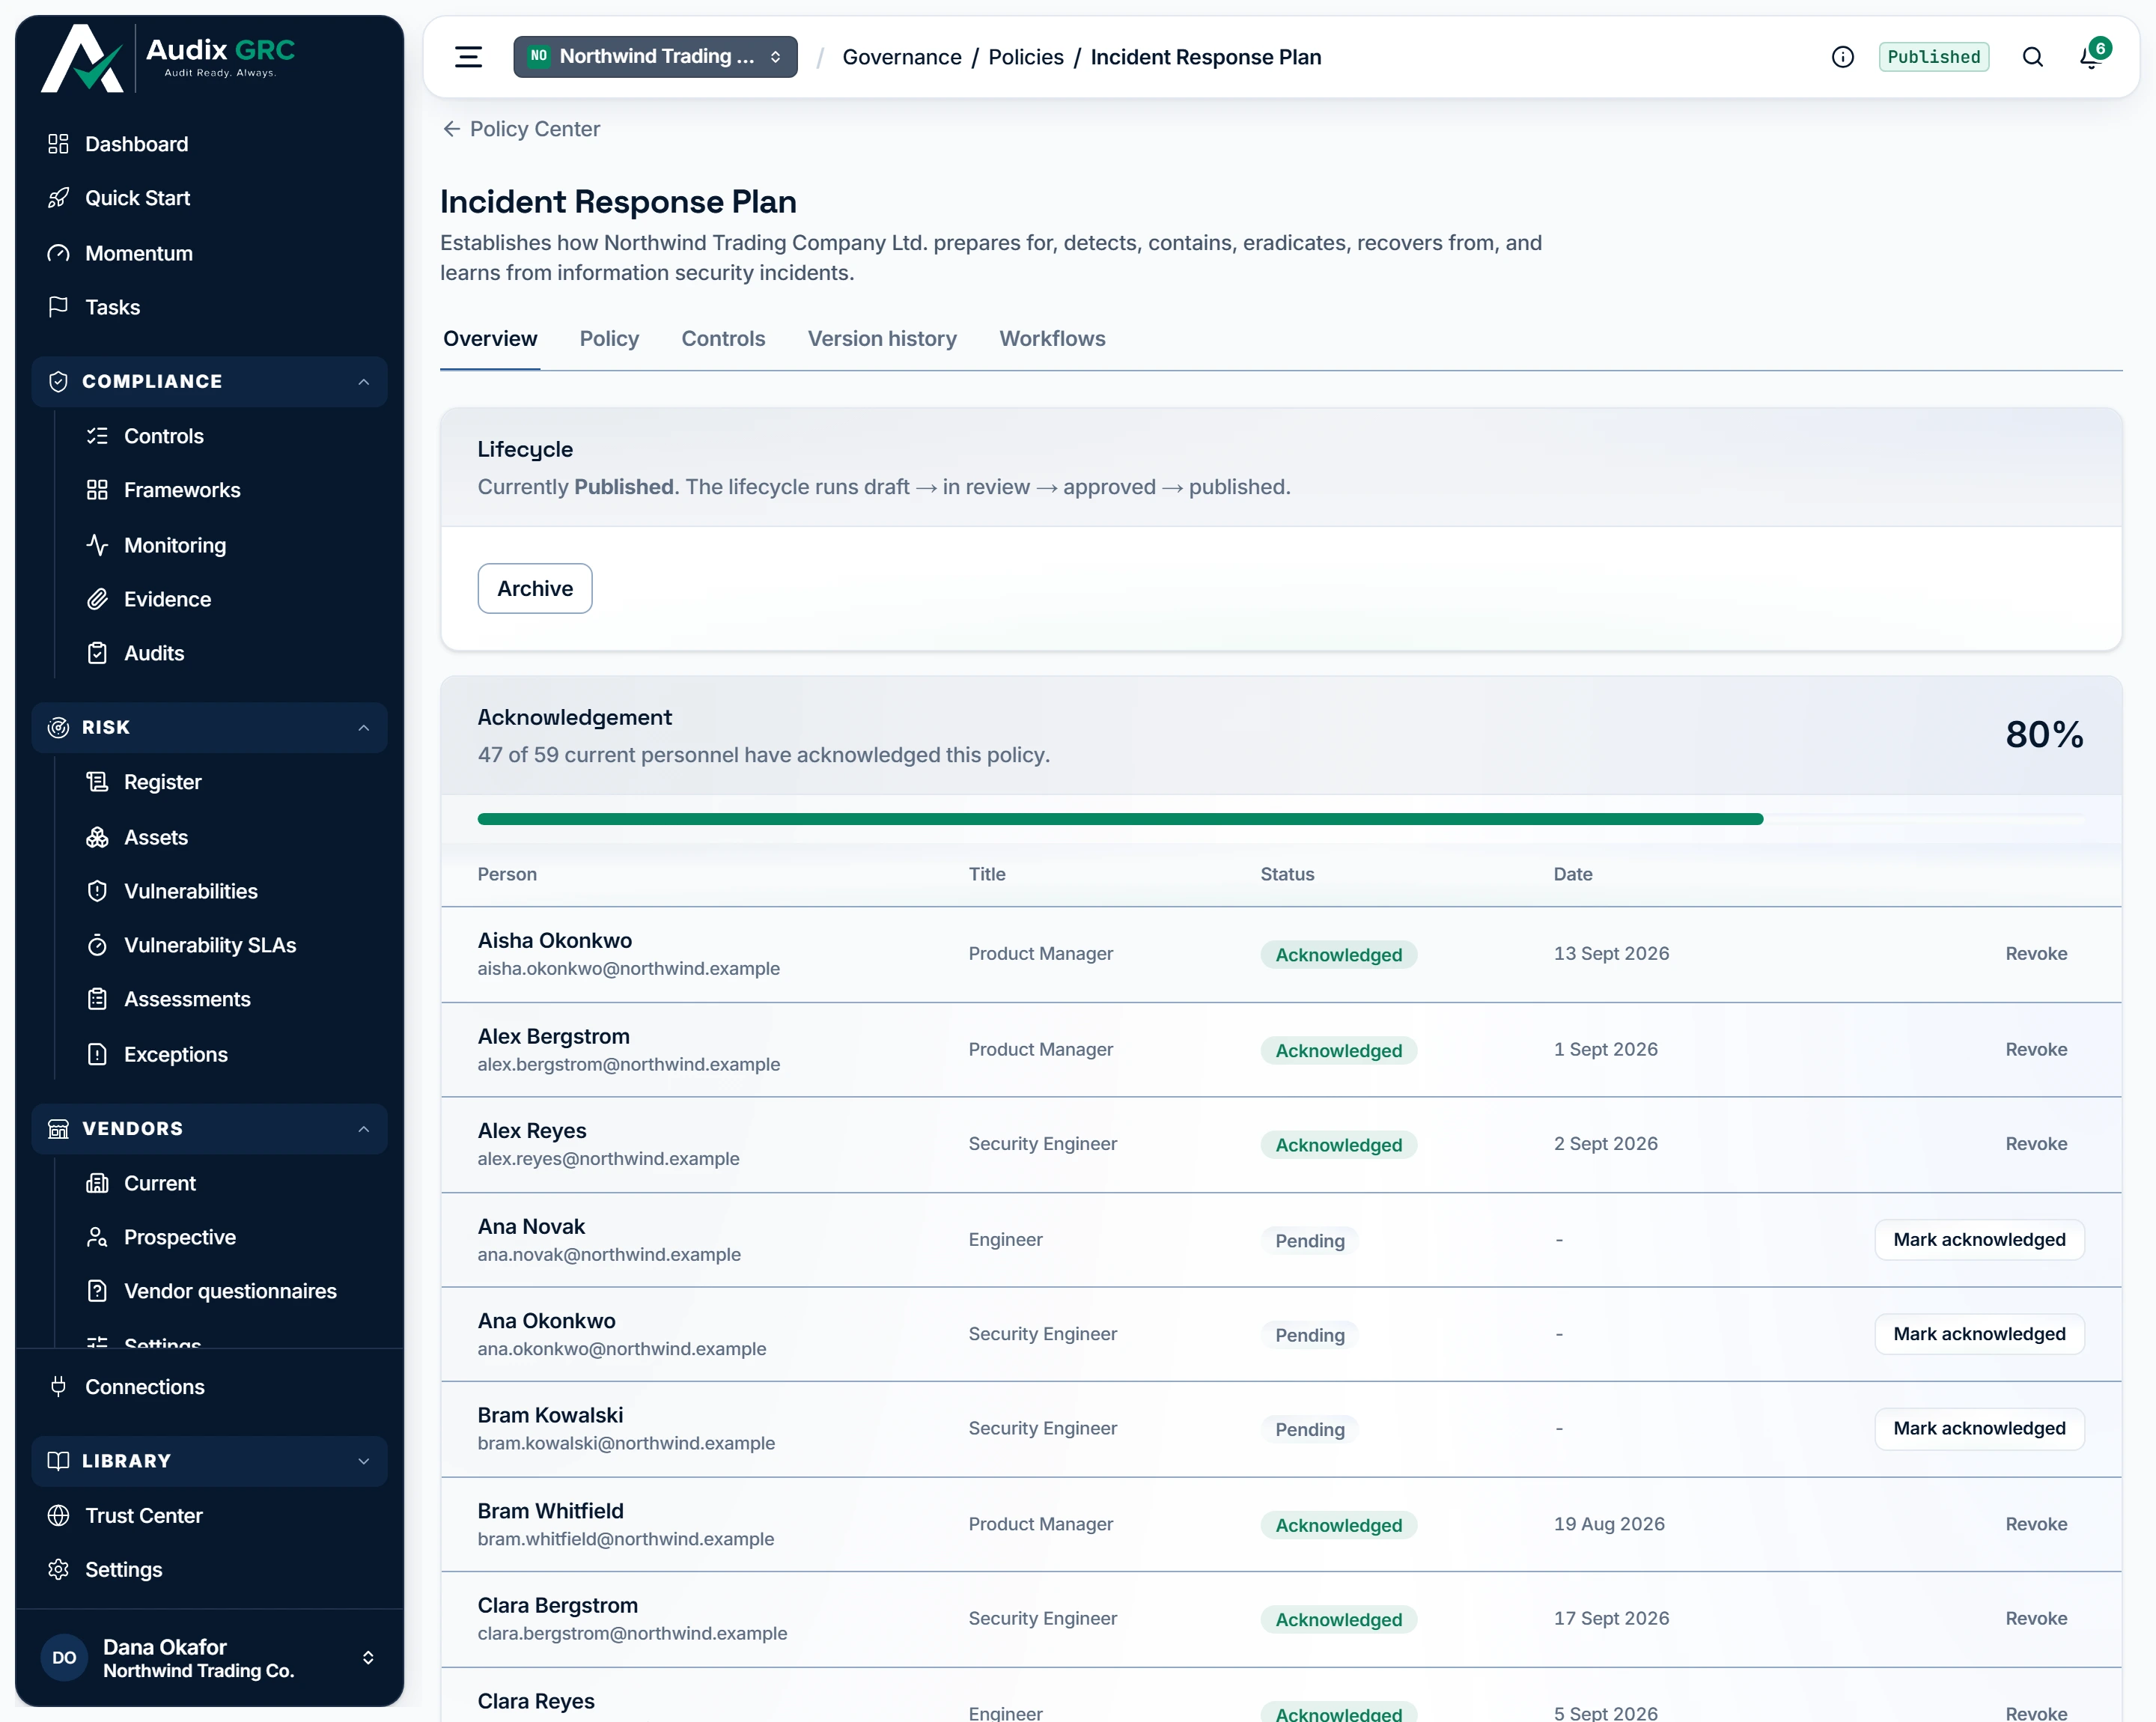
Five tabs: Overview, Policy, Controls, Version history and Workflows.
Start from a template
The 23 built-in templates, then a preview with an editable name, description, body and the controls they map to.
Access Reviews
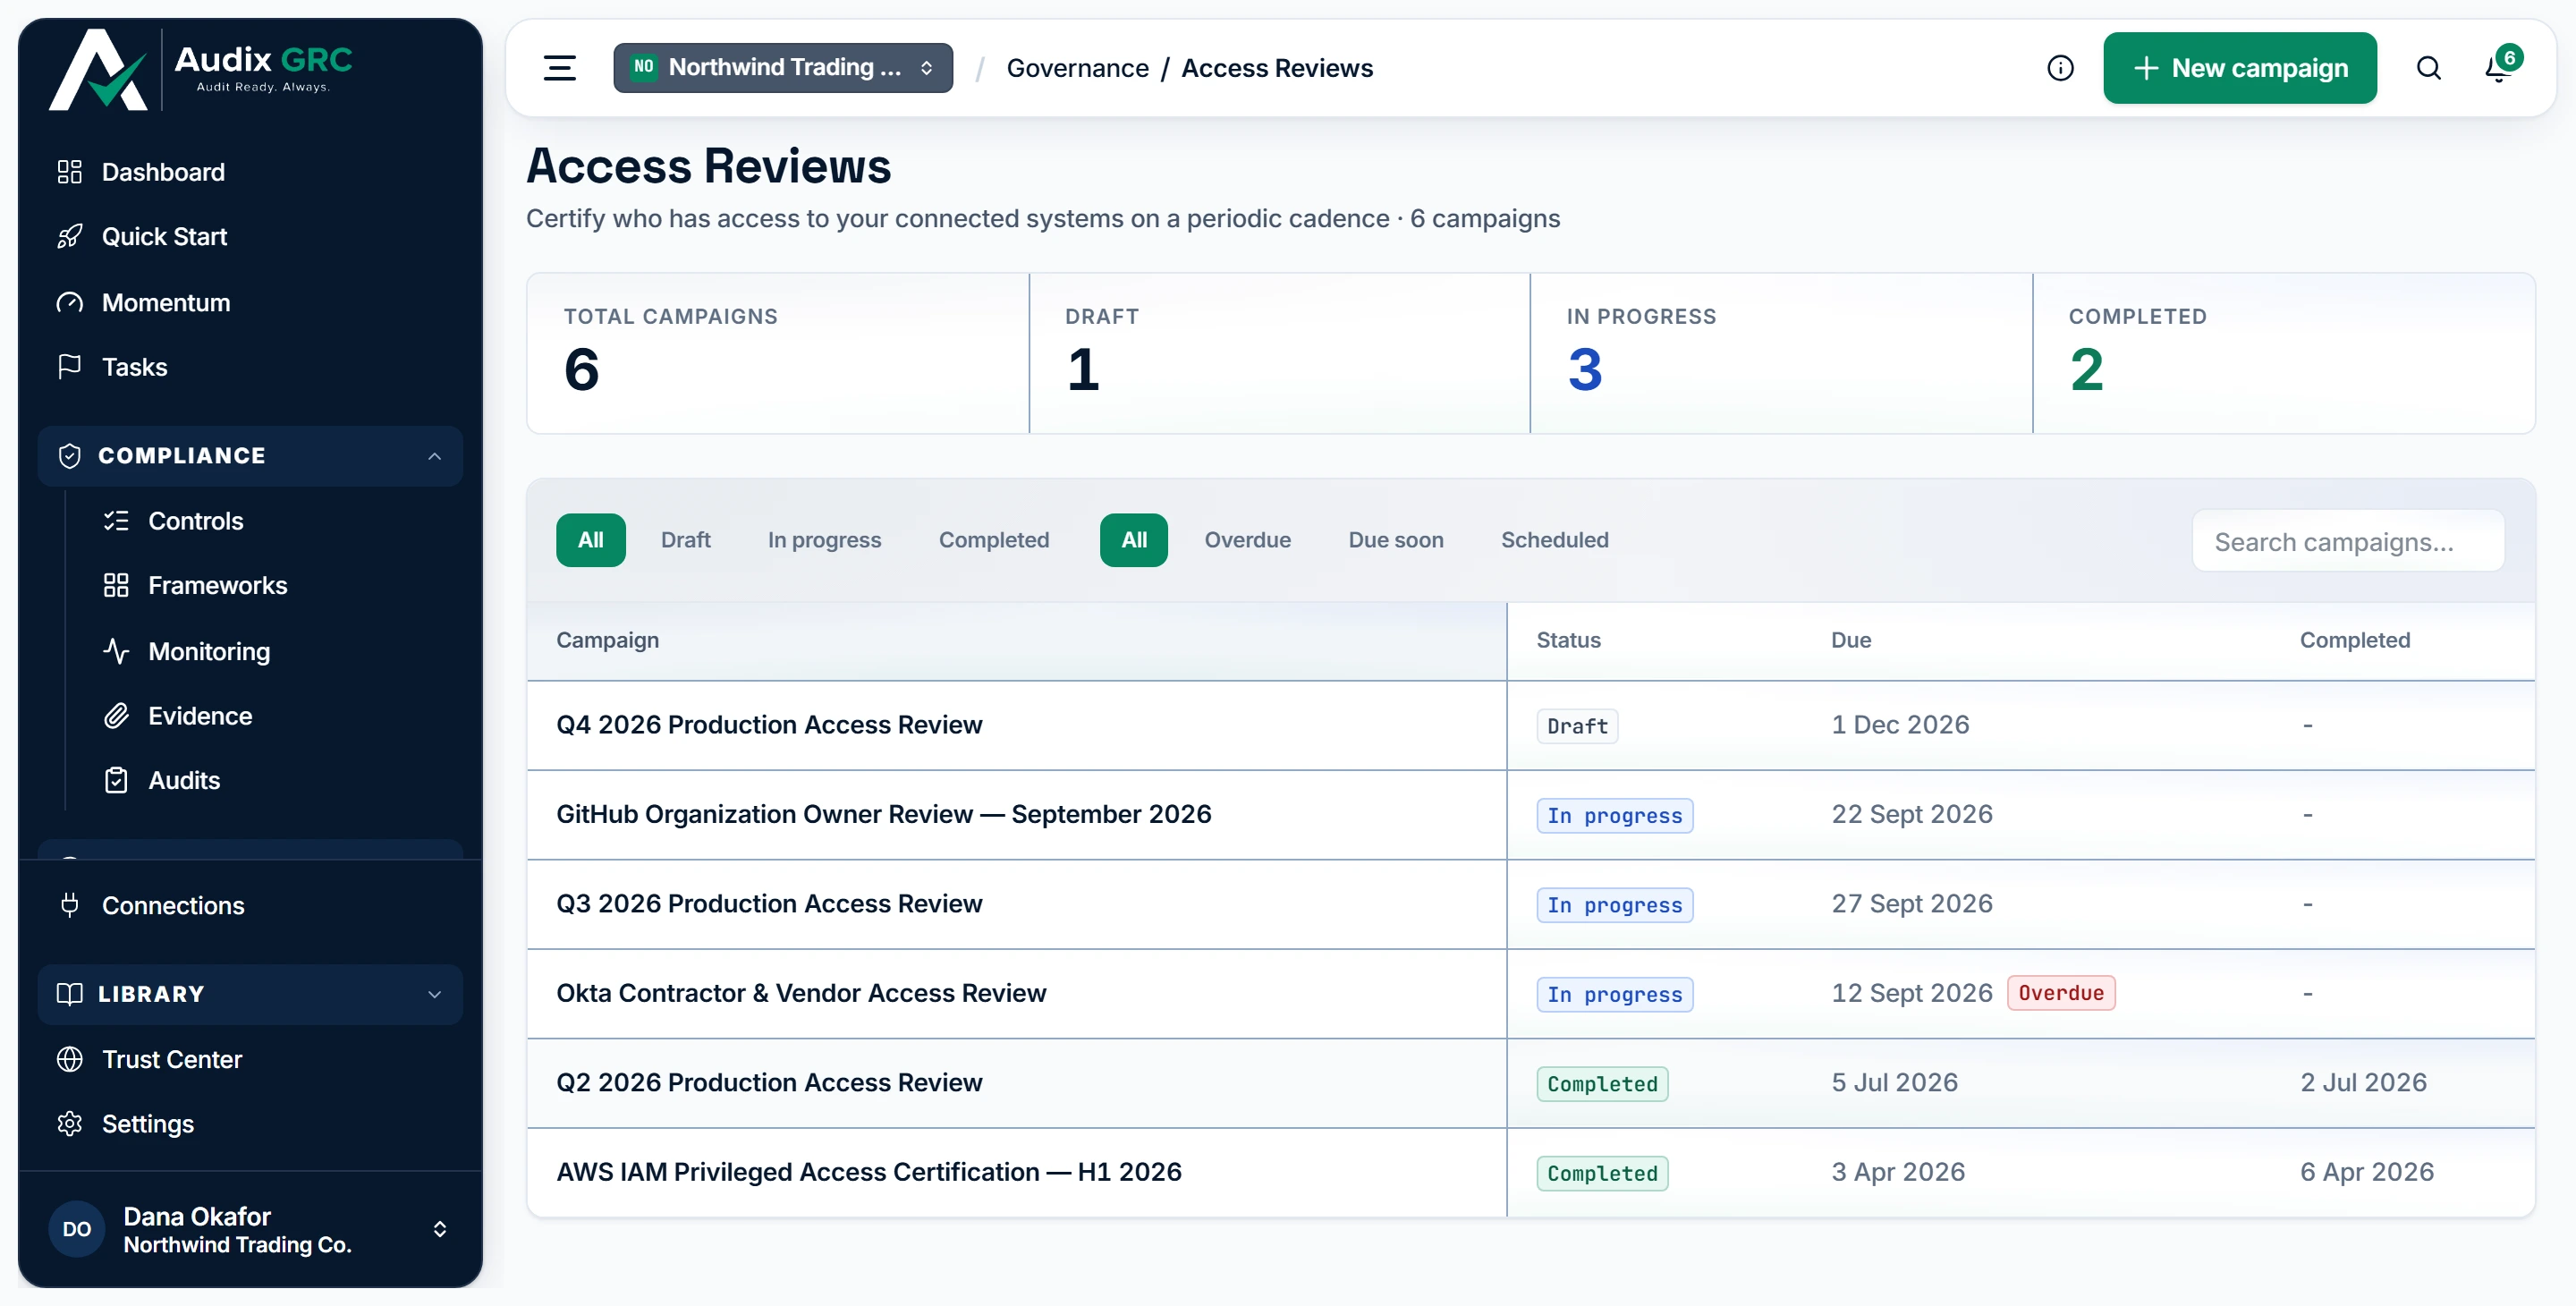
- Start a certification. Creating a campaign gives you an empty draft; generating it copies in every account your connectors have collected, so the review is against what is really there.
- Campaigns by state. Each campaign is one periodic review of who still has access, and these counts show how many are still open.
Campaign counts by status and the campaign table, with status and due-date filters.
Access review detail
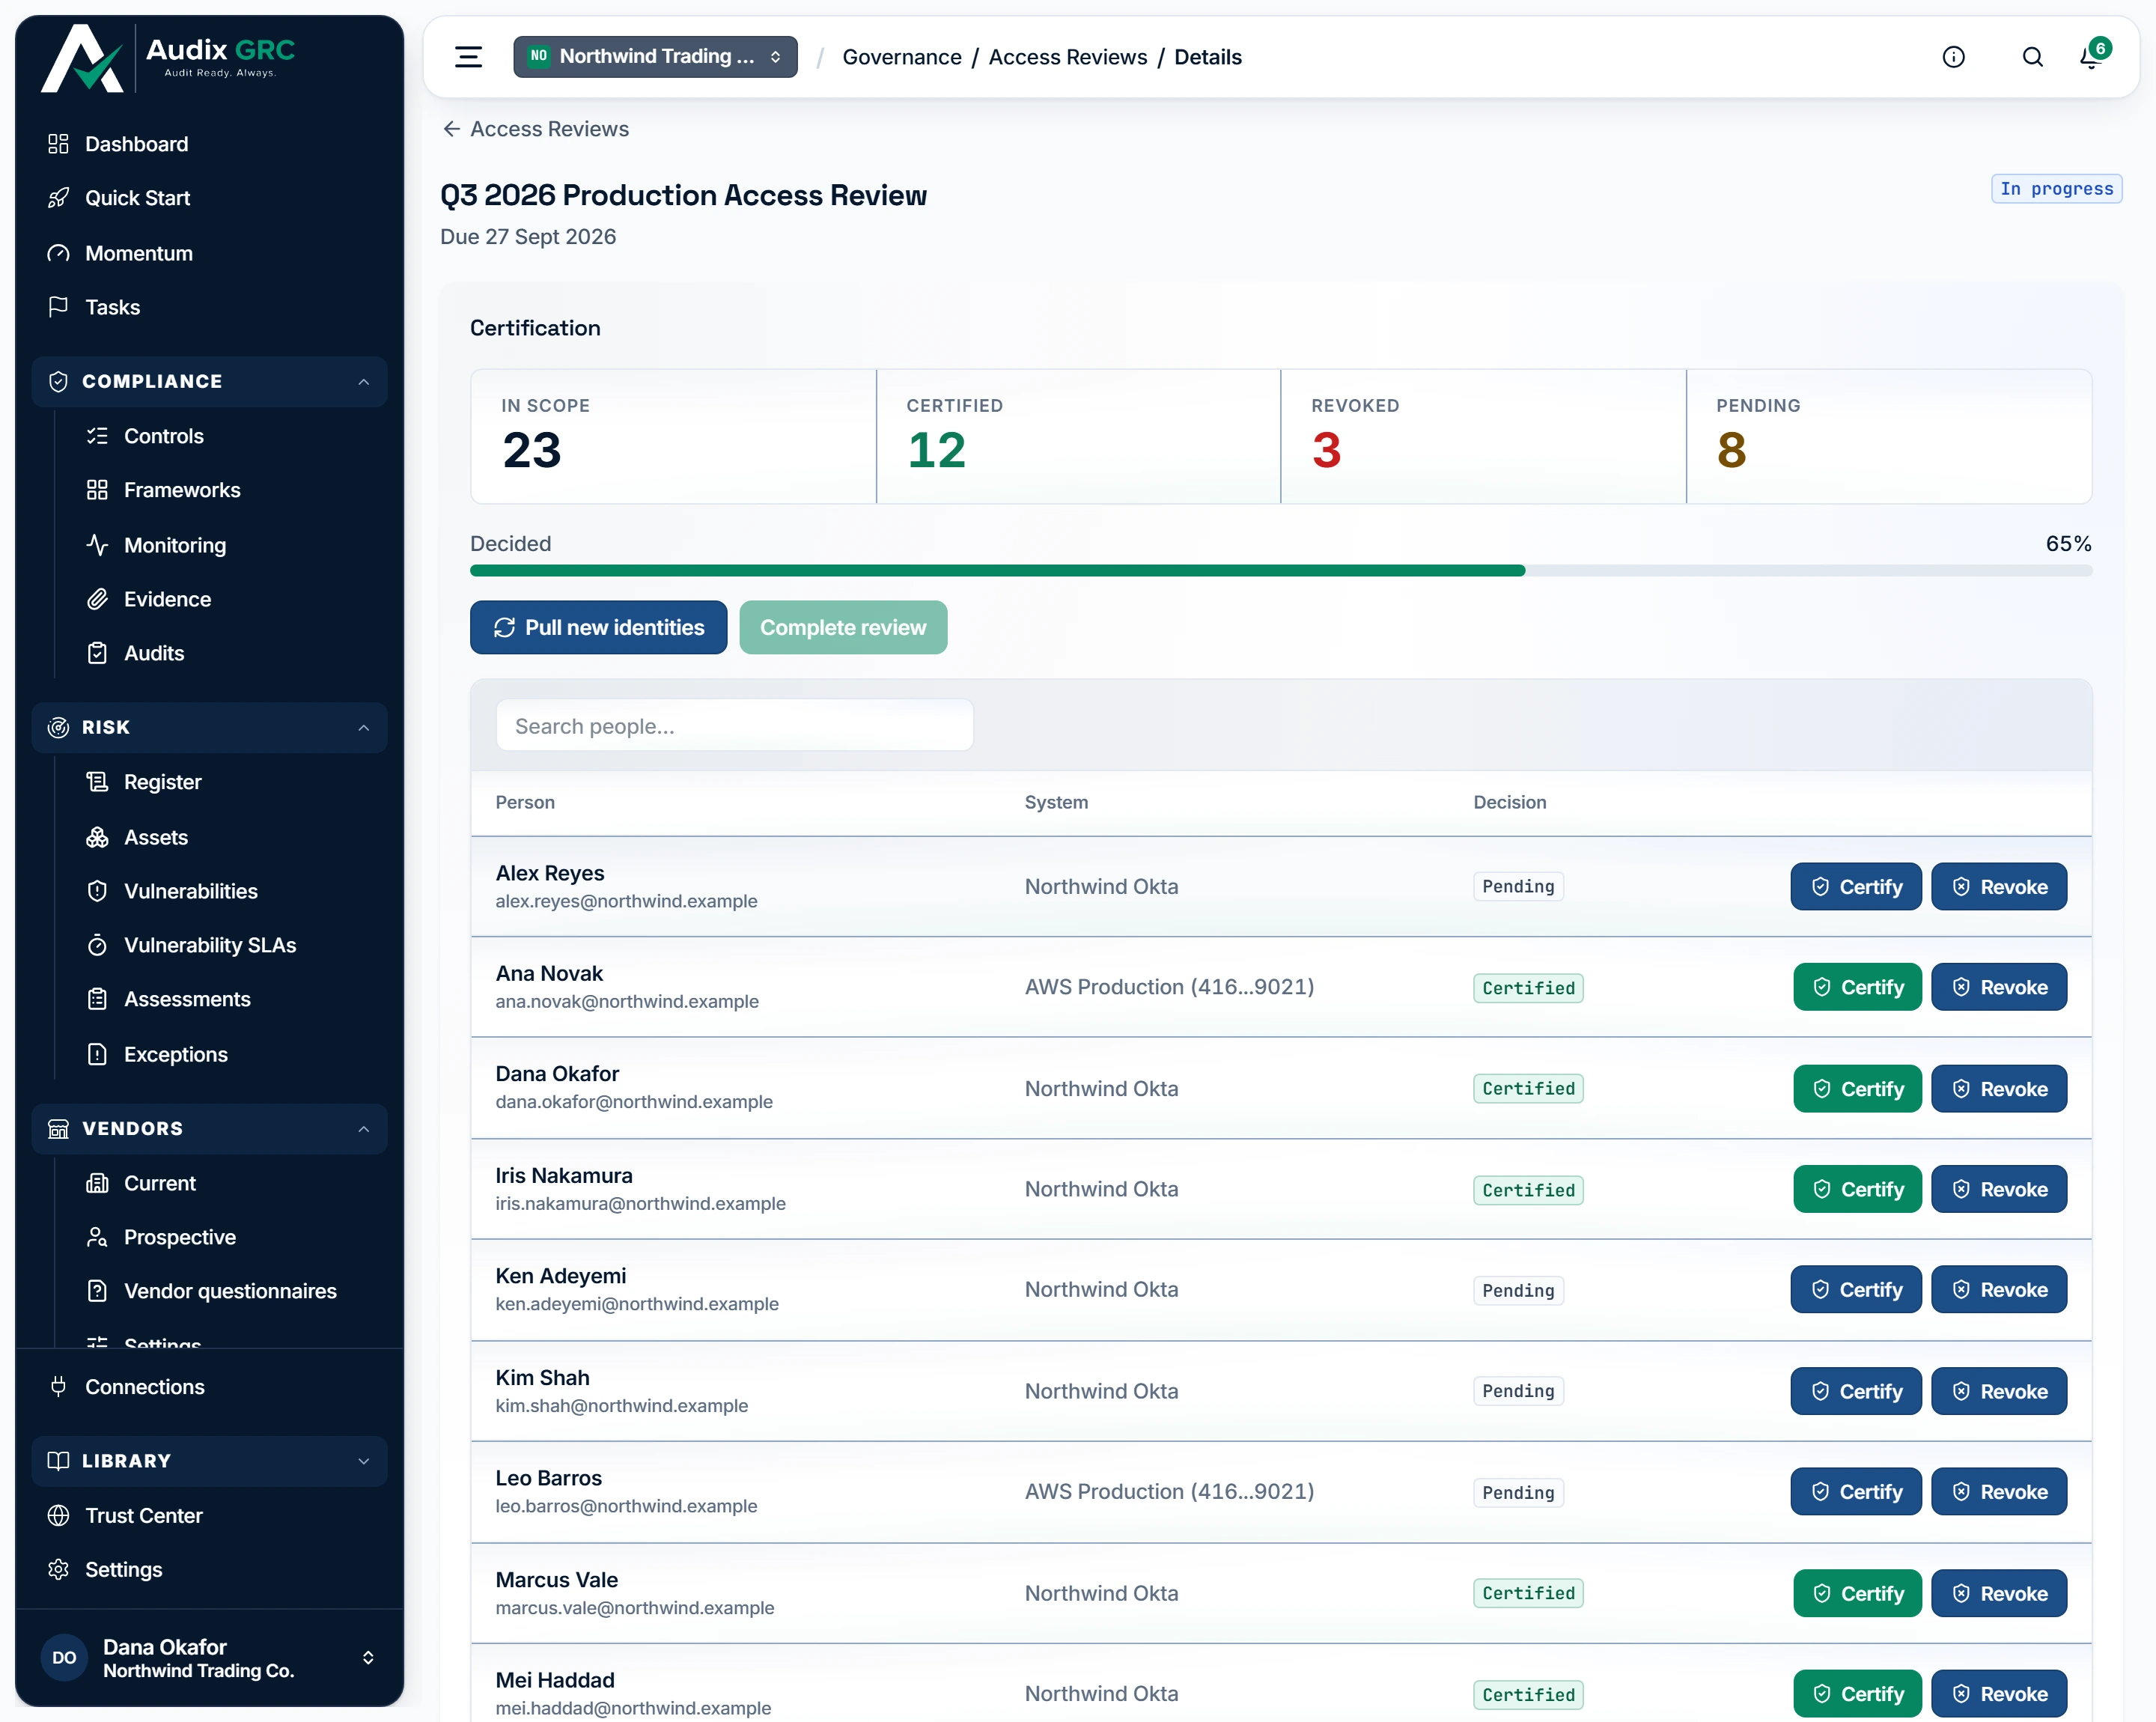
The campaign name, due date and status, the decision rollup, and the per-account Certify and Revoke buttons.
What you can do
Keep the roster of who works hereLive
The roster is the list of people your programme is measured against. Every compliance tile and every policy acknowledgement percentage is counted over it.
As a member
- Open Personnel from the Governance section of the sidebar.
- Read the four tiles: Total people, Current, Former and Non-compliant.
- Filter on the left by Employment status, Compliance, Sync status, Groups, IDP provider, HRIS provider or Failing signal, and narrow further with Search people.
- Click a name to open that person. A failing row carries a "Failing:" line naming the reasons, for example
Disk unencryptedorTraining incomplete. - Tick rows and click Download for a CSV. "Download all" exports what your filters show. "Download selected" exports the ticked rows.
As an admin
- Click Add person and fill in Full name, Email, Job title, Employment status and Compliance status.
- Or pick somebody from Add from your organization and click Add to roster. Only people in your organisation whose email is not already on the roster appear there.
- Change anyone's status straight from the Personnel status column in the table.
- Tick several rows and use Mark as former or Mark as current in the bar that appears.
- Open a person and click Edit details to change Job title, Employment status, Compliance status and Groups.
Rules that apply
- The roster shows at most 500 people, newest first.
- Email addresses are lower-cased when saved, so
Jane@Acme.comandjane@acme.comcannot become two people. Rows created before that rule can still be duplicates, and nothing merges them for you. - Only Current people count towards the non-compliant tile and towards policy acknowledgement coverage. A former employee's old laptop is not a live gap.
- Start date, IdP provider and HRIS provider belong to the sync and cannot be edited by hand.
- There is no way to remove a person from any screen.
Pull the roster from OktaLive
Treat your identity provider as the source of truth for who works here, instead of asking somebody to maintain a list by hand.
As a member
- Not available. Sync roster is not shown to a member.
As an admin
- Connect Okta from Connections and let it collect at least once.
- On Personnel, click Sync roster.
- A toast reads "Personnel roster synced." and the list reloads.
Rules that apply
- Only Okta is read. With no Okta connection the sync reports zero and changes nothing.
- People are matched on their lower-cased email. An existing person keeps their row and gets a refreshed name, employment status and compliance status.
- The Okta account state sets employment. Deprovisioned and suspended become Former. Everything else becomes Current.
- Okta MFA sets a first compliance verdict. MFA on becomes Compliant, MFA off becomes Not compliant. The next recompute overwrites this from device and training data.
- The sync never deletes anybody. Somebody dropped from Okta entirely stays on your roster as they were.
- No HRIS tool is supported. The HRIS provider filter and column exist and nothing fills them.
Work out whether each person is compliantLive
Turn the device and training records your connectors collected into a verdict per person, without inventing a failure where there is no data.
As a member
- On Personnel, read the Compliance status block: Current people, Compliant, Non-compliant and Unknown.
- Read Non-compliant by reason: Device check, Encryption, EDR, Training and Background. One person can count under more than one reason.
- The caption under those tiles says how long ago the figures were computed.
- Filter the table by Failing signal to get the list of people behind any one tile.
As an admin
- Same as a member, plus click Recompute at the top of the page.
- The toast reports how many people were recomputed, how many were matched, and how many devices and training records were read.
Rules that apply
- A signal with no data behind it never counts as a failure. No known signal at all gives Unknown. Any known failure gives Not compliant. Everything known passing gives Compliant.
- Device records supply the device check, disk encryption and EDR. Training records supply training.
- EDR counts as covered only when the agent is installed and active. Either one being off is a real gap.
- Several devices for one person fold together and the worst one wins. An unencrypted laptop fails the person even if their phone passes.
- The Background tile always reads zero. No connector reports a background check, so that signal stays unknown. The page says so on screen.
- Training records for somebody who is not on the roster are skipped.
- A recompute also re-matches devices to people. A match that still resolves to the same person is left alone, so the date it was linked stays honest.
Say whose laptop each device isLive
Attach every collected device to a named person, including the ones that match nobody, so an unencrypted machine cannot fail silently against no one.
As a member
- Open Review Linked Devices at
/connections/devices, or follow the link in the footnote at the bottom of the Personnel page. - Read the four tiles: Devices collected, Linked to a person, Not linked and Not a person.
- While anything is unmatched an amber banner names the tool and breaks down why, using three plain reasons: no user reported by the tool, waiting for a compliance recompute, or the user is not on the roster.
- Filter with the Device status rail and search by person, device or user.
- There is no action column for you.
As an admin
- On a Not linked row, click Link device, search the roster and pick the person, then click Link device in the dialog. Former employees stay pickable and are labelled as such.
- If it is a server or a kiosk rather than somebody's machine, click Not a person and type a reason. The reason is required.
- On a Linked row, use Change for Link to someone else, Unlink or Mark as not a person.
- On a Not a person row, click Undo exclusion to put it back in scope.
Rules that apply
- A human decision always wins. A link you make by hand survives every later recompute, even when the device's own reported email later names somebody else. An exclusion survives the same way.
- Unlinking is asymmetric. Unlinking a hand-made link detaches it for good. Unlinking an automatic one lasts only until the next recompute re-derives it from the same email. Mark it Not a person to detach it permanently.
- One owner per device. Two people cannot share a device record.
- A device marked Not a person feeds nobody's signals and is not counted as an unmatched gap, but it stays on the list with its reason.
- Some tools report a device with no user attached, SentinelOne for example. Those can never match automatically and have to be linked by hand.
- If your backend does not offer this yet, the page says "Device links are not available on this backend yet" instead of showing an empty grid.
Start from the policy template libraryLive
Get a full policy set without writing one from scratch. 23 templates ship with the product, each already mapped to the controls it satisfies.
As a member
- Not available. Start from template is not shown to a member.
As an admin
- On Policy Center, click Start from template.
- Browse or search the library. Each row shows the title, its category and how many controls it covers.
- Click one. The preview gives you an editable Policy name, Description and Document (Markdown), plus the read-only list of Mapped controls.
- Click Create policy. The toast reads "Policy created from template." and you land on the new policy.
Rules that apply
- The library covers Human Resources, Operations, Resilience and Data Protection, and is the same for every organisation. It is read-only content, so you cannot add a template of your own.
- Creating from a template twice does not make a duplicate. If a policy with that name already exists the picker says it is already in your library and gives you the existing one.
- Every template carries the token
[Company Name]. It is replaced with your legal name, or your organisation name if you have not set one. - The whole library is already seeded into a brand new organisation, one policy at a time, every one of them a Draft. Check Policy Center before you adopt anything.
- Editing the body in the picker changes only the policy you are creating. The template itself is untouched.
Write a policy and attach the documentLive
Create the policy record itself: a name, a version label, the document, a renewal date and the controls it satisfies.
As a member
- Not available for writing. Neither New policy nor Start from template is shown to a member.
- You can open any policy, read the document inline, and use Download or Download PDF.
As an admin
- On Policy Center, click New policy. A three-step card opens: Details, Document, Controls.
- In Details, set Policy name, Version, Status, Renewal date and Description.
- In Document, use Upload document (PDF, Word, or text), or paste a link to a document you keep elsewhere.
- In Controls, pick a framework and browse it, or type an exact control code.
- Click Create policy. If the file upload fails the policy is still created, the toast tells you so, and you can retry the upload on the policy page.
- On the Policy tab, use Upload document or Replace document to change the file later.
- On the Workflows tab, the Manage policy panel holds Edit and Delete. Delete asks you to confirm.
Rules that apply
- Documents are capped at 5 MB and limited to PDF, Word, and text or markdown files. Anything else is refused with "Unsupported document type. Upload a PDF, Word document, or text file."
- The file is encrypted before it is stored and is tied to your organisation. Your browser never sees the storage location.
- Download PDF renders a text or markdown policy into a branded PDF with your logo, legal name and a title block. A file that is already a PDF comes back unchanged. A Word file is refused with "This document type can't be exported as a PDF."
- Creating a policy straight as Approved or Published stamps the same dates the lifecycle would, including a renewal date a year out. A policy published that way still gets tracked for renewal.
- Policy Center shows at most 200 policies, newest first.
Move a policy from draft to publishedLive
Make approval and publication a recorded event with a date on it, rather than a field somebody edited.
As a member
- The lifecycle buttons are shown to you, but the server refuses the change and the error appears next to the buttons.
As an admin
- Open a policy. The Lifecycle card on the Overview tab says which state it is in now.
- On a Draft, click Submit for review.
- On one in review, click Approve or Send back.
- On an approved policy, click Publish or Send back.
- On a published policy, click Archive. An archived policy shows no lifecycle buttons at all.
Rules that apply
- A step out of order is refused with a message naming the state the policy is actually in. You cannot publish something that has not been approved.
- Archived is the end of the line. Nothing comes back out of it.
- Approve stamps the approval date the first time it happens, and sets the version to
v1if the policy has none. - Publish stamps the publication date, sets a renewal date 365 days out if you left it blank, and freezes a version snapshot.
- Every transition is written to the audit log.
- The Policy Center table and the policy page use different words for the same two states. The table says New and Needs approval where the policy page says Draft and In review.
Read what the policy said at each publishLive
Keep a record of the policy as it stood on the day it was published, so an auditor can see what was in force at a given time.
As a member
- Open a policy and click the Version history tab.
- The top card gives Current version, Approved, Published, Renewal date, Created and Last updated.
- The Version snapshots table below lists Version, Status, Approved, Published, Document, Size and Change summary, newest first.
- With none yet it reads "No version snapshots yet. One is captured when the policy is published."
Rules that apply
- A snapshot records which document was attached, its name, type and size. It does not keep a second copy of the file.
- One snapshot is written every time a policy is published.
- Publishing the same version label again adds nothing. To get a second snapshot, change the version label first, then publish again.
- A policy with no version label at all is skipped and gets no snapshot.
- The Change summary column is always blank. Nothing on any screen collects one.
Record who has read each policyLive
Track acceptance of a policy per person, and show the coverage percentage an auditor asks for.
As a member
- Open a policy. The Overview tab has an Acknowledgement card reading "N of M current personnel have acknowledged this policy" with a percentage and a bar.
- The table underneath lists Person, Title, Status and Date. Status is Acknowledged or Pending.
- With nobody on the roster the card tells you to connect an identity provider or add people in Personnel.
- The Mark acknowledged and Revoke buttons are shown to you, but the server refuses them.
As an admin
- Confirm the person has actually read the policy. Nothing on this platform asks them.
- Click Mark acknowledged on their row. Clicking twice records it once.
- Click Revoke to take it back. That person returns to Pending.
Rules that apply
- Only Current people are counted, in name order. Former employees never appear.
- The percentage stops at 99 while anybody is still pending, so rounding cannot make an incomplete rollout look finished.
- Acknowledging on behalf of somebody who is not on the roster is refused.
- There is no self-service path and no email. Staff do not sign in to accept a policy. An admin records it for them.
- You can record acknowledgements against a draft. Nothing requires the policy to be published first.
Keep policies from going staleLive
Force a periodic re-read and re-publish of each policy, and count what is falling behind.
As a member
- On Policy Center, read the tiles Renewal required soon, Renewal past due, Needs approval and Ready to publish.
- Filter by Renewal status: Required soon, Past due or No renewal date.
- A banner explains that both renewal counts are driven by the renewal date on each policy. Dismiss it once you have read it.
As an admin
- Same as a member, plus set the date on the create form or in the Manage policy panel on the Workflows tab.
Rules that apply
- Required soon means a renewal date inside the next 30 days. Past due means a renewal date in the past.
- Archived policies are left out of both counts. A retired policy is not due for renewal.
- Publishing a policy with no renewal date sets one 365 days out for you.
- A published policy with a renewal date turns into reminders at 30 days, 7 days and 1 day out, and again once it is overdue.
Point a policy at the controls it satisfiesLive
Say which framework controls a policy covers, so a control can be shown as governed by a published policy or not governed at all.
As a member
- Open a policy and click the Controls tab.
- Mapped framework controls shows the codes as chips. Click one to open that control. With none it reads "None mapped yet."
- On the Policy Center table, filter by Control mapping for Mapped to controls or Not mapped.
As an admin
- Same as a member, plus click Edit controls.
- Pick a framework and browse its controls, or type an exact code.
- Save. The chips update and the control's own page picks up the change.
Rules that apply
- Codes you type are cleaned up on the way in: split on spaces and commas, trimmed, upper-cased and de-duplicated.
- A template brings up to 200 codes with it, each at most 64 characters.
- A control's page sorts its policies by status, so it can tell a control backed by a published policy from one backed only by a draft.
- A member sees the chips with no editing button at all, rather than a greyed-out one.
Certify who still has accessLive
Run a periodic user access review. The platform takes a copy of every account your connectors found, and a human certifies or revokes each one.
As a member
- Open Access Reviews. Four tiles show Total campaigns, Draft, In progress and Completed.
- Filter by status, and by Overdue, Due soon or Scheduled when the data splits that way. Search by campaign name.
- The table shows Campaign, Status, Due and Completed. A past-due campaign that is not finished carries an Overdue pill.
- Open a campaign to see In scope, Certified, Revoked and Pending, a Decided percentage bar, and every account in the review.
- The buttons are shown to you, including New campaign, but the server refuses them.
As an admin
- Click New campaign, give it a Campaign name and an optional Due date, then Create campaign.
- Open it and click Generate items. Every account your connectors collected is copied in and the campaign moves to In progress.
- Work down the list. On each row click Certify to keep the access or Revoke to say the access must go.
- Click Pull new identities at any point to bring in accounts collected since you generated. Your existing decisions are left alone.
- When nothing is pending, click Complete review. The campaign shows a Review completed pill and the per-row buttons disappear.
Rules that apply
- Generating is safe to repeat and only ever adds. Two accounts with the same username in different tools both appear, because each account is identified by the connection it came from.
- Every row names the system that grants the access, taken from the name of the connection it came from.
- Complete review is refused while anything is pending, and refused on a campaign you have not generated yet. The button stays disabled until every row is decided.
- A completed campaign cannot be reopened and cannot be generated again. The only way forward is a new campaign.
- You can flip a decision from Certify to Revoke and back, but you cannot put a row back to undecided.
- The list shows at most 200 campaigns. A campaign that is not yet complete produces due-date reminders.
- Revoking is a decision you record here. It does not remove the account in the tool. Do that yourself.